Advanced Usage
You can use the following command to run wireguard when the system starts:
systemctl enable --now wg-quick@wg0
Now once wireguard is active, you won't be able to access the local subnets:
→ ping 192.168.0.1
PING 192.168.0.1 (192.168.0.1) 56(84) bytes of data.
^C
--- 192.168.0.1 ping statistics ---
4 packets transmitted, 0 received, 100% packet loss, time 3070ms
As you can see, with the wireguard connection i cannot access my home router:
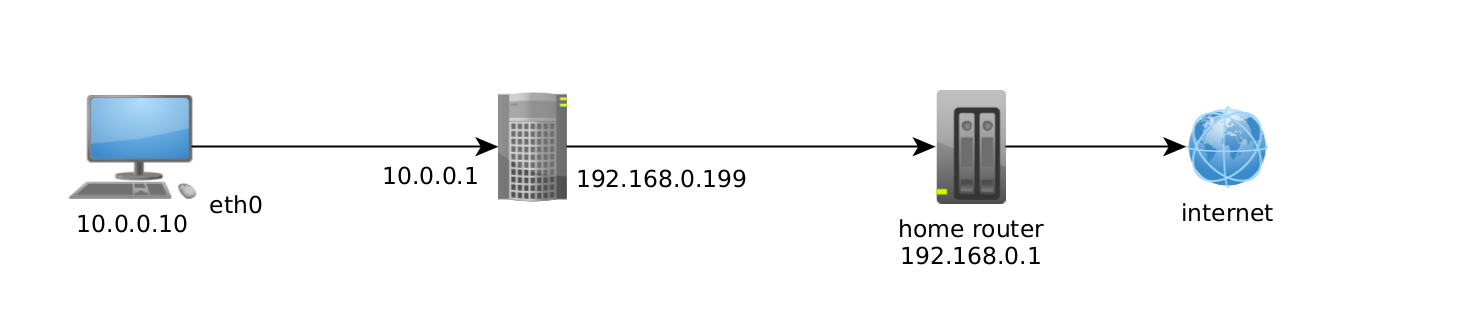
So to fix this, i add the routes to the subnets 10.0.0.0/24 and 192.168.0.0/24 manually:
[ 10.66.66.2/32 ] [ /dev/pts/25 ] [~]

[ 10.66.66.2/32 ] [ /dev/pts/25 ] [~]
→ sudo ip route add 192.168.0.0/24 via 10.0.0.1 dev eth0

[ 10.66.66.2/32 ] [ /dev/pts/25 ] [~]
→ ping 192.168.0.1
PING 192.168.0.1 (192.168.0.1) 56(84) bytes of data.
64 bytes from 192.168.0.1: icmp_seq=1 ttl=63 time=3.42 ms
64 bytes from 192.168.0.1: icmp_seq=2 ttl=63 time=5.03 ms
^C
--- 192.168.0.1 ping statistics ---
2 packets transmitted, 2 received, 0% packet loss, time 1001ms
rtt min/avg/max/mdev = 3.419/4.222/5.025/0.803 ms

[ 10.66.66.2/32 ] [ /dev/pts/25 ] [~]
→ sudo ip route del 192.168.0.0/24 via 10.0.0.1 dev eth0

[ 10.66.66.2/32 ] [ /dev/pts/25 ] [~]
→ ping 192.168.0.1
PING 192.168.0.1 (192.168.0.1) 56(84) bytes of data.
^C
--- 192.168.0.1 ping statistics ---
5 packets transmitted, 0 received, 100% packet loss, time 4077ms
If you need to access local networks (like 192.168.0.0/24 or 10.2.0.0/16 and such) while still having the wireguard connection, you can modify your client config as follows using the PostUp and PostDown parameters:
[ 10.66.66.2/32 ] [ /dev/pts/25 ] [~]
→ sudo vim /etc/wireguard/wg0.conf

[Interface]
PrivateKey = AAAA=
Address = 10.66.66.2/32,fd42:42:42::2/128
DNS = 1.1.1.1, 1.0.0.1
PostUp =    ip route add 192.168.0.0/24 via 10.0.0.1 dev eth0 ; ip route add 10.0.0.0/24 dev eth0
PostDown =  ip route del 192.168.0.0/24 via 10.0.0.1 dev eth0 ; ip route del 10.0.0.0/24 dev eth0

[Peer]
PublicKey =  BBBBBB=
PresharedKey = CCCCCC=
Endpoint = 78.x.x.x:57692
AllowedIPs = 0.0.0.0/0, ::/0

:wq
With this configuration you can even specify local DNS servers, for example i have 2 local piholes at 192.168.0.198 and 192.168.0.199, thanks to the ip route rules, i am able to access them, so i can use them like so:
[ 10.66.66.2/32 ] [ /dev/pts/25 ] [~]
→ sudo vim /etc/wireguard/wg0.conf

[...]

DNS = 192.168.0.199,192.168.0.198

[...]

:wq
Note: that solution isn't the best because this will probably leak your actual location. You can see it on DNSLeakTest here, so instead i recommend choosing public DNS server IPs by location on public-dns.info here, simply pick 2 DNS servers which are inthe same country as your VPS. Then restart wireguard to refresh the configuration :
[ 10.0.0.10/16 ] [ /dev/pts/25 ] [~]
→ sudo wg-quick down wg0
[#] ip -4 rule delete table 51820
[#] ip -4 rule delete table main suppress_prefixlength 0
[#] ip -6 rule delete table 51820
[#] ip -6 rule delete table main suppress_prefixlength 0
[#] ip link delete dev wg0
[#] resolvconf -d tun.wg0 -f
[#] nft -f /dev/fd/63
[#] ip route del 192.168.0.0/24 via 10.0.0.1 dev eth0 ; ip route del 10.0.0.0/24 dev eth0

[ 10.0.0.10/16 ] [ /dev/pts/25 ] [~]
→ sudo wg-quick up wg0
[#] ip link add wg0 type wireguard
[#] wg setconf wg0 /dev/fd/63
[#] ip -4 address add 10.66.66.2/32 dev wg0
[#] ip -6 address add fd42:42:42::2/128 dev wg0
[#] ip link set mtu 1420 up dev wg0
[#] resolvconf -a tun.wg0 -m 0 -x
[#] wg set wg0 fwmark 51820
[#] ip -6 route add ::/0 dev wg0 table 51820
[#] ip -6 rule add not fwmark 51820 table 51820
[#] ip -6 rule add table main suppress_prefixlength 0
[#] nft -f /dev/fd/63
[#] ip -4 route add 0.0.0.0/0 dev wg0 table 51820
[#] ip -4 rule add not fwmark 51820 table 51820
[#] ip -4 rule add table main suppress_prefixlength 0
[#] sysctl -q net.ipv4.conf.all.src_valid_mark=1
[#] nft -f /dev/fd/63
[#] ip route add 192.168.0.0/24 via 10.0.0.1 dev eth0 ; ip route add 10.0.0.0/24 dev eth0
You can also do it with systemctl directly:
[ 10.0.0.10/16 ] [ /dev/pts/25 ] [~]
→ systemctl stop wg-quick@wg0
==== AUTHENTICATING FOR org.freedesktop.systemd1.manage-units ===
Authentication is required to stop 'wg-quick@wg0.service'.
Authenticating as: nothing,,, (nothing)
Password:
==== AUTHENTICATION COMPLETE ===

[ 10.0.0.10/16 ] [ /dev/pts/25 ] [~]
→ systemctl start wg-quick@wg0
==== AUTHENTICATING FOR org.freedesktop.systemd1.manage-units ===
Authentication is required to start 'wg-quick@wg0.service'.
Authenticating as: nothing,,, (nothing)
Password:
==== AUTHENTICATION COMPLETE ===

[ 10.0.0.10/16 ] [ /dev/pts/25 ] [~]
→ systemctl status wg-quick@wg0
● wg-quick@wg0.service - WireGuard via wg-quick(8) for wg0
     Loaded: loaded (/lib/systemd/system/wg-quick@.service; enabled; vendor preset: disabled)
     Active: active (exited) since Fri 2021-06-11 19:12:53 CEST; 1s ago
       Docs: man:wg-quick(8)
             man:wg(8)
             https://www.wireguard.com/
             https://www.wireguard.com/quickstart/
             https://git.zx2c4.com/wireguard-tools/about/src/man/wg-quick.8
             https://git.zx2c4.com/wireguard-tools/about/src/man/wg.8
    Process: 3988248 ExecStart=/usr/bin/wg-quick up wg0 (code=exited, status=0/SUCCESS)
   Main PID: 3988248 (code=exited, status=0/SUCCESS)
        CPU: 143ms
You can also just do a zshrc / bashrc function to do this automatically:
[ 10.66.66.2/32 ] [ /dev/pts/16 ] [blog/servers/wireguard_auto]
→ vim ~/.zshrc

[...]

temple(){
    GREEN="\033[0;32m"
    RED="\033[0;31m"
    ORANGE="\033[0;33m"
    NC="\033[0m"

    if [ $(ip a | grep wg0 | wc -l) -eq "0"  ]; then
        echo -en "${GREEN}[+]${NC} WireGuard is ${RED}DOWN${NC}, ${ORANGE}connecting to Temple...${GREEN}\n\n"
        sudo wg-quick up wg0
        echo -en "\n${GREEN}[+]${NC} your public ip is : ${GREEN} $(curl ifconfig.me) ${NC}"
    else
        echo -en "${GREEN}[+]${NC} WireGuard is ${GREEN}UP, ${ORANGE}disconnecting from Temple...${RED}\n\n"
        sudo wg-quick down wg0
        echo -en "\n${GREEN}[+]${NC} your public ip is : ${ORANGE} $(curl ifconfig.me) ${NC}"
    fi
}

[...]

:wq