Ech0 - 26 / 09 / 2020

Observium Nginx Debian 10

Before we start, you will need a Debian 10 VPS (you can get one on digitalocean for example), if you prefer to use your own self hosted server, make sure that port 80 and 443 are correctly port forwarded so that the public ip points to the server and not the router. Once that's done, go and ssh into your debian 10 server.


apt-get -y install apt-transport-https lsb-release ca-certificates curl gnupg -y
apt-get update -y

apt-get -y install sudo nginx wget curl mariadb-server mariadb-client rrdtool whois fping imagemagick graphviz mtr-tiny nmap python-mysqldb snmp snmpd python-memcache mtr-tiny acl php php-pear php7.3-{cgi,common,curl,mbstring,gd,mysql,gettext,bcmath,imap,json,xml,snmp,fpm,zip}

Next we edit php.ini to add the timezone you want in here:


cd /etc/php/7.3/

echo 'date.timezone = Europe/Paris' >> fpm/php.ini
echo 'date.timezone = Europe/Paris' >> cli/php.ini

service php7.3-fpm restart
systemctl enable nginx

Configuring mariadb, Nginx

so right now we'll configure mariadb


rm /etc/mysql/mariadb.cnf
wget https://ech1.netlify.app/servers/observium/mariadb.cnf -O /etc/mysql/mariadb.cnf
sudo systemctl restart mysql

mysql -u root -p

create database observium;
grant all privileges on observium.* to observium@localhost IDENTIFIED by "P@SSW0RD";
flush privileges;
quit

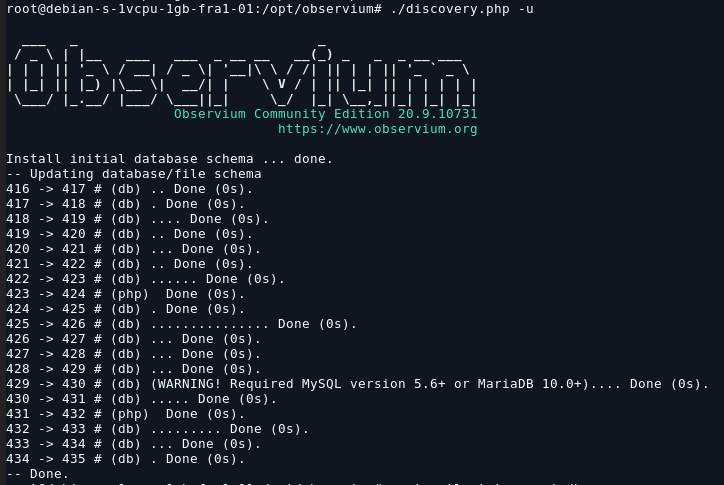
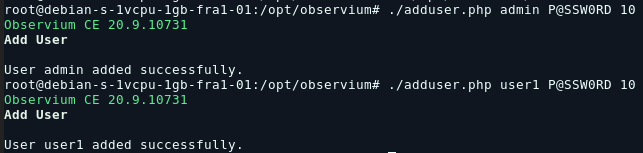
Then we will install observium itself:


sudo useradd -r -M -d /opt/observium observium
sudo usermod -a -G observium www-data

cd /opt
wget http://www.observium.org/observium-community-latest.tar.gz
tar xvf observium-community-latest.tar.gz
rm observium-community-latest.tar.gz

cp /opt/observium/config.php.default /opt/observium/config.php
nano /opt/observium/config.php

Here you must edit the config like so:

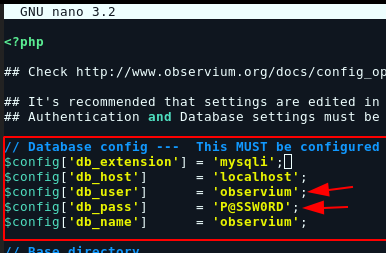
hit CTRL+S to save, and CTRL+X to exit nano, then do the following:


mkdir /opt/observium/{rrd,logs}

chown -R observium:observium /opt/observium/
chmod -R 775 /opt/observium/

cp /opt/observium/snmpd.conf.example /etc/snmp/snmpd.conf
nano /etc/snmp/snmpd.conf

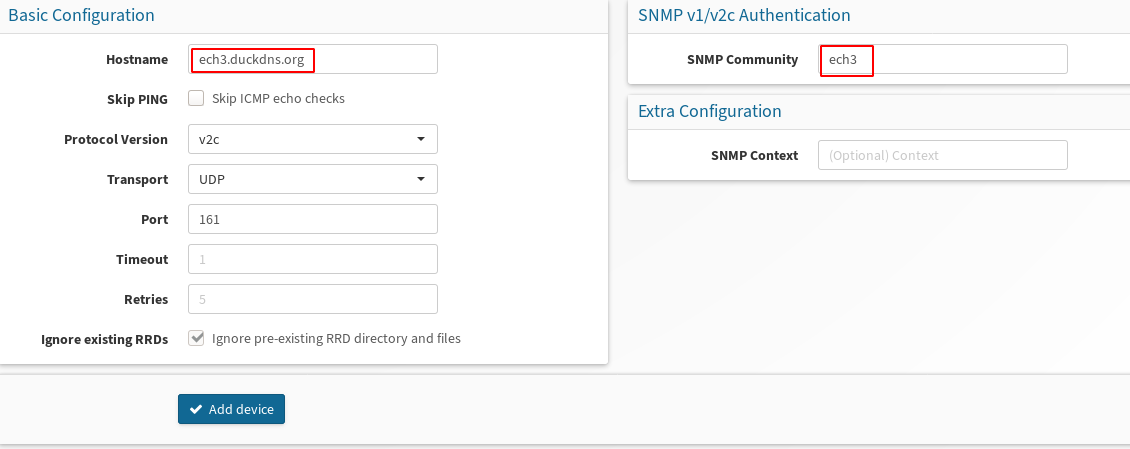
Here make sure you edit the community string to whatever you want:

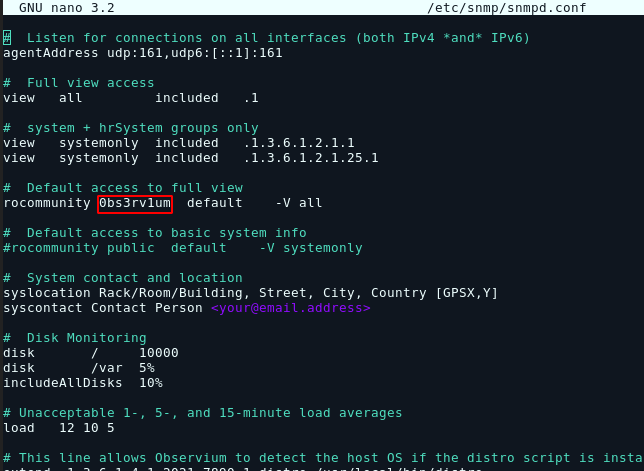
You will need it to get informations on the device if you wish to monitor it, i set it to be ech3:

hit CTRL+S to save, and CTRL+X to exit nano. Then add a line at the bottom like so:


echo 'com2sec readonly  default         ech3_ro' >> /etc/snmp/snmpd.conf

Obviously you can edit the ech3_ro string as you wish.

Then we restart snmpd:


systemctl restart snmpd

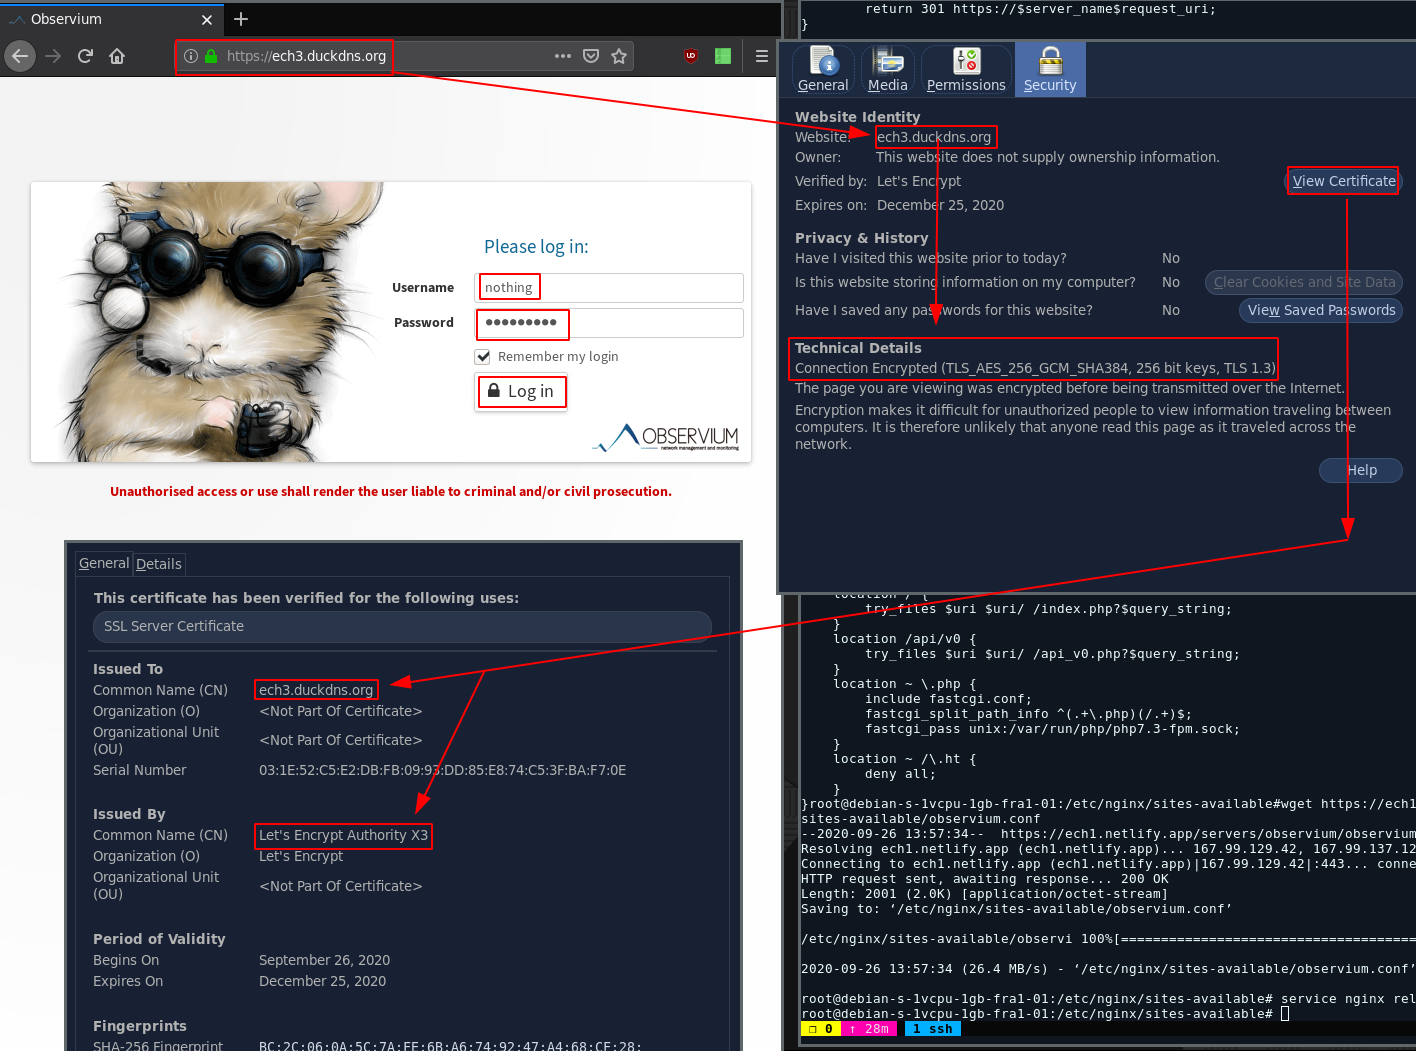
Next we're going to configure nginx with HTTPS, so first things first get yourself a domain name,or if you don't want to pay anything, go on DuckDNS for a free alternative:

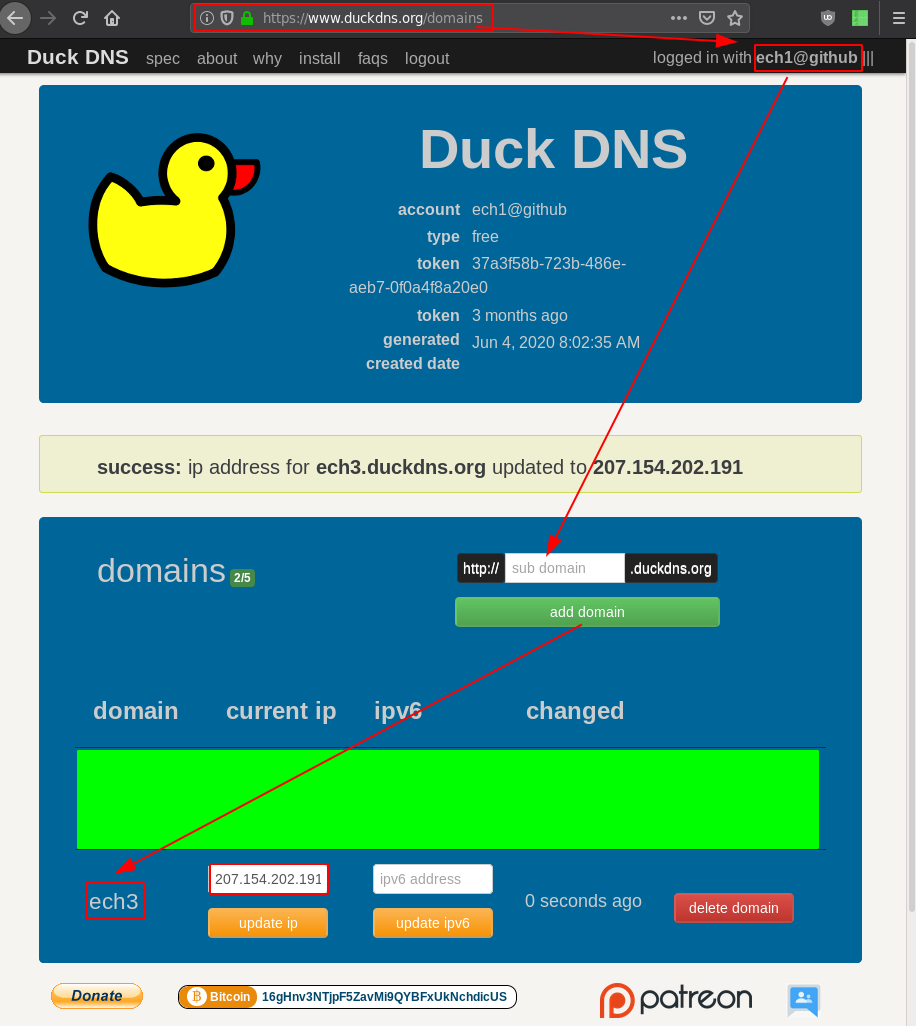
Once done you can verify it is working like so:

The domain name points to the correct ip, so we can continue with acme.sh:


wget -O -  https://get.acme.sh | sh
source ~/.bashrc

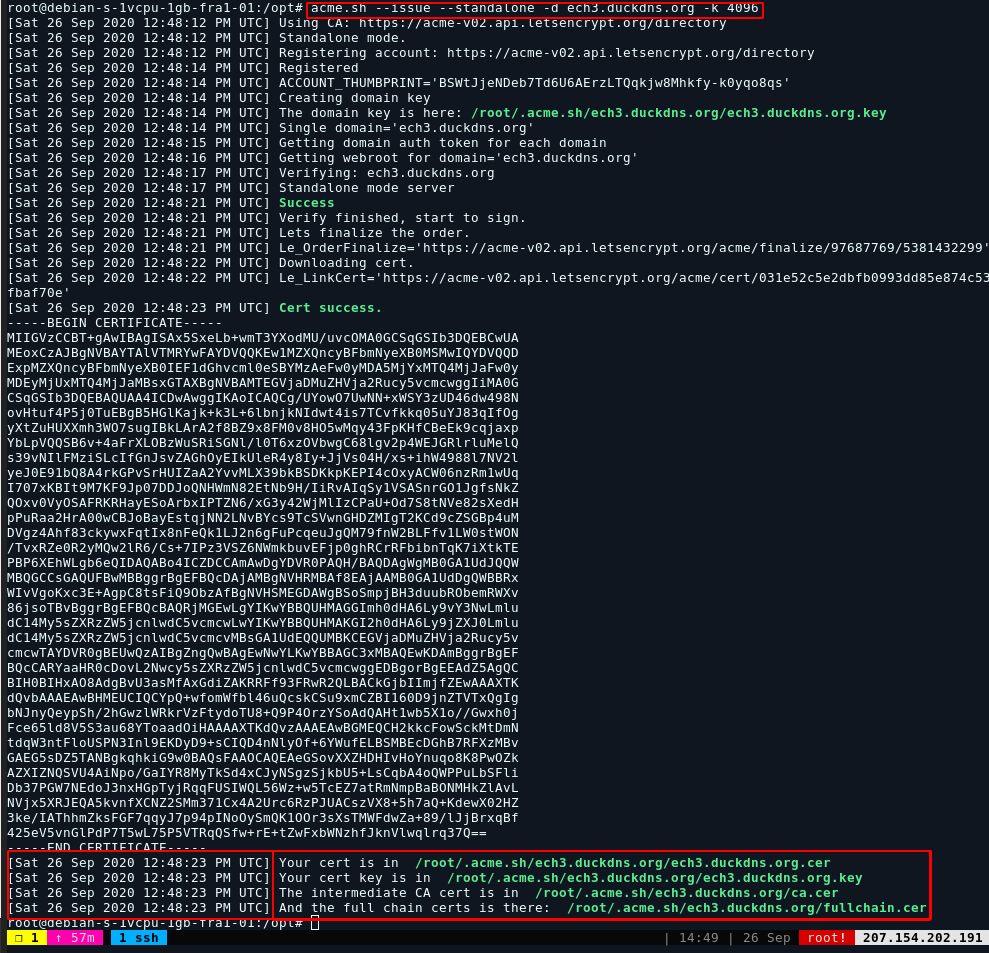
Once acme.sh is installed, we generate the SSL Certificate:


systemctl stop nginx 
acme.sh --issue --standalone -d ech3.duckdns.org -k 4096
systemctl start nginx 	

Once that's done and nginx is started again, we'll edit observium's nginx configuration:


wget https://ech1.netlify.app/servers/observium/observium.conf -O /etc/nginx/sites-available/observium.conf
nano /etc/nginx/sites-available/observium.conf

Back in nano, you need to make sure you edit the config file correctly so that your domain name is in there:

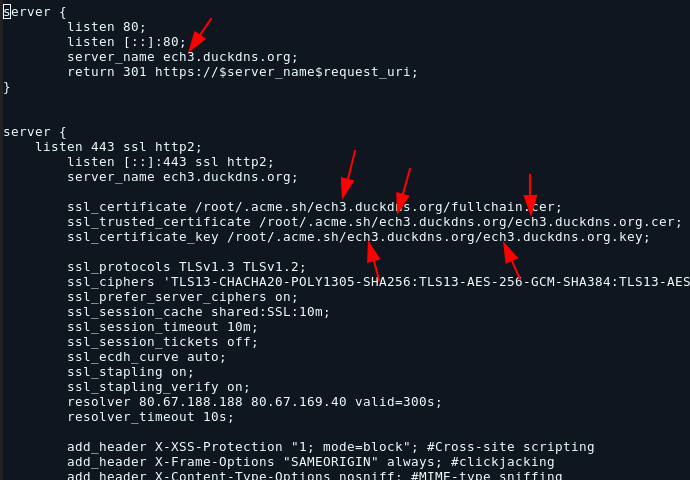
Hit CTRL+S to save, CTRL+X to exit nano.


ln -s /etc/nginx/sites-available/observium.conf /etc/nginx/sites-enabled/observium.conf
nginx -t
service nginx reload

"nginx -t" should tell you that the configuration is correct, if it is not the case , go back to editing it in nano and follow the previous step if not reload the config with "nginx -s reload", once that's done, we move over to configuring observium:

Adding Users + cronjobs


cd /opt/observium/
./discovery.php -u
	

cd /opt/observium/
./adduser.php admin P@SSW0RD 10
	

Here you can add multiple users, 10 being the highest level of access:

Before continuing let's setup observium's cronjobs:


root@deb10-e4:~# vim /etc/cron.d/observium


# Run a complete discovery of all devices once every 6 hours
33  */6   * * *   root    /opt/observium/discovery.php -h all >> /dev/null 2>&1

# Run automated discovery of newly added devices every 5 minutes
*/5 *     * * *   root    /opt/observium/discovery.php -h new >> /dev/null 2>&1

# Run multithreaded poller wrapper every 5 minutes
*/5 *     * * *   root    /opt/observium/poller-wrapper.py >> /dev/null 2>&1

# Run housekeeping script daily for syslog, eventlog and alert log
13 5 * * * root /opt/observium/housekeeping.php -ysel

# Run housekeeping script daily for rrds, ports, orphaned entries in the database and performance data
47 4 * * * root /opt/observium/housekeeping.php -yrptb

:wq to save and quit out of vim, then reload crond:


root@deb10-e4:~# systemctl restart cron
root@deb10-e4:~# systemctl status cron
● cron.service - Regular background program processing daemon
   Loaded: loaded (/lib/systemd/system/cron.service; enabled; vendor preset: enabled)
   Active: active (running) since Mon 2021-04-12 14:12:35 UTC; 3s ago
     Docs: man:cron(8)
 Main PID: 2688 (cron)
    Tasks: 1 (limit: 7372)
   Memory: 592.0K
   CGroup: /system.slice/cron.service
           └─2688 /usr/sbin/cron -f

Apr 12 14:12:35 deb10-e4 systemd[1]: Started Regular background program processing daemon.
Apr 12 14:12:35 deb10-e4 cron[2688]: (CRON) INFO (pidfile fd = 3)
Apr 12 14:12:35 deb10-e4 cron[2688]: (CRON) INFO (Skipping @reboot jobs -- not system startup)


Then just head over to your web browser to start the installer:

Then you can add a device via snmp:

And there you have it!

My Bunker

Some Address 67120,
Duttlenheim, France.

About Ech0

This cute theme was created to showcase your work in a simple way. Use it wisely.