
RTMP HLS Setup (June 2021 Update)
In this tutorial we're going to look at how we can install a HLS server to replace streaming platforms like twitch.
Click here for my previous tutorial HLS, with a more simplistic setup.
In this tutorial we're going to look at how we can install a HLS server to replace streaming platforms like twitch.
Click here for my previous tutorial HLS, with a more simplistic setup.First of all get a VPS that's running the latest ubuntu version, for example on DigitalOcean or on Vultr.
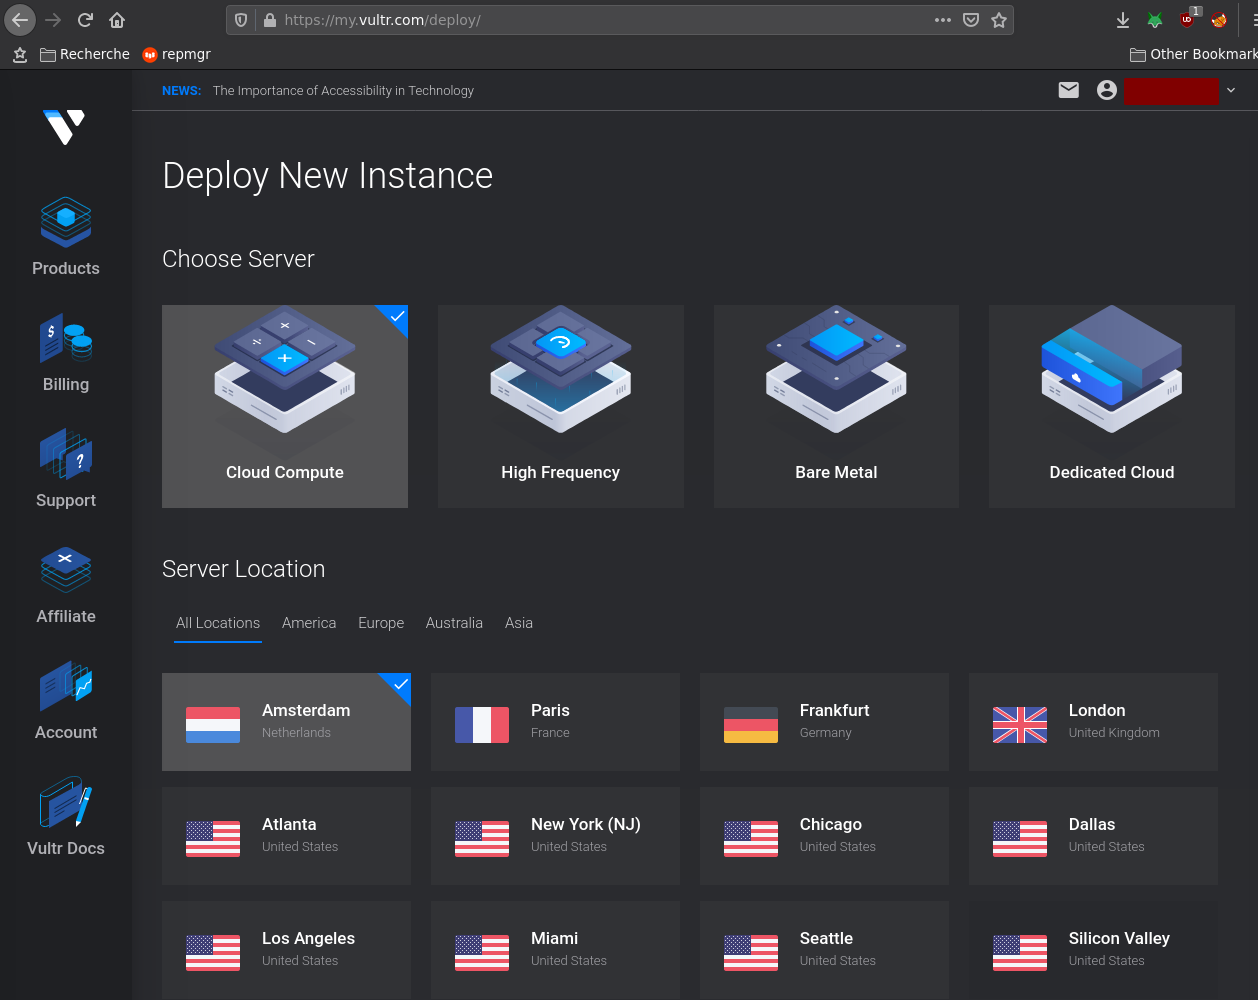
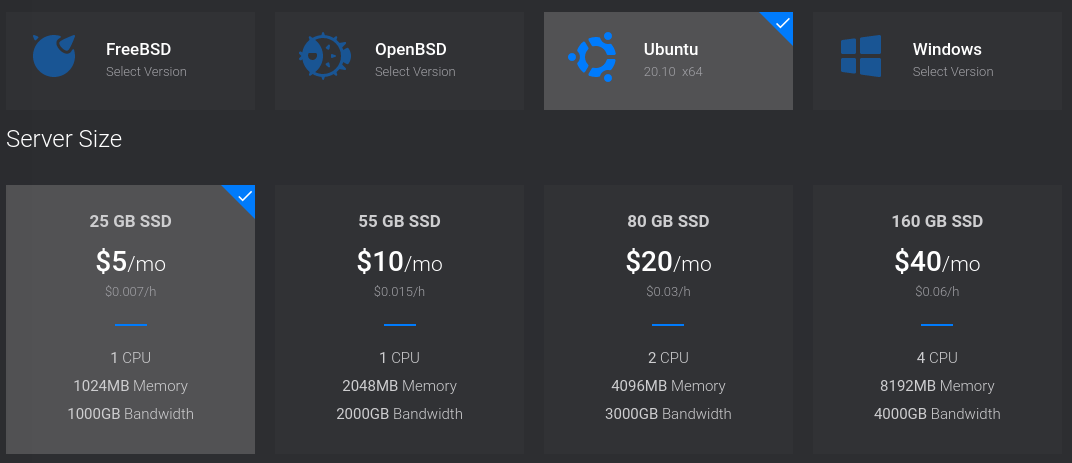
Make sure you pick the Ubuntu OS (20.10+) for ease of use.
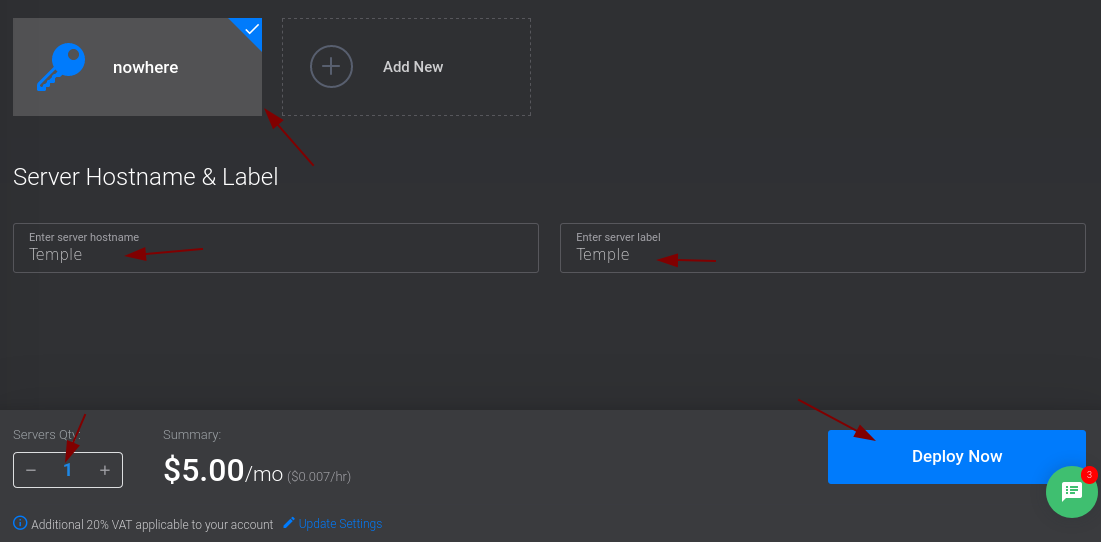
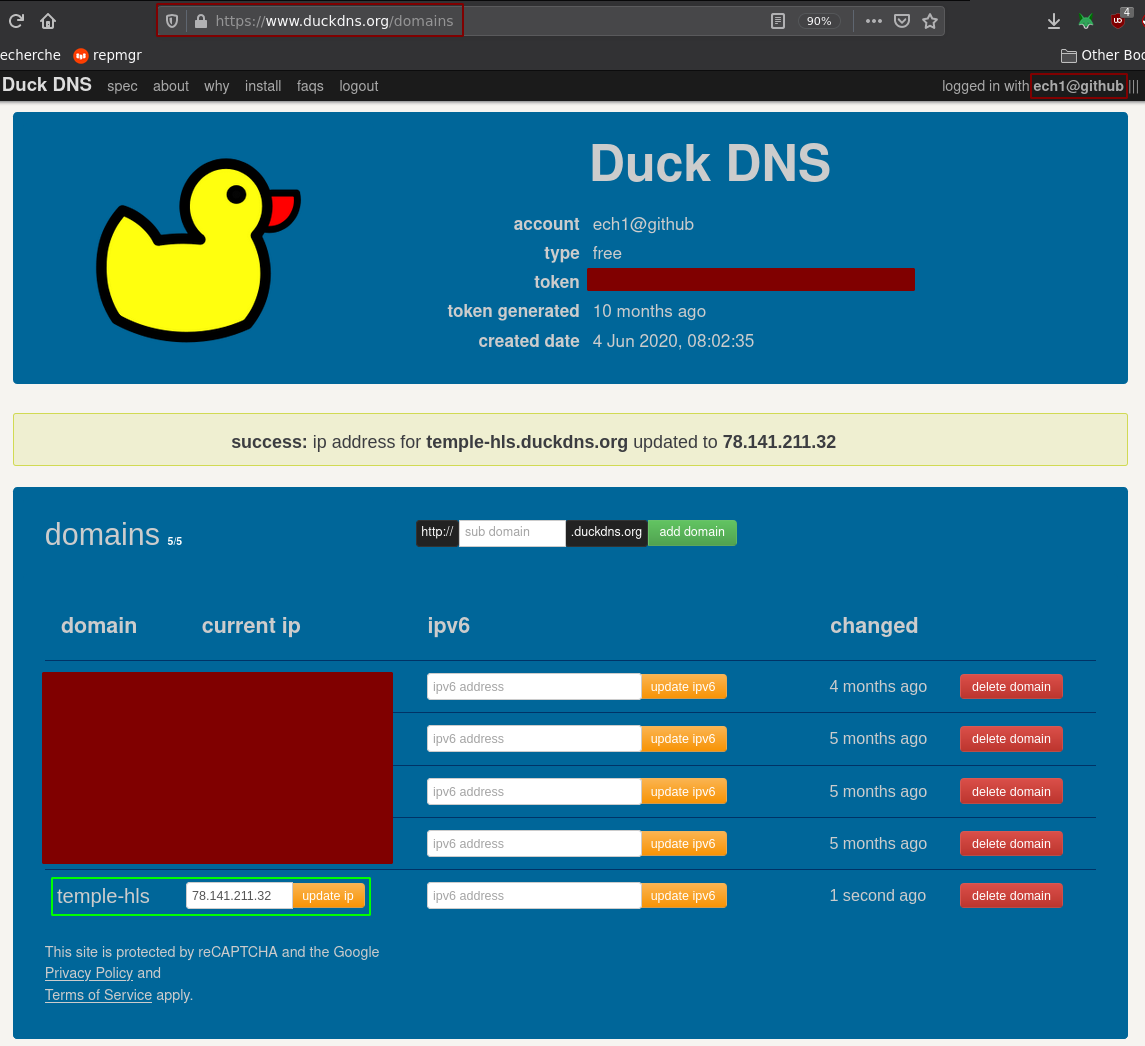
Once that's done, check out it's public ip and setup a DNS record that points to it's public IP. If you don't own a domain then go use DuckDNS:

[ 10.0.0.10/16 ] [ /dev/pts/44 ] [~]
→ ping temple-hls.duckdns.org
PING temple-hls.duckdns.org (78.141.211.32) 56(84) bytes of data.
64 bytes from 78.141.211.32.vultr.com (78.141.211.32): icmp_seq=1 ttl=50 time=27.2 ms
64 bytes from 78.141.211.32.vultr.com (78.141.211.32): icmp_seq=2 ttl=50 time=26.6 ms
64 bytes from 78.141.211.32.vultr.com (78.141.211.32): icmp_seq=3 ttl=50 time=27.9 ms
64 bytes from 78.141.211.32.vultr.com (78.141.211.32): icmp_seq=4 ttl=50 time=27.8 ms
^C
--- temple-hls.duckdns.org ping statistics ---
4 packets transmitted, 4 received, 0% packet loss, time 3004ms
rtt min/avg/max/mdev = 26.618/27.382/27.910/0.505 ms

[ 10.0.0.10/16 ] [ /dev/pts/44 ] [~]
→ ssh root@temple-hls.duckdns.org
The authenticity of host 'temple-hls.duckdns.org (78.141.211.32)' can't be established.
ED25519 key fingerprint is SHA256:HDiBgVqdc5Sf028SAE8YaiOdiQ/OUikdo/jPqCl423k.
This key is not known by any other names
Are you sure you want to continue connecting (yes/no/[fingerprint])? yes
Warning: Permanently added 'temple-hls.duckdns.org' (ED25519) to the list of known hosts.
Welcome to Ubuntu 20.10 (GNU/Linux 5.8.0-44-generic x86_64)

 * Documentation:  https://help.ubuntu.com
 * Management:     https://landscape.canonical.com
 * Support:        https://ubuntu.com/advantage

  System information as of Wed Apr 14 08:12:50 AM UTC 2021

  System load:  0.13               Processes:             101
  Usage of /:   10.7% of 23.38GB   Users logged in:       0
  Memory usage: 24%                IPv4 address for ens3: 78.141.211.32
  Swap usage:   0%


52 updates can be installed immediately.
0 of these updates are security updates.
To see these additional updates run: apt list --upgradable


The list of available updates is more than a week old.
To check for new updates run: sudo apt update


The programs included with the Ubuntu system are free software;
the exact distribution terms for each program are described in the
individual files in /usr/share/doc/*/copyright.

Ubuntu comes with ABSOLUTELY NO WARRANTY, to the extent permitted by
applicable law.

root@Temple:~# id
uid=0(root) gid=0(root) groups=0(root)
Now once you ssh'd into your VPS via the A DNS record you've created, we are going to setup the HLS server manually as follows:
[ 10.0.0.10/16 ] [ /dev/pts/44 ] [~]
→ ping temple.void.yt
PING temple.void.yt (78.141.211.32) 56(84) bytes of data.
64 bytes from temple.void.yt (78.141.211.32): icmp_seq=1 ttl=50 time=27.9 ms
64 bytes from temple.void.yt (78.141.211.32): icmp_seq=2 ttl=50 time=27.2 ms
64 bytes from temple.void.yt (78.141.211.32): icmp_seq=3 ttl=50 time=31.6 ms
^C
--- temple.void.yt ping statistics ---
3 packets transmitted, 3 received, 0% packet loss, time 2003ms
rtt min/avg/max/mdev = 27.244/28.915/31.641/1.943 ms

[ 10.0.0.10/16 ] [ /dev/pts/44 ] [~]
→ ssh root@temple.void.yt

root@Temple:~# apt update -y ; apt upgrade -y ; apt install php7.4-fpm socat vim build-essential libpcre3 libpcre3-dev libssl-dev zlib1g zlib1g-dev -y
Once the dependencies are installed, get the latest version of nginx on your VPS:
root@Temple:~# wget http://nginx.org/download/nginx-1.19.9.tar.gz
--2021-04-14 08:43:26--  http://nginx.org/download/nginx-1.19.9.tar.gz
Resolving nginx.org (nginx.org)... 3.125.197.172, 52.58.199.22, 2a05:d014:edb:5702::6, ...
Connecting to nginx.org (nginx.org)|3.125.197.172|:80... connected.
HTTP request sent, awaiting response... 200 OK
Length: 1060580 (1.0M) [application/octet-stream]
Saving to: ‘nginx-1.19.9.tar.gz’

nginx-1.19.9.tar.gz                 100%[=================================================================>]   1.01M  --.-KB/s    in 0.05s

2021-04-14 08:43:26 (20.5 MB/s) - ‘nginx-1.19.9.tar.gz’ saved [1060580/1060580]

root@Temple:~# tar -xf nginx-1.19.9.tar.gz

root@Temple:~# cd nginx-1.19.9/

root@Temple:~/nginx-1.19.9# mkdir modules

root@Temple:~/nginx-1.19.9# cd modules/

root@Temple:~/nginx-1.19.9/modules# git clone https://github.com/sergey-dryabzhinsky/nginx-rtmp-module.git
Cloning into 'nginx-rtmp-module'...
remote: Enumerating objects: 4936, done.
remote: Total 4936 (delta 0), reused 0 (delta 0), pack-reused 4936
Receiving objects: 100% (4936/4936), 3.29 MiB | 9.82 MiB/s, done.
Resolving deltas: 100% (3093/3093), done.

root@Temple:~/nginx-1.19.9/modules# cd ..
root@Temple:~/nginx-1.19.9/modules# apt install gcc cmake libpcre3-dev libssl-dev zlib1g-dev socat curl php7.4-fpm -y

root@Temple:~/nginx-1.19.9# NGINX_OPTIONS="
                 --prefix=/etc/nginx \
                 --sbin-path=/usr/sbin/nginx \
                 --conf-path=/etc/nginx/nginx.conf \
                 --error-log-path=/var/log/nginx/error.log \
                 --http-log-path=/var/log/nginx/access.log \
                 --pid-path=/var/run/nginx.pid \
                 --lock-path=/var/run/nginx.lock \
                 --user=www-data \
                 --group=www-data \
                 --with-cc-opt=-Wno-deprecated-declarations \
                 --with-cc-opt=-Wno-ignored-qualifiers
                 --with-threads \
                 --with-file-aio \
                 --with-http_ssl_module \
                 --with-http_v2_module \
                 --with-http_mp4_module \
                 --with-http_auth_request_module \
                 --with-http_slice_module \
                 --with-http_stub_status_module \
                 --with-http_realip_module \
                 --with-http_sub_module \
                 --add-module=modules/nginx-rtmp-module"

root@Temple:~/nginx-1.19.9# ./configure $NGINX_OPTIONS
Let it configure and then do the following:
root@Temple:~/nginx-1.19.9# make -j $(nproc)
root@Temple:~/nginx-1.19.9# make install
root@Temple:~/nginx-1.19.9# strip -s /usr/sbin/nginx
root@Temple:~/nginx-1.19.9# mkdir -p /etc/nginx
root@Temple:~/nginx-1.19.9# mkdir -p /var/log/nginx
Then go get the nginx systemd service file:
root@Temple:~/nginx-1.19.9# cd /lib/systemd/system

root@Temple:/lib/systemd/system# wget https://raw.githubusercontent.com/Angristan/nginx-autoinstall/master/conf/nginx.service


root@Temple:/lib/systemd/system# systemctl daemon-reload

root@Temple:/lib/systemd/system# systemctl enable nginx
Created symlink /etc/systemd/system/multi-user.target.wants/nginx.service → /lib/systemd/system/nginx.service.
Once that's done test if nginx works :
root@Temple:~# /usr/sbin/nginx -t
nginx: the configuration file /etc/nginx/nginx.conf syntax is ok
nginx: configuration file /etc/nginx/nginx.conf test is successful
Since it does, let's get the custom nginx config:
root@Temple:~# wget https://raw.githubusercontent.com/ech1/Stream-Temple/main/nginx.conf -O /etc/nginx/nginx.conf
root@Temple:~# vim /etc/nginx/nginx.conf
You're going to edit it in vim, inside of vim you press i to enter Insert Mode to edit the text just like in a regular text editor, And you press ESC to get out of Insert Mode. Outside of Insert mode you can type :w to save the file you edited, or :wq to save and quit the file you were editing.
First thing we want to edit is the rtmp block to allow only the ips you choose to stream to the server. Otherwise you will see that anyone can stream to your server. If you want to know your own ip (where the stream will originate from with your OBS client), just go to http://ifconfig.me/. Let's say my IP is 1.2.3.4, i edit the config file as follows:
# RTMP configuration
rtmp {
        server {
                listen 1935;  #listen port
                allow 1.2.3.4;
                deny all;
                #People can use your stream so deny every ip except yours ^
[...]
If you want to allow anyone to stream to your server, just comment out the 'allow x;' and 'deny all;' directives, and nginx won't filter the 1935 port.
That is if you have a static public ip. If you have a dynamic public IP like i do, you can't just whitelist your IP you would have to whitelist the entire range of IPs you can have. so you can instead just limit the amount of 'streams' on your RTMP block, apparently 10 streams is ONE OBS stream, which i don't even understand either because the documentation on that isn't detailed enough.
Data streams are multiplexed into a single data stream. Different channels are used for sending commands, audio, video etc. Default value is 32 which is usually ok for many cases.Who knows what that means, if you want to use it you can use it inside the rtmp server block:
rtmp {
	server {
		listen 1935;
		max_streams 10; #10 streams is 1 obs stream or something like that
[...]
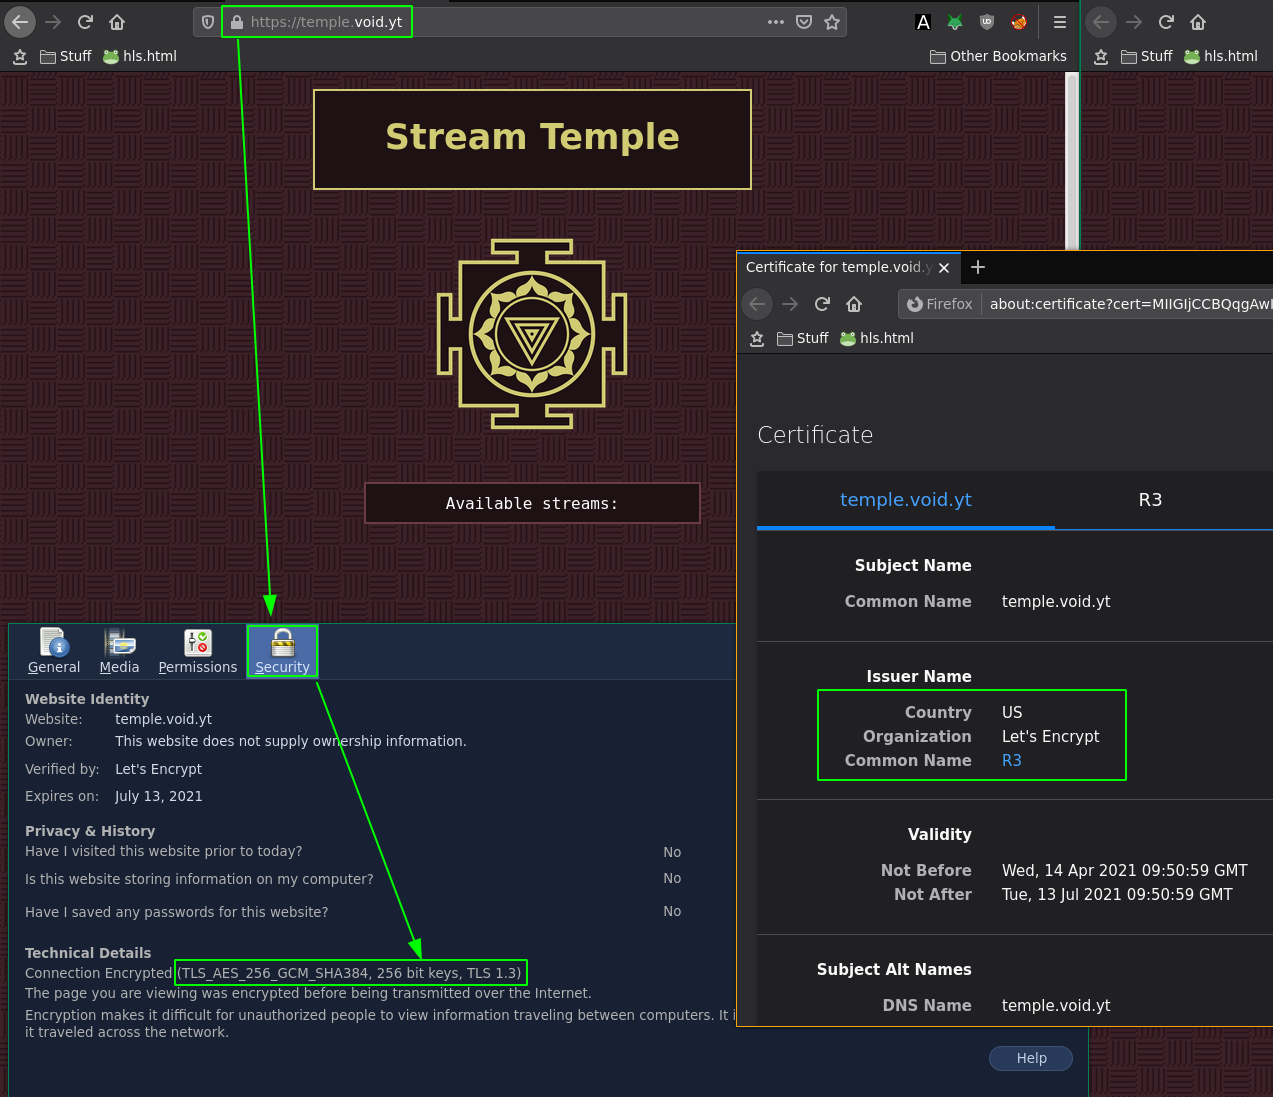
Next step is to make sure that the SSL certificate lines contain YOUR domain name. for example if you have the domain name temple.void.yt you have the following http block:
[...]

http {
        ssl_certificate /root/.acme.sh/temple.void.yt/fullchain.cer;
        ssl_trusted_certificate /root/.acme.sh/temple.void.yt/temple.void.yt.cer;
        ssl_certificate_key /root/.acme.sh/temple.void.yt/temple.void.yt.key;
[...]

server {
                listen 443 ssl http2;
                listen [::]:443 ssl http2;
                server_name temple.void.yt;
[...]

 server {
                listen 4443 ssl http2;
                listen [::]:4443 ssl http2;
                server_name temple.void.yt;
[...]
Obviously if nginx isn't a new thing to you you can tweak this config whichever way you like. Once you're done with the changes, press ESC to exit the insert mode, and type :wq to save and quit out of vim. Then get the LetsEncrypt TLS certificates with acme.sh:
root@Temple:~# wget -O -  https://get.acme.sh | sh

root@Temple:~# source ~/.bashrc
Once that's done, make sure your domain name points to your VPS's public IP address:
root@Temple:~# curl ifconfig.me ; echo ; echo ; ping temple.void.yt
78.141.211.32

PING temple.void.yt (78.141.211.32) 56(84) bytes of data.
64 bytes from 78.141.211.32.vultr.com (78.141.211.32): icmp_seq=1 ttl=64 time=0.027 ms
64 bytes from 78.141.211.32.vultr.com (78.141.211.32): icmp_seq=2 ttl=64 time=0.014 ms
64 bytes from 78.141.211.32.vultr.com (78.141.211.32): icmp_seq=3 ttl=64 time=0.051 ms
64 bytes from 78.141.211.32.vultr.com (78.141.211.32): icmp_seq=4 ttl=64 time=0.053 ms
^C
--- temple.void.yt ping statistics ---
4 packets transmitted, 4 received, 0% packet loss, time 4671ms
rtt min/avg/max/mdev = 0.014/0.036/0.053/0.016 ms
Since the steps above told you to ssh in via the domain name itself, it should already point to the right IP, next disable nginx and get the certificates:
root@Temple:~# systemctl stop nginx
root@Temple:~# acme.sh --issue --standalone -d temple.void.yt -k 4096
Once that's done, check if the nginx configuration is correct:
root@Temple:~# /usr/sbin/nginx -t
nginx: the configuration file /etc/nginx/nginx.conf syntax is ok
nginx: configuration file /etc/nginx/nginx.conf test is successful
And once that's done, start nginx, and get the 2 /mnt folders needed for the nginx config:
root@Temple:~# mkdir /mnt/hls/
root@Temple:~# git clone https://github.com/ech1/Stream-Temple /mnt/web
root@Temple:~# chmod 755 -R /mnt/web
root@Temple:~# chmod 755 -R /mnt/hls
root@Temple:~# chown www-data: -R /mnt/web
root@Temple:~# chown www-data: -R /mnt/hls
root@Temple:~# systemctl enable --now nginx php7.4-fpm
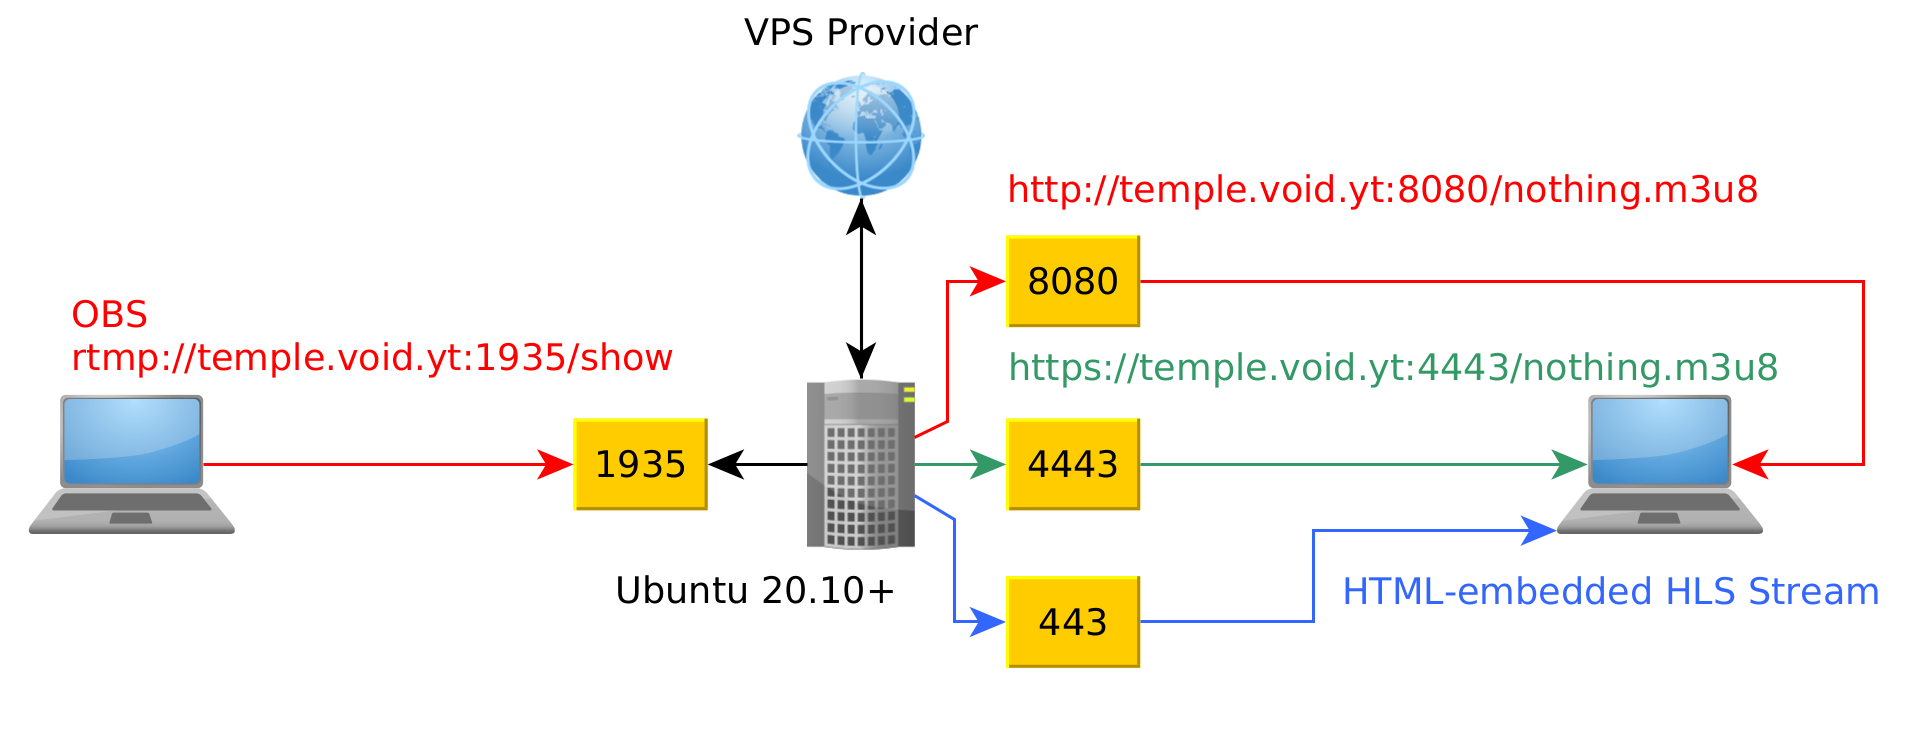
And that's it! We managed to setup our HTTPS RTMP HLS server.
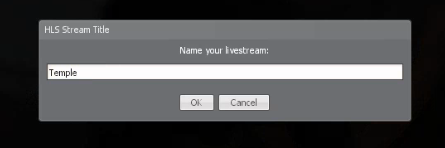
Now let's test it out using OBS, you need to do the following:
Server: 	rtmp://my.example.com:1935/show
Stream key:	something_random
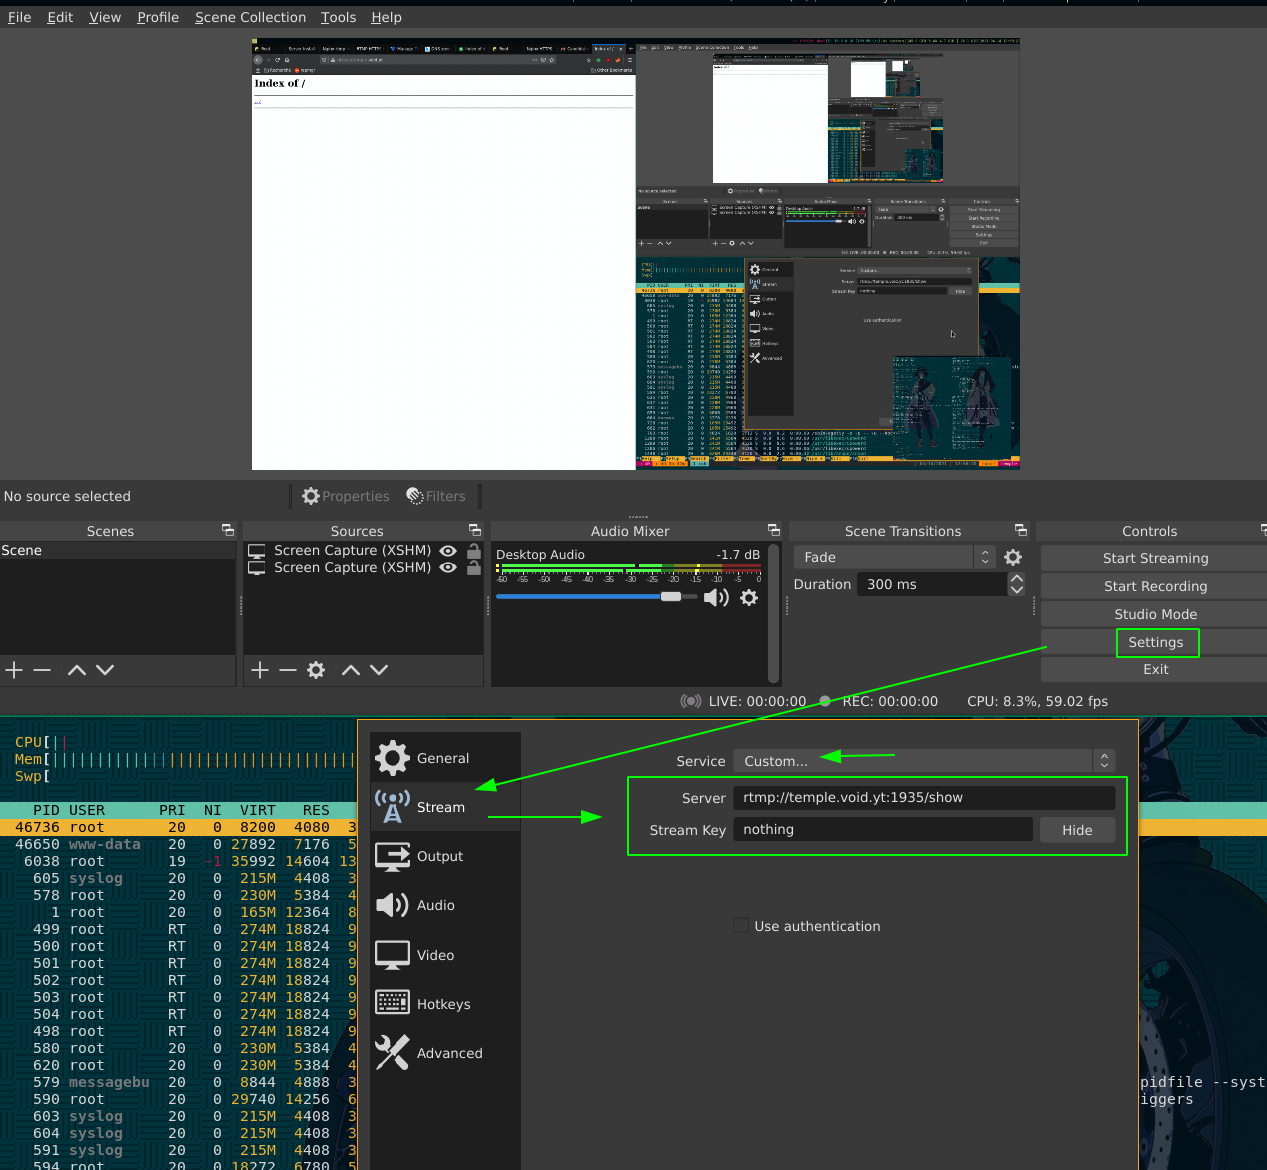
Once in here, click 'Ok' and start streaming:
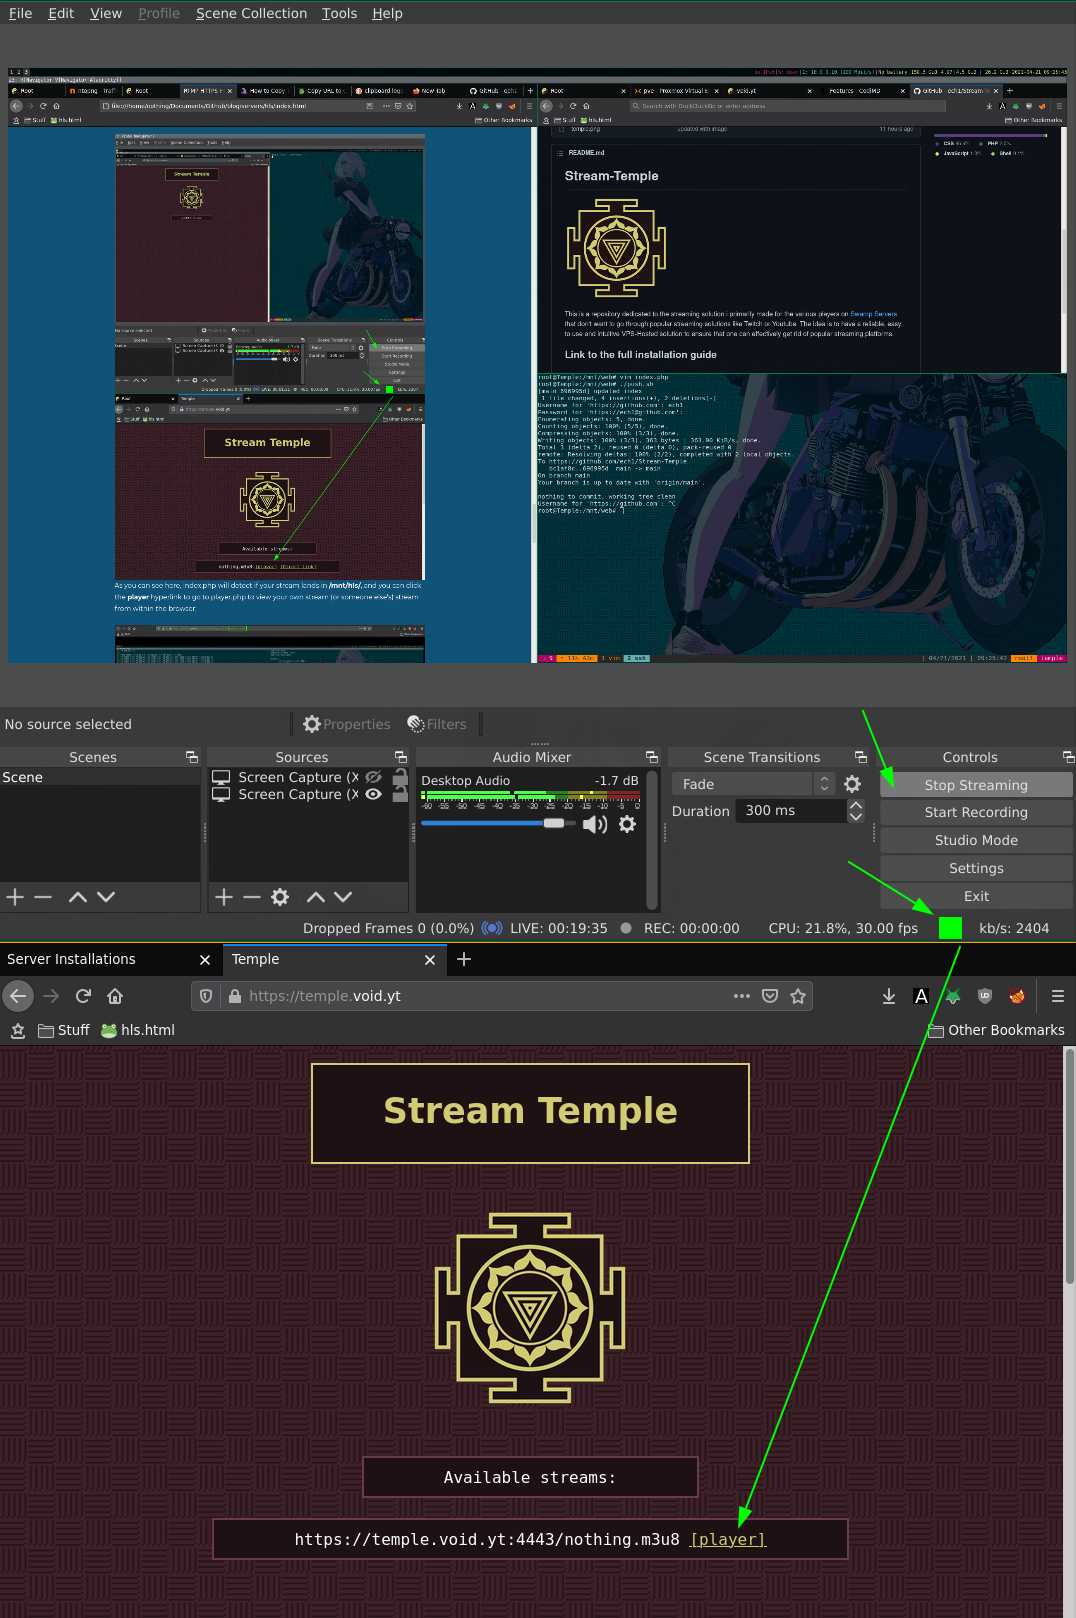
As you can see here, index.php will detect if your stream lands in /mnt/hls/, and you can click the player hyperlink to go to player.php to view your own stream (or someone else's) stream from within the browser:
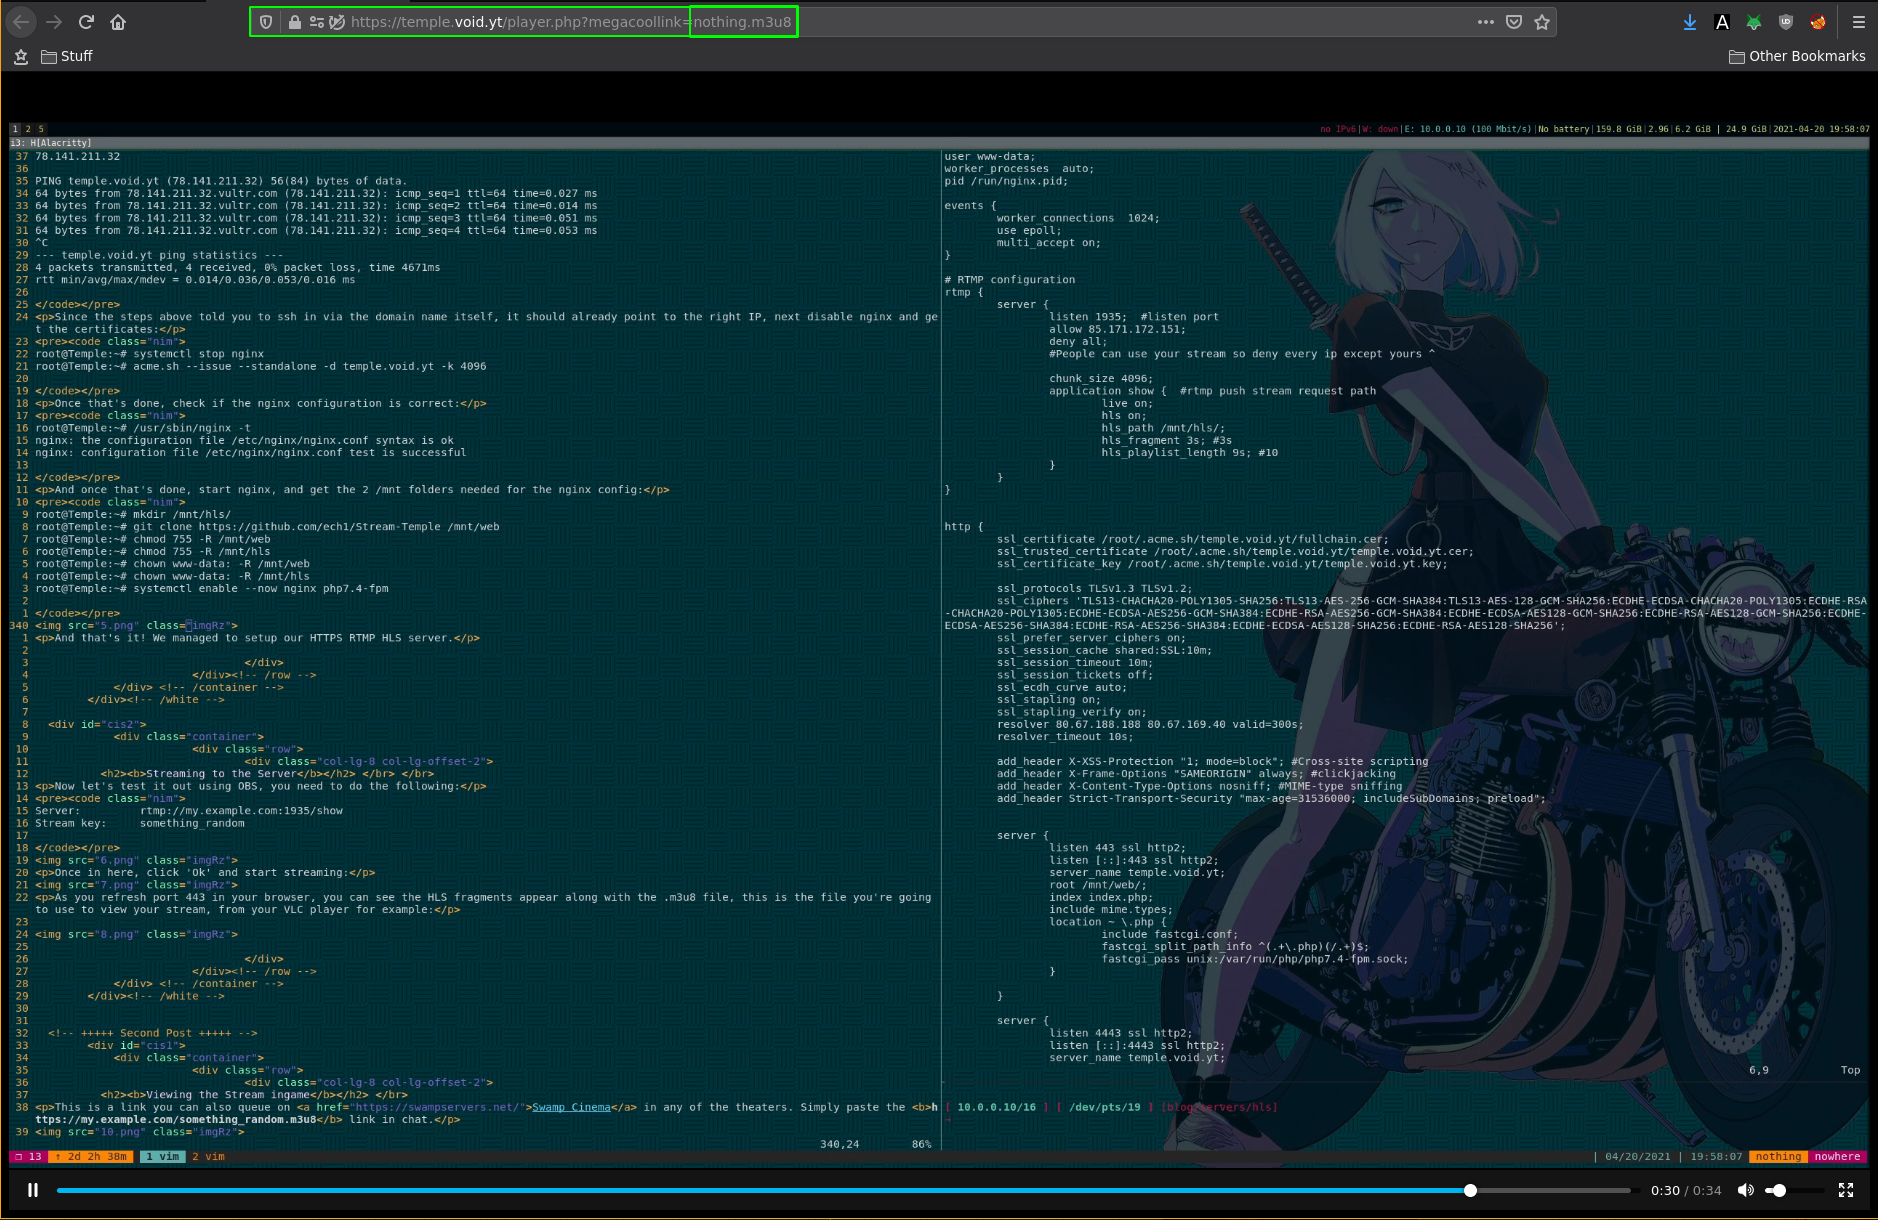
As you can see here, we are able to view our stream within the web browser itself, thanks to the player.php page. Now you can copy the direct stream link and use it in VLC for example:

If you want to debug what's going on with your stream in case it doesn't work, then you can check port 4443:
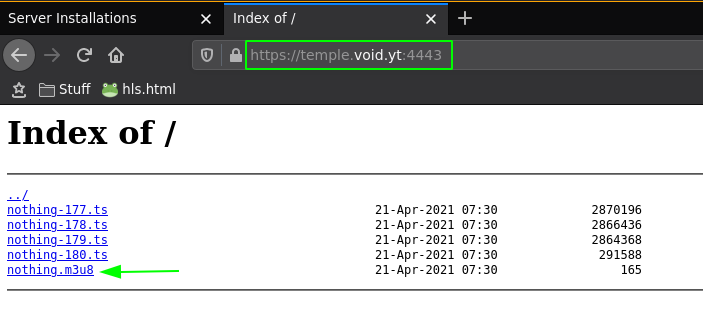
As you refresh port 4443 in your browser, you can see the HLS fragments beginning to appear along with the .m3u8 file, this is the file you're going to use to view your stream, which is also what the index.php page automatically looks for within the /mnt/hls/ directory.
Yes this is not with port 4443, this is with port 8080 and without https, i have no idea why it doesn't work ingame, but i know that THIS works. I also included the autoindex directive for that 8080 port in the nginx config:
http {
	server {
		[...]
	}

	server {
		[...]
	}

	server {
                listen 8080 ;
                listen [::]:8080 ;
                server_name temple.void.yt;

                sendfile off;
                tcp_nopush on;
                #aio on;
                directio 512;
                default_type application/octet-stream;


                location / {
                        if ($request_method = 'GET') {
                                add_header 'Access-Control-Allow-Origin' '*';
                                add_header 'Access-Control-Allow-Credentials' 'true';
                                add_header 'Cache-Control' 'no-cache';
                                add_header 'Access-Control-Allow-Methods' 'GET, POST, OPTIONS';
                                add_header 'Access-Control-Allow-Headers' 'DNT,X-CustomHeader,Keep-Alive,User-Agent,X-Requested-With,If-Modified-Since,Cache-Control,Content-Type';
                        }
                        types {
                                application/dash+xml mpd;
                                application/vnd.apple.mpegurl m3u8;
                                video/mp2t ts;
                        }
                        root  /mnt/hls/;
                        autoindex on;
		}
	}
}
You can view it in the browser just like for port 4443:

Sidenote: if you try to open it in firefox, you may encounter the problem where firefox tries to force it as HTTPS, so just open a private window CTRL+SHIFT+P and go to the http://yourdoma.in:8080 url there
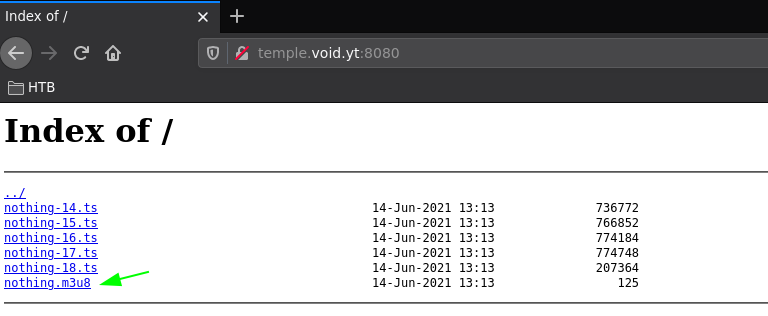
And it is the link to that m3u8 file you need to queue ingame, for example for me it's http://temple.void.yt:8080/nothing.m3u8 and i can just queue it the ingame chat inside of a theater:

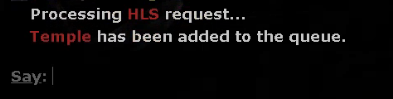

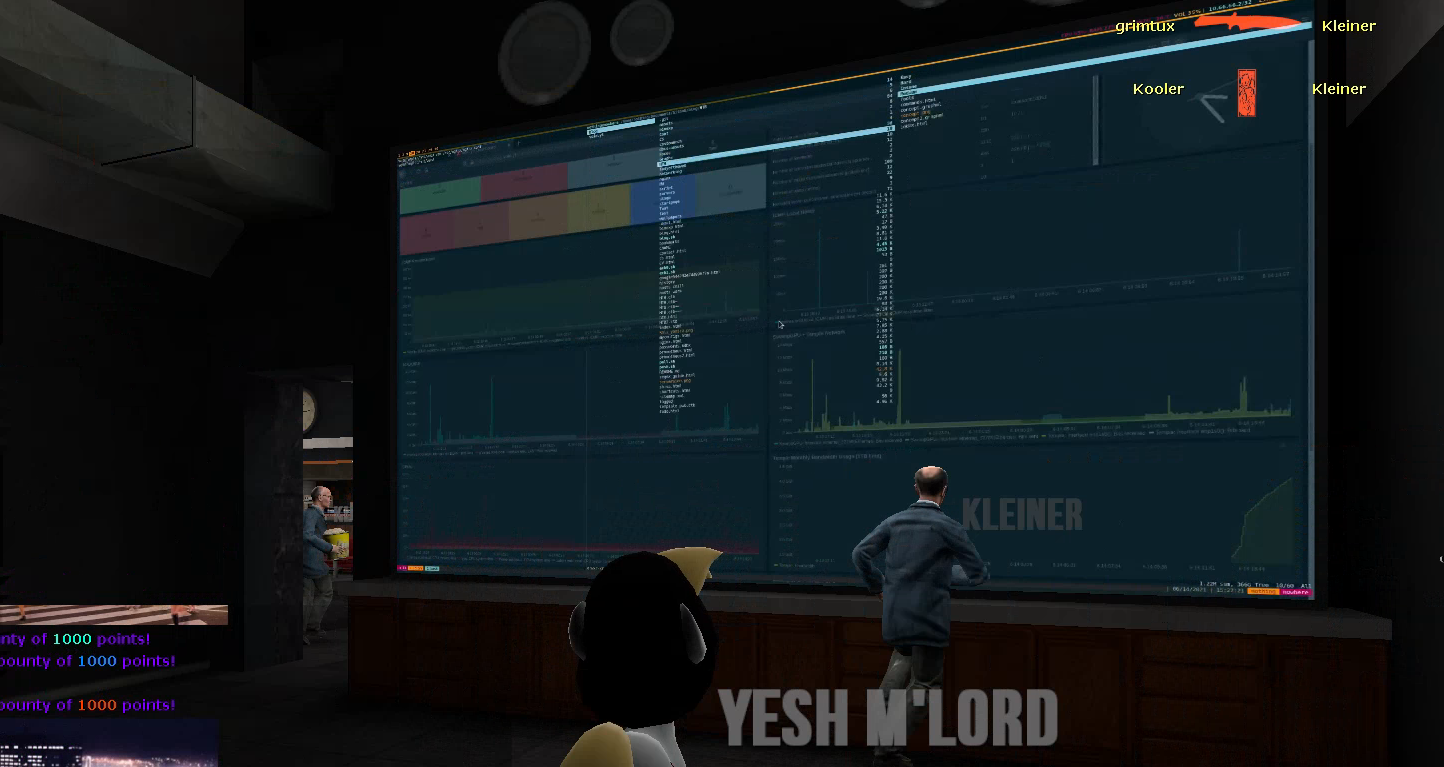
And that's it! We have been able to setup a RTMP HLS NGINX server and view it ingame.
Some Address 67120,
Duttlenheim, France.
This cute theme was created to showcase your work in a simple way. Use it wisely.