
Ansible

In this tutorial we're going to take a look at how Ansible can be used.
In this tutorial we're going to take a look at how Ansible can be used.
One fundamental requirement for ansible to work is to have a working SSH connection. we can setup key-based ssh authentication connections or we can just setup a regular ssh connection using passwords. let's first take a look at how you can setup a regular ssh connection:

We're going to show an example using a debian LXC container (CT) from a proxmox server. Once the CT is launched get into it's console:

We're going to edit the ssh config as follows:
PermitRootLogin yes
inside vim, press i to enter the insert mode, then make your text changes, then press ESC to exit out of insert mode, and type :wq to save and quit vim. After that, restart the sshd service:
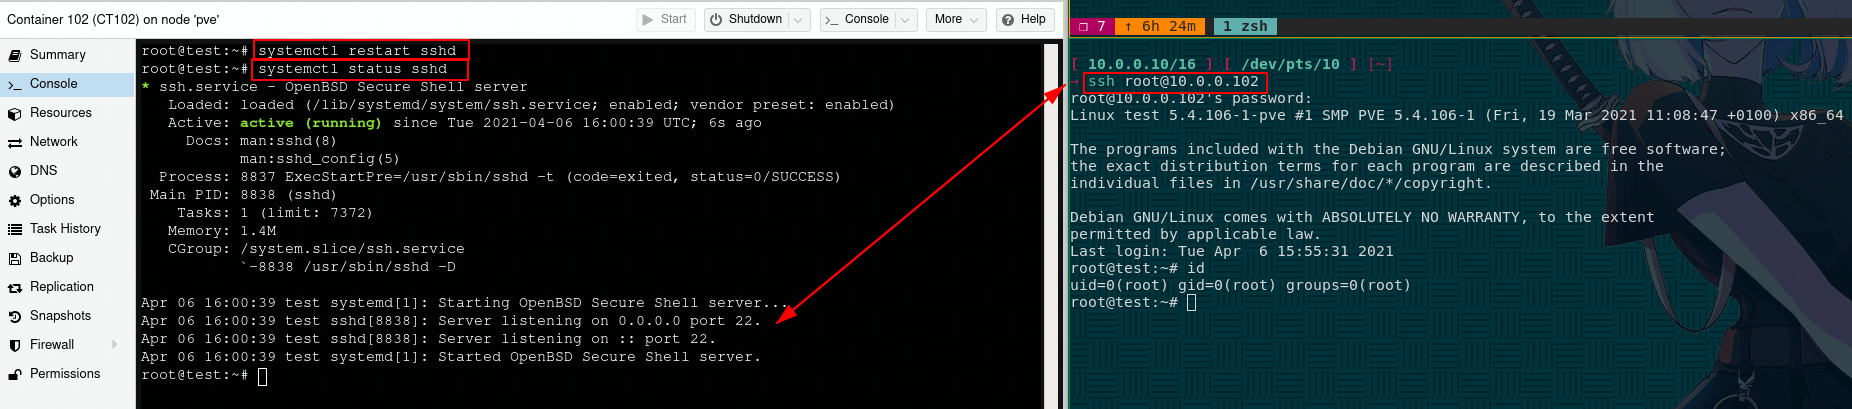
Once you have a working SSH connection, that's the bare minimum requirement you need to be able to use ansible. If you want to skip the password prompt you can use key-based authentication SSH connection as follows:
[ 10.0.0.10/16 ] [ /dev/pts/10 ] [~]
→ ssh root@10.0.0.102
root@10.0.0.102's password:
Linux test 5.4.106-1-pve #1 SMP PVE 5.4.106-1 (Fri, 19 Mar 2021 11:08:47 +0100) x86_64

The programs included with the Debian GNU/Linux system are free software;
the exact distribution terms for each program are described in the
individual files in /usr/share/doc/*/copyright.

Debian GNU/Linux comes with ABSOLUTELY NO WARRANTY, to the extent
permitted by applicable law.
Last login: Tue Apr  6 15:55:31 2021
root@test:~# id
uid=0(root) gid=0(root) groups=0(root)
root@test:~# mkdir ~/.ssh
root@test:~# cd ~/.ssh
root@test:~/.ssh# ssh-keygen -t ed25519
Generating public/private ed25519 key pair.
Enter file in which to save the key (/root/.ssh/id_ed25519):
Enter passphrase (empty for no passphrase):
Enter same passphrase again:
Your identification has been saved in /root/.ssh/id_ed25519.
Your public key has been saved in /root/.ssh/id_ed25519.pub.
The key fingerprint is:
SHA256:9SovHVeK8XlycaJDGzHsukb0CvIv9qaNspSZRCV3kn8 root@test
The key's randomart image is:
+--[ED25519 256]--+
|      . +...     |
|       +.o  +    |
|      .  ... o   |
|     .   .+.E + .|
|      . S. O.B + |
|     ..+. =.@ o  |
|      =o.+.= =   |
|     .. ==*      |
|      .+oO=      |
+----[SHA256]-----+
root@test:~/.ssh# cat id_ed25519.pub >> authorized_keys
root@test:~/.ssh# python3 -m http.server 8080
Serving HTTP on 0.0.0.0 port 8080 (http://0.0.0.0:8080/) ...
With the ssh-keygen command we generated the private key id_ed25519 and the public key id_ed25519.pub. the private key is a file we need to give to the client that is going to connect to the SSH server, and we permit it's use by making sure the public key that is associated with it is referenced in the authorized_keys file on the server. Now how do we transfer the private key to the client ? I think the easiest method is to temporarily use python3's http module to transfer the ssh key somewhere else on the network. Our last command opened a http server in the server's /root/.ssh directory, as you can see here:
[ 10.0.0.10/16 ] [ /dev/pts/14 ] [blog/servers/ansible]
→ curl 10.0.0.102:8080
Directory listing for /
Directory listing for /
And especially here:
[ 10.0.0.10/16 ] [ /dev/pts/14 ] [blog/servers/ansible]
→ curl 10.0.0.102:8080/id_ed25519
-----BEGIN OPENSSH PRIVATE KEY-----
b3BlbnNzaC1rZXktdjEAAAAABG5vbmUAAAAEbm9uZQAAAAAAAAABAAAAMwAAAAtzc2gtZW
QyNTUxOQAAACDY0+xVKpBv9IhRkRH4C55/SaF+FJsd7vTJq7IvX6/RlgAAAJCwK2ycsCts
nAAAAAtzc2gtZWQyNTUxOQAAACDY0+xVKpBv9IhRkRH4C55/SaF+FJsd7vTJq7IvX6/Rlg
AAAEDELHAkjN/D62SUBd7QYQ6tKQ3RZV192RKP5xLz9BZ1itjT7FUqkG/0iFGREfgLnn9J
oX4Umx3u9Mmrsi9fr9GWAAAACXJvb3RAdGVzdAECAwQ=
-----END OPENSSH PRIVATE KEY-----
This is how you can transfer a file from a host to another on the same network. Now that we know we can access it, let's retrieve the ssh key:
[ 10.0.0.10/16 ] [ /dev/pts/14 ] [blog/servers/ansible]
→ curl http://10.0.0.102:8080/id_ed25519
-----BEGIN OPENSSH PRIVATE KEY-----
b3BlbnNzaC1rZXktdjEAAAAABG5vbmUAAAAEbm9uZQAAAAAAAAABAAAAMwAAAAtzc2gtZW
QyNTUxOQAAACDY0+xVKpBv9IhRkRH4C55/SaF+FJsd7vTJq7IvX6/RlgAAAJCwK2ycsCts
nAAAAAtzc2gtZWQyNTUxOQAAACDY0+xVKpBv9IhRkRH4C55/SaF+FJsd7vTJq7IvX6/Rlg
AAAEDELHAkjN/D62SUBd7QYQ6tKQ3RZV192RKP5xLz9BZ1itjT7FUqkG/0iFGREfgLnn9J
oX4Umx3u9Mmrsi9fr9GWAAAACXJvb3RAdGVzdAECAwQ=
-----END OPENSSH PRIVATE KEY-----

[ 10.0.0.10/16 ] [ /dev/pts/14 ] [blog/servers/ansible]
→ curl http://10.0.0.102:8080/id_ed25519 > ~/.ssh/test.pkey
  % Total    % Received % Xferd  Average Speed   Time    Time     Time  Current
                                 Dload  Upload   Total   Spent    Left  Speed
100   399  100   399    0     0   129k      0 --:--:-- --:--:-- --:--:--  129k

[ 10.0.0.10/16 ] [ /dev/pts/14 ] [blog/servers/ansible]
→ ssh root@10.0.0.102 -i ~/.ssh/test.pkey
@@@@@@@@@@@@@@@@@@@@@@@@@@@@@@@@@@@@@@@@@@@@@@@@@@@@@@@@@@@
@         WARNING: UNPROTECTED PRIVATE KEY FILE!          @
@@@@@@@@@@@@@@@@@@@@@@@@@@@@@@@@@@@@@@@@@@@@@@@@@@@@@@@@@@@
Permissions 0644 for '/home/nothing/.ssh/test.pkey' are too open.
It is required that your private key files are NOT accessible by others.
This private key will be ignored.
Load key "/home/nothing/.ssh/test.pkey": bad permissions
root@10.0.0.102's password:


[ 10.0.0.10/16 ] [ /dev/pts/14 ] [blog/servers/ansible]
→ chmod 600 ~/.ssh/test.pkey

[ 10.0.0.10/16 ] [ /dev/pts/14 ] [blog/servers/ansible]
→ ssh root@10.0.0.102 -i ~/.ssh/test.pkey
Linux test 5.4.106-1-pve #1 SMP PVE 5.4.106-1 (Fri, 19 Mar 2021 11:08:47 +0100) x86_64

The programs included with the Debian GNU/Linux system are free software;
the exact distribution terms for each program are described in the
individual files in /usr/share/doc/*/copyright.

Debian GNU/Linux comes with ABSOLUTELY NO WARRANTY, to the extent
permitted by applicable law.
Last login: Tue Apr  6 16:01:04 2021 from 10.0.0.10
root@test:~#
We saved the private key in our client's ~/.ssh folder, we gave it the 600 permissions with chmod, and in the end we have been able to ssh into the server as the root user using that private key, and we didn't get prompted for a password, this is ideal for ansible to work best, but you can settle for the basic password-based authentication and ansible should work fine that way aswell.
We're going to follow this network graph:
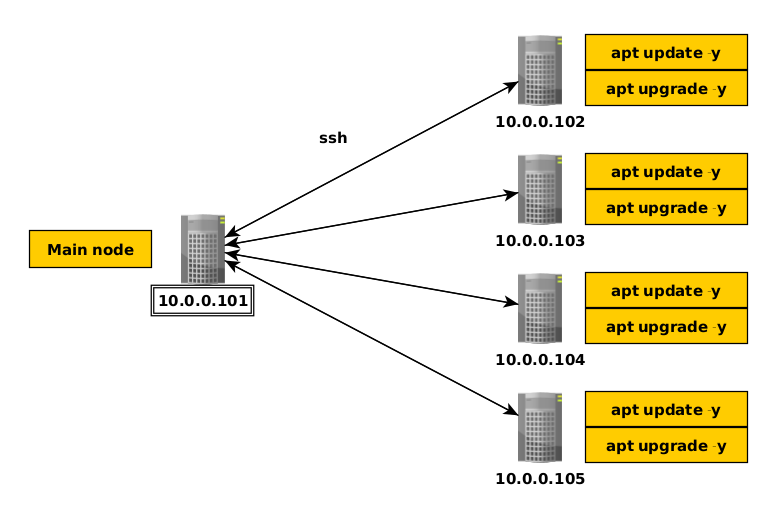
Now we have our main node at 10.0.0.101, and we want each of our other nodes to be ran a specific command. normally what you would do is to login via ssh into each node one by one to run your set of specific commands one after the other. This is fine if you have 5 or less nodes, but when you end up with 20 or 50 linux nodes it starts to get tedious running these commands one after the other. This is why ansible. All you need is ssh access to your linux cluster to be able to run those commands via ssh for each of them in one go thanks to ansible. Let's setup ansible on our main node:
[ 10.0.0.10/16 ] [ /dev/pts/10 ] [~]
→ ssh root@10.0.0.101
root@10.0.0.101's password:
Linux home 4.19.0-13-amd64 #1 SMP Debian 4.19.160-2 (2020-11-28) x86_64

The programs included with the Debian GNU/Linux system are free software;
the exact distribution terms for each program are described in the
individual files in /usr/share/doc/*/copyright.

Debian GNU/Linux comes with ABSOLUTELY NO WARRANTY, to the extent
permitted by applicable law.
Last login: Tue Apr  6 18:31:43 2021 from 10.0.0.10
root@home:~# apt install ansible -y
ansible is there by default in debian10's repositories, next we're going to need to set it up. The first config file we need to edit is /etc/ansible/hosts:
root@home:~# vim /etc/ansible/hosts
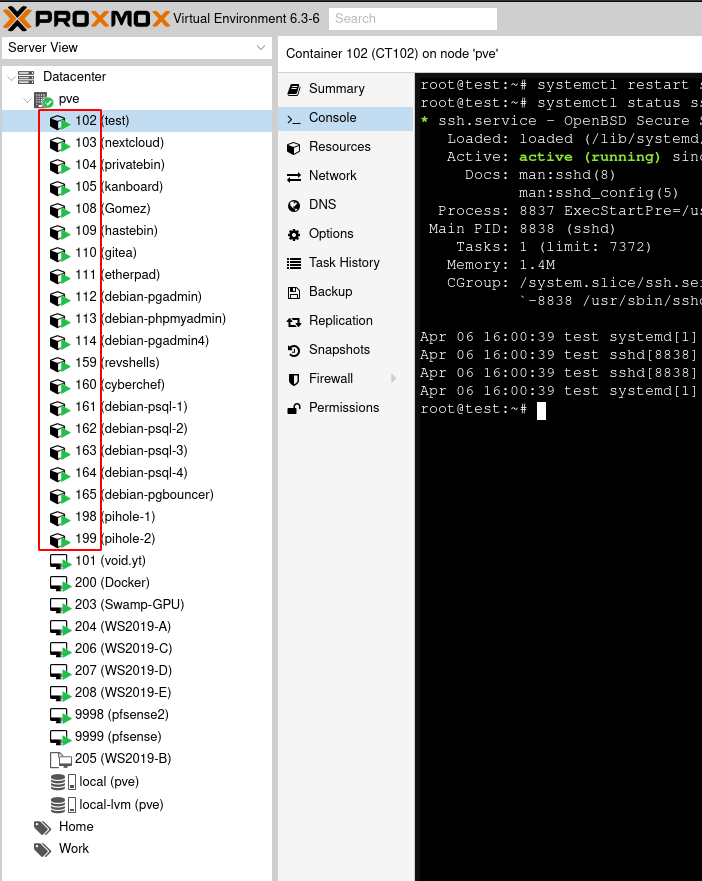
In here we're going to list the ips or hostnames of our other nodes, for this tutorial i'm going to include every LXC container in my proxmox server:
# Ex 3: A collection of database servers in the 'dbservers' group

#[dbservers]
#
#db01.intranet.mydomain.net
#db02.intranet.mydomain.net
#10.25.1.56
#10.25.1.57

# Here's another example of host ranges, this time there are no
# leading 0s:

#db-[99:101]-node.example.com
10.0.0.102
10.0.0.103
10.0.0.104
10.0.0.105
10.0.0.108
10.0.0.109
10.0.0.110
10.0.0.111
10.0.0.112
10.0.0.113
10.0.0.114
10.0.0.159
10.0.0.160
10.0.0.161
10.0.0.162
10.0.0.164
10.0.0.165
10.0.0.198
10.0.0.199
In here i listed the ip addresses of my other nodes i know i can access via SSH, hit :wq to save and quit out of vim. Next step is to test if each of these ips are reachable.
root@home:~# ansible all -a "/bin/echo hello" -K --ask-pass
SSH password:
SUDO password[defaults to SSH password]:
10.0.0.103 | FAILED | rc=-1 >>
to use the 'ssh' connection type with passwords, you must install the sshpass program

10.0.0.102 | FAILED | rc=-1 >>
to use the 'ssh' connection type with passwords, you must install the sshpass program

10.0.0.104 | FAILED | rc=-1 >>
to use the 'ssh' connection type with passwords, you must install the sshpass program

10.0.0.105 | FAILED | rc=-1 >>
to use the 'ssh' connection type with passwords, you must install the sshpass program

10.0.0.108 | FAILED | rc=-1 >>
to use the 'ssh' connection type with passwords, you must install the sshpass program

10.0.0.109 | FAILED | rc=-1 >>
to use the 'ssh' connection type with passwords, you must install the sshpass program

10.0.0.110 | FAILED | rc=-1 >>
to use the 'ssh' connection type with passwords, you must install the sshpass program

10.0.0.111 | FAILED | rc=-1 >>
to use the 'ssh' connection type with passwords, you must install the sshpass program

10.0.0.112 | FAILED | rc=-1 >>
to use the 'ssh' connection type with passwords, you must install the sshpass program

10.0.0.113 | FAILED | rc=-1 >>
to use the 'ssh' connection type with passwords, you must install the sshpass program

10.0.0.114 | FAILED | rc=-1 >>
to use the 'ssh' connection type with passwords, you must install the sshpass program

10.0.0.160 | FAILED | rc=-1 >>
to use the 'ssh' connection type with passwords, you must install the sshpass program

10.0.0.159 | FAILED | rc=-1 >>
to use the 'ssh' connection type with passwords, you must install the sshpass program

10.0.0.161 | FAILED | rc=-1 >>
to use the 'ssh' connection type with passwords, you must install the sshpass program

10.0.0.162 | FAILED | rc=-1 >>
to use the 'ssh' connection type with passwords, you must install the sshpass program

10.0.0.164 | FAILED | rc=-1 >>
to use the 'ssh' connection type with passwords, you must install the sshpass program

10.0.0.165 | FAILED | rc=-1 >>
to use the 'ssh' connection type with passwords, you must install the sshpass program

10.0.0.198 | FAILED | rc=-1 >>
to use the 'ssh' connection type with passwords, you must install the sshpass program

10.0.0.199 | FAILED | rc=-1 >>
to use the 'ssh' connection type with passwords, you must install the sshpass program
We forgot to install sshpass, so let's do it again:
root@home:~# apt install sshpass -y

root@home:~# ansible all -a "/bin/echo hello" -K --ask-pass
SSH password:
SUDO password[defaults to SSH password]:
10.0.0.102 | CHANGED | rc=0 >>
hello

10.0.0.103 | CHANGED | rc=0 >>
hello

10.0.0.105 | UNREACHABLE! => {
    "changed": false,
    "msg": "Invalid/incorrect password: Permission denied, please try again.",
    "unreachable": true
}
10.0.0.104 | UNREACHABLE! => {
    "changed": false,
    "msg": "Invalid/incorrect password: Permission denied, please try again.",
    "unreachable": true
}
10.0.0.108 | UNREACHABLE! => {
    "changed": false,
    "msg": "Invalid/incorrect password: Permission denied, please try again.",
    "unreachable": true
}
10.0.0.109 | UNREACHABLE! => {
    "changed": false,
    "msg": "Invalid/incorrect password: Permission denied, please try again.",
    "unreachable": true
}
10.0.0.110 | UNREACHABLE! => {
    "changed": false,
    "msg": "Invalid/incorrect password: Permission denied, please try again.",
    "unreachable": true
}
10.0.0.111 | UNREACHABLE! => {
    "changed": false,
    "msg": "Invalid/incorrect password: Permission denied, please try again.",
    "unreachable": true
}
10.0.0.112 | CHANGED | rc=0 >>
hello

10.0.0.113 | CHANGED | rc=0 >>
hello

10.0.0.114 | CHANGED | rc=0 >>
hello

10.0.0.161 | CHANGED | rc=0 >>
hello

10.0.0.162 | CHANGED | rc=0 >>
hello

10.0.0.164 | CHANGED | rc=0 >>
hello

10.0.0.165 | CHANGED | rc=0 >>
hello

10.0.0.159 | UNREACHABLE! => {
    "changed": false,
    "msg": "Invalid/incorrect password: Permission denied, please try again.",
    "unreachable": true
}
10.0.0.160 | UNREACHABLE! => {
    "changed": false,
    "msg": "Invalid/incorrect password: Permission denied, please try again.",
    "unreachable": true
}
10.0.0.198 | UNREACHABLE! => {
    "changed": false,
    "msg": "Failed to connect to the host via ssh: ssh: connect to host 10.0.0.198 port 22: No route to host",
    "unreachable": true
}
10.0.0.199 | UNREACHABLE! => {
    "changed": false,
    "msg": "Failed to connect to the host via ssh: ssh: connect to host 10.0.0.199 port 22: No route to host",
    "unreachable": true
}
And here we see that there are some nodes i forgot to setup to have root access. But we managed to make ansible run a simple hello command on the ones that had ssh activated on them! Before hitting the next part of this tutorial, i'm going to setup key-based authentication on all of my nodes and then configure ssh to use them automatically. The idea here is that my main node 10.0.0.101 is in fact the client, and all of the other nodes will be accessed by the main node with their respective private ssh key which will be stored on the main node, therefore the main node has to collect them all.
root@home:~# cd ~/.ssh
root@home:~/.ssh# ls -lash
total 16K
4.0K drwx------ 2 root root 4.0K Oct 29 21:40 .
4.0K drwx------ 7 root root 4.0K Apr  6 18:52 ..
8.0K -rw-r--r-- 1 root root 4.2K Apr  6 18:40 known_hosts
As i've already explained how to setup SSH with key based authentication, we can now use a script to automate that:
[ 10.0.0.10/16 ] [ /dev/pts/12 ] [blog/servers/ansible]
→ curl https://raw.githubusercontent.com/ech1/serverside/master/ssh/ssh.sh
#!/bin/bash
if [ "$EUID" -ne 0 ]
then
        echo 'MUST RUN AS ROOT!'
        exit
fi

apt update -y
apt install openssh-server rsync -y
systemctl status ssh
cd /etc/ssh
rm sshd_config
wget https://raw.githubusercontent.com/ech1/serverside/master/ssh/sshd_config
systemctl restart ssh

#WE ARE ON THE SERVER !!!
#So we generate the public ssh key
mkdir ~/.ssh/
cd ~/.ssh/
ssh-keygen -t ed25519
cat id_ed25519.pub >> authorized_keys

#ssh server has the public key
#we give the private key to the user somehow
#the user puts id_ed25519 into his own ~/.ssh/
#and he does "chmod 600 ~/.ssh/id_ed25519"
#and only after he can login

systemctl status ssh
Let's use that script on each node one by one starting with my test node (10.0.0.102):
root@test:~# wget https://raw.githubusercontent.com/ech1/serverside/master/ssh/ssh.sh
--2021-04-06 17:05:16--  https://raw.githubusercontent.com/ech1/serverside/master/ssh/ssh.sh
Resolving raw.githubusercontent.com (raw.githubusercontent.com)... 185.199.111.133, 185.199.108.133, 185.199.109.133, ...
Connecting to raw.githubusercontent.com (raw.githubusercontent.com)|185.199.111.133|:443... connected.
HTTP request sent, awaiting response... 200 OK
Length: 652 [text/plain]
Saving to: 'ssh.sh'

ssh.sh                                         100%[==================================================================================================>]     652  --.-KB/s    in 0s

2021-04-06 17:05:16 (12.0 MB/s) - 'ssh.sh' saved [652/652]

root@test:~# chmod +X ssh.sh
root@test:~# chmod +x ssh.sh
root@test:~# ./ssh.sh
Hit:1 http://security.debian.org buster/updates InRelease
Hit:2 http://ftp.debian.org/debian buster InRelease
Hit:3 http://ftp.debian.org/debian buster-updates InRelease
Reading package lists... Done
Building dependency tree
Reading state information... Done
All packages are up to date.
Reading package lists... Done
Building dependency tree
Reading state information... Done
openssh-server is already the newest version (1:7.9p1-10+deb10u2).
rsync is already the newest version (3.1.3-6).
0 upgraded, 0 newly installed, 0 to remove and 0 not upgraded.
* ssh.service - OpenBSD Secure Shell server
   Loaded: loaded (/lib/systemd/system/ssh.service; enabled; vendor preset: enabled)
   Active: active (running) since Tue 2021-04-06 17:04:07 UTC; 1min 26s ago
     Docs: man:sshd(8)
           man:sshd_config(5)
  Process: 9646 ExecStartPre=/usr/sbin/sshd -t (code=exited, status=0/SUCCESS)
 Main PID: 9647 (sshd)
    Tasks: 1 (limit: 7372)
   Memory: 1.2M
   CGroup: /system.slice/ssh.service
           `-9647 /usr/sbin/sshd -D

Apr 06 17:04:07 test systemd[1]: Starting OpenBSD Secure Shell server...
Apr 06 17:04:07 test sshd[9647]: Server listening on 0.0.0.0 port 22.
Apr 06 17:04:07 test sshd[9647]: Server listening on :: port 22.
Apr 06 17:04:07 test systemd[1]: Started OpenBSD Secure Shell server.
--2021-04-06 17:05:34--  https://raw.githubusercontent.com/ech1/serverside/master/ssh/sshd_config
Resolving raw.githubusercontent.com (raw.githubusercontent.com)... 185.199.109.133, 185.199.110.133, 185.199.111.133, ...
Connecting to raw.githubusercontent.com (raw.githubusercontent.com)|185.199.109.133|:443... connected.
HTTP request sent, awaiting response... 200 OK
Length: 3307 (3.2K) [text/plain]
Saving to: 'sshd_config'

sshd_config                                    100%[==================================================================================================>]   3.23K  --.-KB/s    in 0s

2021-04-06 17:05:34 (13.2 MB/s) - 'sshd_config' saved [3307/3307]

Generating public/private ed25519 key pair.
Enter file in which to save the key (/root/.ssh/id_ed25519):
Enter passphrase (empty for no passphrase):
Enter same passphrase again:
Your identification has been saved in /root/.ssh/id_ed25519.
Your public key has been saved in /root/.ssh/id_ed25519.pub.
The key fingerprint is:
SHA256:qZBD/lo/RULWgbmOS+gajCCtcmnACP24FHKd3RL4C3w root@test
The key's randomart image is:
+--[ED25519 256]--+
|     ..  +..     |
| . ..o o= .      |
|o +.+.oo..       |
|++ *o.E.o..      |
|=.+ *+ +So       |
|o* o.++.. .      |
|+ B. .+. .       |
|.o ..o...        |
|  ...   ..       |
+----[SHA256]-----+
* ssh.service - OpenBSD Secure Shell server
   Loaded: loaded (/lib/systemd/system/ssh.service; enabled; vendor preset: enabled)
   Active: active (running) since Tue 2021-04-06 17:05:34 UTC; 2s ago
     Docs: man:sshd(8)
           man:sshd_config(5)
  Process: 9912 ExecStartPre=/usr/sbin/sshd -t (code=exited, status=0/SUCCESS)
 Main PID: 9913 (sshd)
    Tasks: 1 (limit: 7372)
   Memory: 1.2M
   CGroup: /system.slice/ssh.service
           `-9913 /usr/sbin/sshd -D

Apr 06 17:05:34 test systemd[1]: Starting OpenBSD Secure Shell server...
Apr 06 17:05:34 test sshd[9913]: Server listening on 0.0.0.0 port 22.
Apr 06 17:05:34 test sshd[9913]: Server listening on :: port 22.
Apr 06 17:05:34 test systemd[1]: Started OpenBSD Secure Shell server.
once it finished running, check the ~/.ssh directory:
root@test:~# ls -lash ~/.ssh/
total 20K
4.0K drwxr-xr-x 2 root root 4.0K Apr  6 17:05 .
4.0K drwx------ 4 root root 4.0K Apr  6 17:05 ..
4.0K -rw-r--r-- 1 root root   91 Apr  6 17:05 authorized_keys
4.0K -rw------- 1 root root  399 Apr  6 17:05 id_ed25519
4.0K -rw-r--r-- 1 root root   91 Apr  6 17:05 id_ed25519.pub
And what we want from here is the id_ed25519 file which is our test node's private key.
root@test:~# ip a | grep inet
    inet 127.0.0.1/8 scope host lo
    inet6 ::1/128 scope host
    inet 10.0.0.102/16 brd 10.0.255.255 scope global eth0
    inet6 fe80::b847:2bff:fe85:4dd3/64 scope link
root@test:~# python3 -m http.server 8080
and retrieve the ssh key on the main node:
root@home:~# wget 10.0.0.102:8080/.ssh/id_ed25519 -O ~/.ssh/test.pkey
--2021-04-06 19:08:33--  http://10.0.0.102:8080/.ssh/id_ed25519
Connecting to 10.0.0.102:8080... connected.
HTTP request sent, awaiting response... 200 OK
Length: 399 [application/octet-stream]
Saving to: ‘/root/.ssh/test.pkey’

/root/.ssh/test.pkey     100%[===============================>]     399  --.-KB/s    in 0s

2021-04-06 19:08:33 (22.0 MB/s) - ‘/root/.ssh/test.pkey’ saved [399/399]
Easy! Now after doing the same on the other nodes we end up with the following:
root@home:~/.ssh# ls -l
total 84
-rw------- 1 root root  411 Apr  6 20:07 cyber-160.pkey
-rw------- 1 root root  399 Apr  6 20:16 dns198.pkey
-rw------- 1 root root  399 Apr  6 20:16 dns199.pkey
-rw------- 1 root root  399 Apr  6 19:58 etherpad-111.pkey
-rw------- 1 root root  399 Apr  6 19:56 gitea-110.pkey
-rw------- 1 root root  399 Apr  6 19:54 hastebin-109.pkey
-rw------- 1 root root  399 Apr  6 19:52 kanboard-105.pkey
-rw-r--r-- 1 root root 4662 Apr  6 20:17 known_hosts
-rw------- 1 root root  411 Oct 11 12:29 nextcloud-103.pkey
-rw------- 1 root root  411 Apr  6 19:59 pgadmin-112.pkey
-rw------- 1 root root  411 Apr  6 20:02 pgadmin4-114.pkey
-rw------- 1 root root  411 Apr  6 20:13 pgbouncer-165.pkey
-rw------- 1 root root  419 Apr  6 20:01 phpmyadmin-113.pkey
-rw------- 1 root root  411 Apr  6 19:50 privatebin-104.pkey
-rw------- 1 root root  411 Apr  6 20:10 psql1-161.pkey
-rw------- 1 root root  411 Apr  6 20:10 psql1-162.pkey
-rw------- 1 root root  411 Apr  6 20:10 psql1-163.pkey
-rw------- 1 root root  411 Apr  6 20:10 psql1-164.pkey
-rw------- 1 root root  411 Apr  6 20:05 rev-159.pkey
-rw------- 1 root root  399 Apr  6 19:18 test-102.pkey
Basically i have a bunch of private ssh keys and i want my ssh client to automatically associate them with their corresponding IPs to make sure that this is an automatic connection
root@home:~/.ssh# vim ~/.ssh/config
Host nextcloud
        Hostname 10.0.0.103
        IdentityFile ~/.ssh/nextcloud-103.pkey
        User root

Host privatebin
        Hostname 10.0.0.104
        IdentityFile ~/.ssh/privatebin-104.pkey
        User root

Host kanboard
        Hostname 10.0.0.105
        IdentityFile ~/.ssh/kanboard-105.pkey
        User root

Host hastebin
        Hostname 10.0.0.109
        IdentityFile ~/.ssh/hastebin-109.pkey
        User root

Host gitea
        Hostname 10.0.0.110
        IdentityFile ~/.ssh/gitea-110.pkey
        User root

Host etherpad
        Hostname 10.0.0.111
        IdentityFile ~/.ssh/etherpad-111.pkey
        User root

Host pgadmin
        Hostname 10.0.0.112
        IdentityFile ~/.ssh/pgadmin-112.pkey
        User root

Host phpmyadmin
        Hostname 10.0.0.113
        IdentityFile ~/.ssh/phpmyadmin-113.pkey
        User root

Host pgadmin4
        Hostname 10.0.0.114
        IdentityFile ~/.ssh/pgadmin4-114.pkey
        User root
Host revshells
        Hostname 10.0.0.159
        IdentityFile ~/.ssh/rev-159.pkey
        User root
Host cyberchef
        Hostname 10.0.0.160
        IdentityFile ~/.ssh/cyber-160.pkey
        User root
Each of the hosts defined in here can be re-used in ansible's config file:
root@home:~# cat ~/.ssh/config | grep 'Host\ '
Host nextcloud
Host privatebin
Host kanboard
Host hastebin
Host gitea
Host etherpad
Host pgadmin
Host phpmyadmin
Host pgadmin4
Host revshells
Host cyberchef
Host psql1
Host psql2
Host psql3
Host psql4
Host pgbouncer
Host pihole1
Host pihole2

root@home:~/.ssh# vim /etc/ansible/hosts

root@home:~/.ssh# cat /etc/ansible/hosts | tail -n20

nextcloud
privatebin
kanboard
hastebin
gitea
etherpad
pgadmin
phpmyadmin
pgadmin4
revshells
cyberchef
psql1
psql2
psql3
psql4
pgbouncer
pihole1
pihole2
Once added run ansible to test the changes:
root@home:~/.ssh# ansible all -a "/bin/echo hello"
gitea | CHANGED | rc=0 >>
hello

hastebin | CHANGED | rc=0 >>
hello

nextcloud | CHANGED | rc=0 >>
hello

privatebin | CHANGED | rc=0 >>
hello

kanboard | CHANGED | rc=0 >>
hello

pgadmin | CHANGED | rc=0 >>
hello

phpmyadmin | CHANGED | rc=0 >>
hello

etherpad | CHANGED | rc=0 >>
hello

pgadmin4 | CHANGED | rc=0 >>
hello

revshells | CHANGED | rc=0 >>
hello

cyberchef | CHANGED | rc=0 >>
hello

psql2 | CHANGED | rc=0 >>
hello

psql4 | CHANGED | rc=0 >>
hello

psql1 | CHANGED | rc=0 >>
hello

psql3 | CHANGED | rc=0 >>
hello

pgbouncer | CHANGED | rc=0 >>
hello

pihole1 | CHANGED | rc=0 >>
hello

pihole2 | CHANGED | rc=0 >>
hello
Another way of testing it is by using the ping module:
root@home:~/.ssh# ansible all -m ping
kanboard | SUCCESS => {
    "changed": false,
    "ping": "pong"
}
nextcloud | SUCCESS => {
    "changed": false,
    "ping": "pong"
}
gitea | SUCCESS => {
    "changed": false,
    "ping": "pong"
}
hastebin | SUCCESS => {
    "changed": false,
    "ping": "pong"
}
privatebin | SUCCESS => {
    "changed": false,
    "ping": "pong"
}
pgadmin | SUCCESS => {
    "changed": false,
    "ping": "pong"
}
phpmyadmin | SUCCESS => {
    "changed": false,
    "ping": "pong"
}
pgadmin4 | SUCCESS => {
    "changed": false,
    "ping": "pong"
}

[...]
That's the correct way of using ansible.To summarize, you first setup key-based authentication ssh connections on all hosts (you can run a script to do that), then you retrieve the private ssh keys to the master node, and create the ~/.ssh/config file to associate the private keys with their corresponding ips which gives you SSH Host aliases (private key + ip pairs) to give to ansible via /etc/ansible/hosts and from there, ansible is going to run what you want on the hosts without requiring a password.
root@home:~# mkdir playbooks
root@home:~# cd playbooks/
root@home:~/playbooks# vim update.yml
Be careful when you do .yml files, you need to watch out for indentations, just like for python programs.
root@home:~/playbooks# vim update.yml
---
        - name: Playbook
          hosts: all
          become: yes
          tasks:
                - name: Update and upgrade apt packages
                  become: true
                  apt:
                        upgrade: yes
                        update_cache: yes
                        cache_valid_time: 86400 #One day
ansible has an apt module to run apt updates, the 'become' line means that we want to run our commands as the root user (become root = yes)
:wq to save and quit out of vim, and then run the playbook like so:
root@home:~/playbooks# ansible-playbook update.yml

PLAY [Playbook] ***********************************************************************************************************************************************

TASK [Gathering Facts] ****************************************************************************************************************************************
ok: [hastebin]
ok: [kanboard]
ok: [privatebin]
ok: [gitea]
ok: [nextcloud]
ok: [etherpad]
ok: [phpmyadmin]
ok: [revshells]
ok: [pgadmin]
ok: [pgadmin4]
ok: [cyberchef]
ok: [psql2]
ok: [psql3]
ok: [psql4]
ok: [psql1]
ok: [pgbouncer]
ok: [pihole1]
ok: [pihole2]

TASK [Update and upgrade apt packages] ************************************************************************************************************************
At this point it's going to take a bit of time to effectively run on all hosts, but when it finishes it looks like that:
TASK [Update and upgrade apt packages] ************************************************************************************************************************
 [WARNING]: Could not find aptitude. Using apt-get instead.

changed: [hastebin]
changed: [gitea]
ok: [pgadmin]
changed: [etherpad]
ok: [pgadmin4]
changed: [phpmyadmin]
changed: [kanboard]
changed: [nextcloud]
changed: [privatebin]
ok: [psql2]
ok: [psql1]
ok: [psql3]
ok: [psql4]
ok: [pgbouncer]
changed: [revshells]
changed: [cyberchef]
changed: [pihole1]
changed: [pihole2]

PLAY RECAP ****************************************************************************************************************************************************
cyberchef                  : ok=2    changed=1    unreachable=0    failed=0
etherpad                   : ok=2    changed=1    unreachable=0    failed=0
gitea                      : ok=2    changed=1    unreachable=0    failed=0
hastebin                   : ok=2    changed=1    unreachable=0    failed=0
kanboard                   : ok=2    changed=1    unreachable=0    failed=0
nextcloud                  : ok=2    changed=1    unreachable=0    failed=0
pgadmin                    : ok=2    changed=0    unreachable=0    failed=0
pgadmin4                   : ok=2    changed=0    unreachable=0    failed=0
pgbouncer                  : ok=2    changed=0    unreachable=0    failed=0
phpmyadmin                 : ok=2    changed=1    unreachable=0    failed=0
pihole1                    : ok=2    changed=1    unreachable=0    failed=0
pihole2                    : ok=2    changed=1    unreachable=0    failed=0
privatebin                 : ok=2    changed=1    unreachable=0    failed=0
psql1                      : ok=2    changed=0    unreachable=0    failed=0
psql2                      : ok=2    changed=0    unreachable=0    failed=0
psql3                      : ok=2    changed=0    unreachable=0    failed=0
psql4                      : ok=2    changed=0    unreachable=0    failed=0
revshells                  : ok=2    changed=1    unreachable=0    failed=0

root@home:~/playbooks#
So from that we see that i had to run apt update and apt upgrade on 11 of my LXC containers. If we run the same playbook again we see that it shouldn't need to change anything:
root@home:~/playbooks# ansible-playbook update.yml

PLAY [Playbook] ***********************************************************************************************************************************************

TASK [Gathering Facts] ****************************************************************************************************************************************
ok: [hastebin]
ok: [gitea]
ok: [privatebin]
ok: [nextcloud]
ok: [kanboard]
ok: [phpmyadmin]
ok: [pgadmin]
ok: [revshells]
ok: [pgadmin4]
ok: [etherpad]
ok: [cyberchef]
ok: [psql2]
ok: [psql4]
ok: [psql1]
ok: [psql3]
ok: [pgbouncer]
ok: [pihole1]
ok: [pihole2]

TASK [Update and upgrade apt packages] ************************************************************************************************************************
 [WARNING]: Could not find aptitude. Using apt-get instead.

ok: [gitea]
ok: [nextcloud]
ok: [privatebin]
ok: [kanboard]
ok: [hastebin]
ok: [phpmyadmin]
ok: [pgadmin]
ok: [pgadmin4]
ok: [revshells]
ok: [cyberchef]
ok: [etherpad]
ok: [psql2]
ok: [pihole1]
ok: [pgbouncer]
ok: [psql1]
ok: [psql4]
ok: [psql3]
ok: [pihole2]

PLAY RECAP ****************************************************************************************************************************************************
cyberchef                  : ok=2    changed=0    unreachable=0    failed=0
etherpad                   : ok=2    changed=0    unreachable=0    failed=0
gitea                      : ok=2    changed=0    unreachable=0    failed=0
hastebin                   : ok=2    changed=0    unreachable=0    failed=0
kanboard                   : ok=2    changed=0    unreachable=0    failed=0
nextcloud                  : ok=2    changed=0    unreachable=0    failed=0
pgadmin                    : ok=2    changed=0    unreachable=0    failed=0
pgadmin4                   : ok=2    changed=0    unreachable=0    failed=0
pgbouncer                  : ok=2    changed=0    unreachable=0    failed=0
phpmyadmin                 : ok=2    changed=0    unreachable=0    failed=0
pihole1                    : ok=2    changed=0    unreachable=0    failed=0
pihole2                    : ok=2    changed=0    unreachable=0    failed=0
privatebin                 : ok=2    changed=0    unreachable=0    failed=0
psql1                      : ok=2    changed=0    unreachable=0    failed=0
psql2                      : ok=2    changed=0    unreachable=0    failed=0
psql3                      : ok=2    changed=0    unreachable=0    failed=0
psql4                      : ok=2    changed=0    unreachable=0    failed=0
revshells                  : ok=2    changed=0    unreachable=0    failed=0

root@home:~/playbooks#
As expected, our playbook didn't need to change anything this time.For our next part, although not recommended, we can also bypass the need for playbooks:
root@home:~/playbooks# ansible all -m apt -a "upgrade=yes update_cache=yes cache_valid_time=86400" --become
 [WARNING]: Could not find aptitude. Using apt-get instead.

privatebin | SUCCESS => {
    "changed": false,
    "msg": "Reading package lists...\nBuilding dependency tree...\nReading state information...\nCalculating upgrade...\n0 upgraded, 0 newly installed, 0 to remove and 0 not upgraded.\n",
    "stderr": "",
    "stderr_lines": [],
    "stdout": "Reading package lists...\nBuilding dependency tree...\nReading state information...\nCalculating upgrade...\n0 upgraded, 0 newly installed, 0 to remove and 0 not upgraded.\n",
    "stdout_lines": [
        "Reading package lists...",
        "Building dependency tree...",
        "Reading state information...",
        "Calculating upgrade...",
        "0 upgraded, 0 newly installed, 0 to remove and 0 not upgraded."
    ]
}
gitea | SUCCESS => {
    "changed": false,
    "msg": "Reading package lists...\nBuilding dependency tree...\nReading state information...\nCalculating upgrade...\n0 upgraded, 0 newly installed, 0 to remove and 0 not upgraded.\n",
    "stderr": "",
    "stderr_lines": [],
    "stdout": "Reading package lists...\nBuilding dependency tree...\nReading state information...\nCalculating upgrade...\n0 upgraded, 0 newly installed, 0 to remove and 0 not upgraded.\n",
    "stdout_lines": [
        "Reading package lists...",
        "Building dependency tree...",
        "Reading state information...",
        "Calculating upgrade...",
        "0 upgraded, 0 newly installed, 0 to remove and 0 not upgraded."
    ]
}

[...]

root@home:~/playbooks# ansible all -m shell -a "ping -c1 1.1.1.1"
privatebin | CHANGED | rc=0 >>
PING 1.1.1.1 (1.1.1.1) 56(84) bytes of data.
64 bytes from 1.1.1.1: icmp_seq=1 ttl=57 time=21.9 ms

--- 1.1.1.1 ping statistics ---
1 packets transmitted, 1 received, 0% packet loss, time 0ms
rtt min/avg/max/mdev = 21.889/21.889/21.889/0.000 ms

hastebin | CHANGED | rc=0 >>
PING 1.1.1.1 (1.1.1.1) 56(84) bytes of data.
64 bytes from 1.1.1.1: icmp_seq=1 ttl=57 time=27.9 ms

--- 1.1.1.1 ping statistics ---
1 packets transmitted, 1 received, 0% packet loss, time 0ms
rtt min/avg/max/mdev = 27.925/27.925/27.925/0.000 ms

nextcloud | CHANGED | rc=0 >>
PING 1.1.1.1 (1.1.1.1) 56(84) bytes of data.
64 bytes from 1.1.1.1: icmp_seq=1 ttl=57 time=26.6 ms

--- 1.1.1.1 ping statistics ---
1 packets transmitted, 1 received, 0% packet loss, time 0ms
rtt min/avg/max/mdev = 26.642/26.642/26.642/0.000 ms

gitea | CHANGED | rc=0 >>
PING 1.1.1.1 (1.1.1.1) 56(84) bytes of data.
64 bytes from 1.1.1.1: icmp_seq=1 ttl=57 time=25.7 ms

--- 1.1.1.1 ping statistics ---
1 packets transmitted, 1 received, 0% packet loss, time 0ms
rtt min/avg/max/mdev = 25.708/25.708/25.708/0.000 ms

kanboard | CHANGED | rc=0 >>
PING 1.1.1.1 (1.1.1.1) 56(84) bytes of data.
64 bytes from 1.1.1.1: icmp_seq=1 ttl=57 time=22.0 ms

[...]
Like this you can run any commands you want. But ideally we want to use playbooks. Now let's make sure this ansible playbook runs daily, we're going to use crontab to do that:
root@home:~/playbooks# which ansible-playbook
/usr/bin/ansible-playbook
root@home:~/playbooks# /usr/bin/ansible-playbook /root/playbooks/update.yml

PLAY [Playbook] ***********************************************************************************************************************************************

TASK [Gathering Facts] ****************************************************************************************************************************************
ok: [hastebin]
ok: [privatebin]
ok: [gitea]
ok: [kanboard]
ok: [nextcloud]
ok: [pgadmin]
ok: [pgadmin4]
ok: [phpmyadmin]
ok: [revshells]
ok: [etherpad]
ok: [cyberchef]
ok: [psql2]
ok: [psql4]
ok: [psql1]
ok: [psql3]
ok: [pgbouncer]
ok: [pihole2]
Cron needs the absolute paths so now we know we can do it:
root@home:~/playbooks# crontab -e

0  3 * * * "/usr/bin/ansible-playbook /root/playbooks/update.yml"

:wq
Now with this, cron is going to run our playbook every night at 3 am.
Some Address 67120,
Duttlenheim, France.
This cute theme was created to showcase your work in a simple way. Use it wisely.