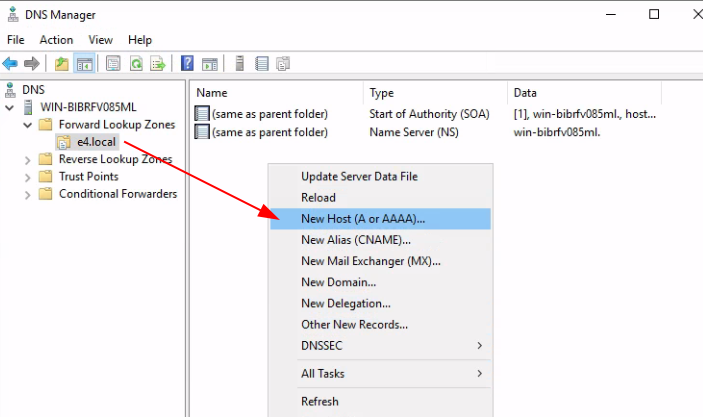
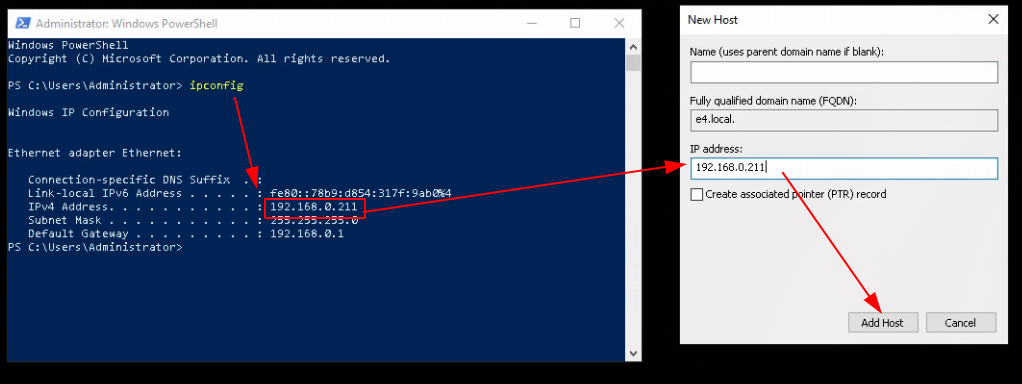
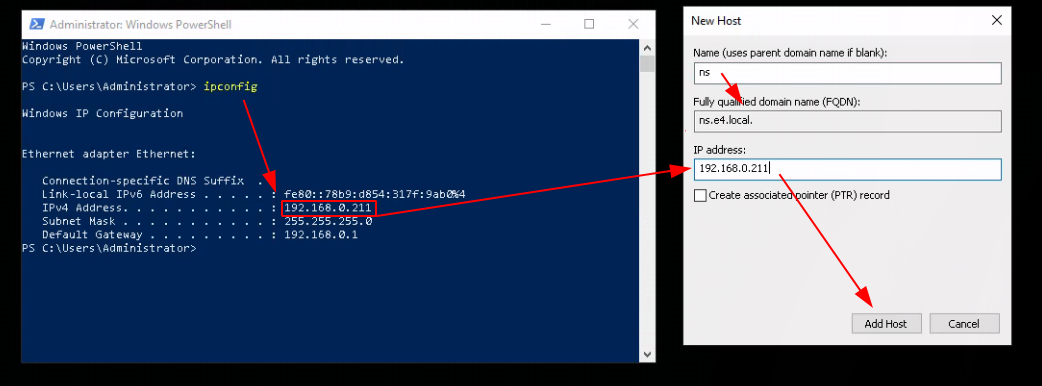
Debian10 (Observium + SNMP)
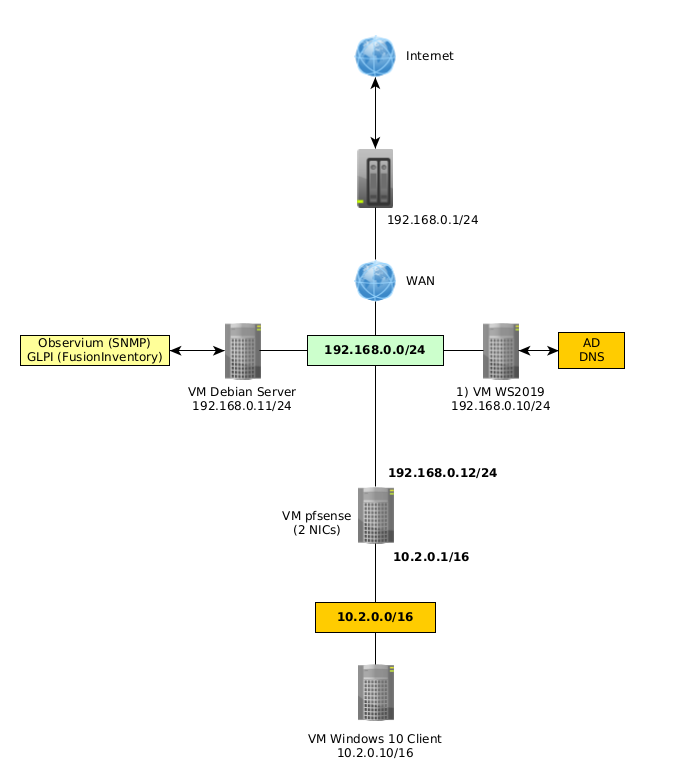
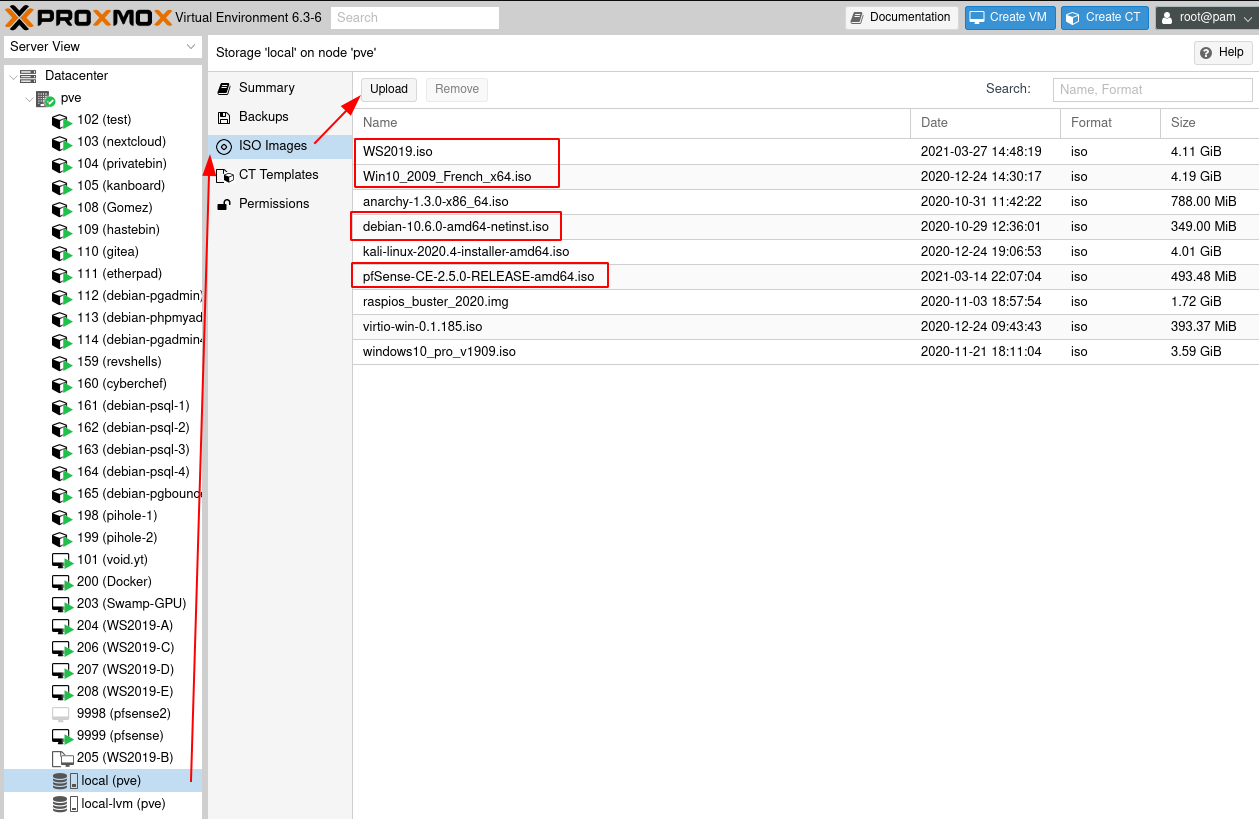
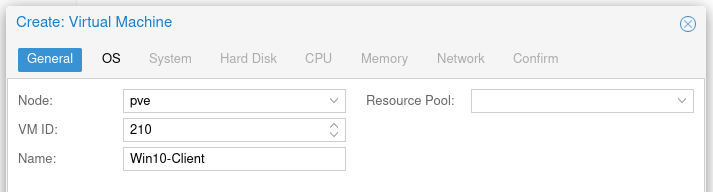
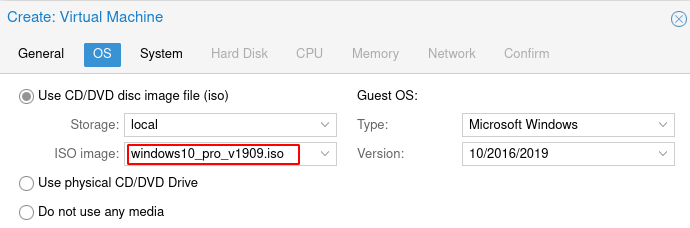
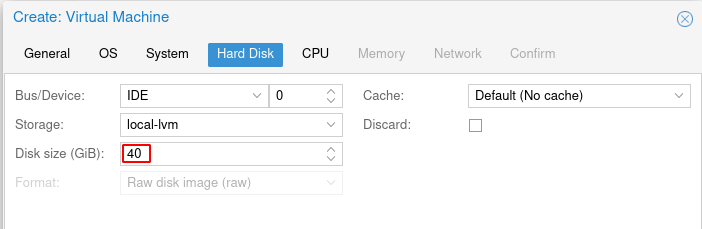
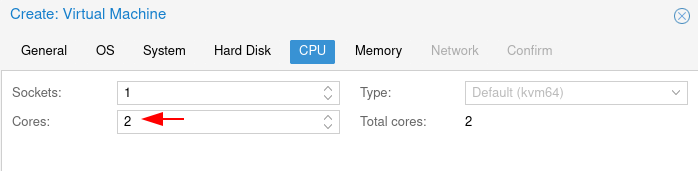
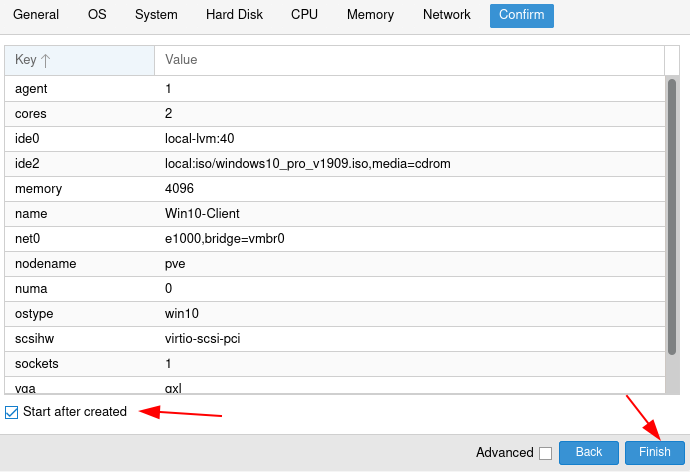
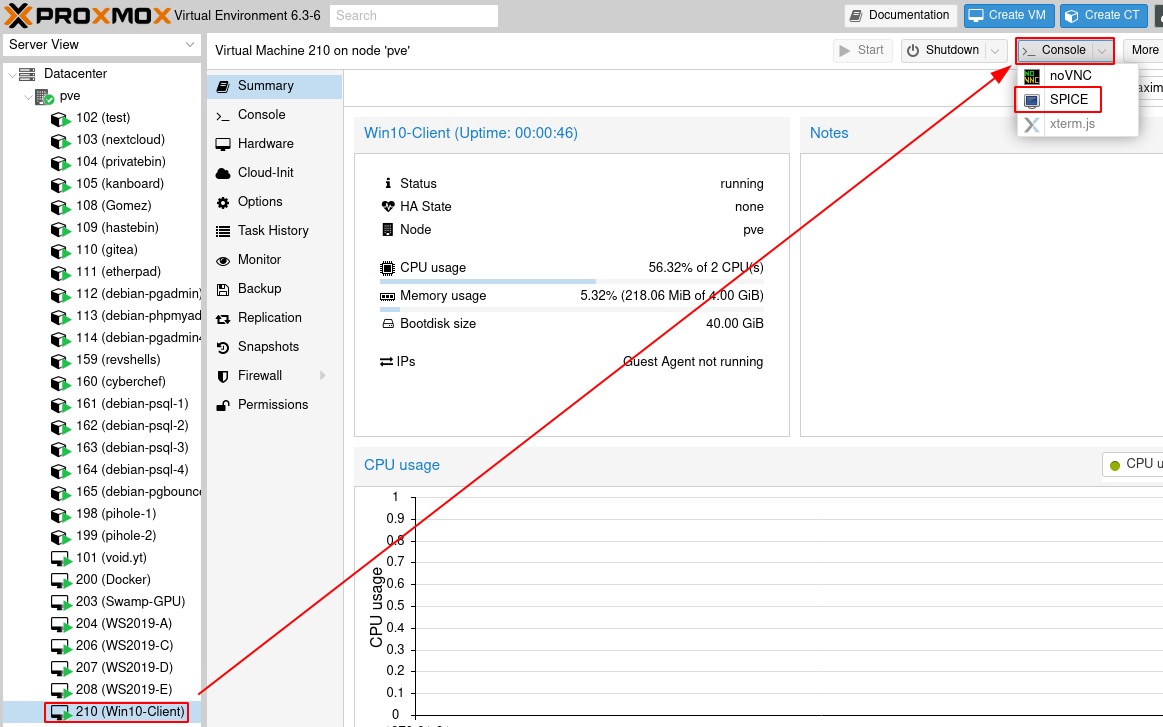
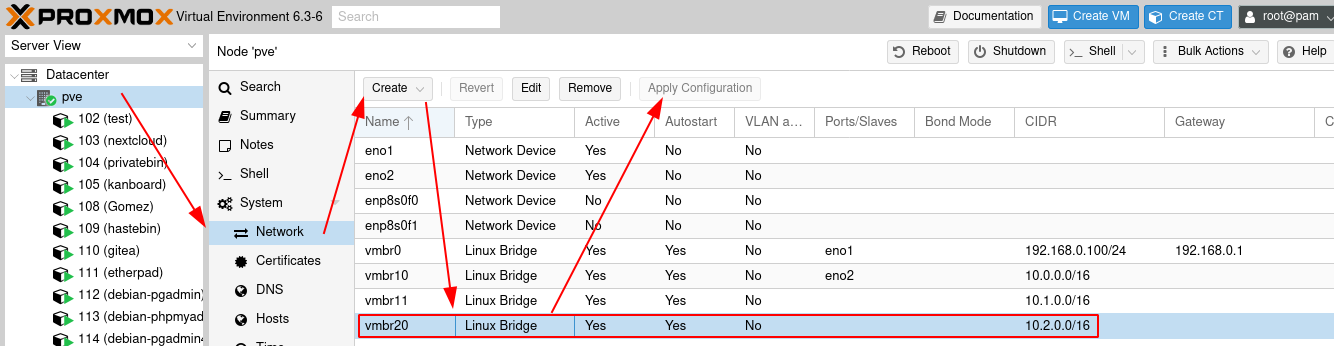
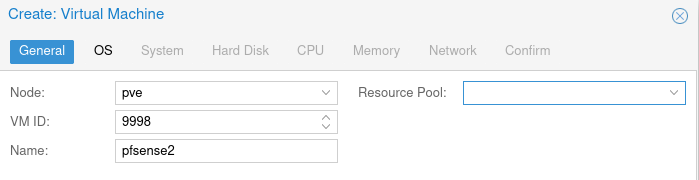
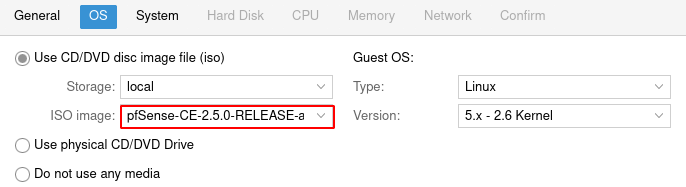
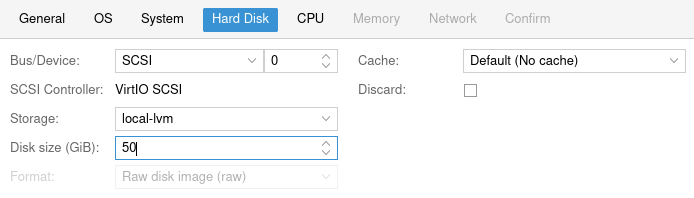
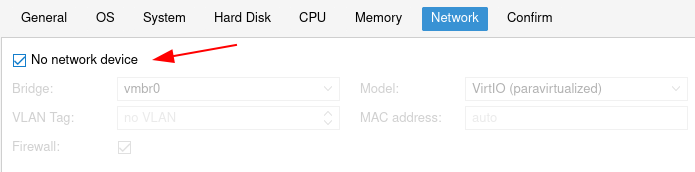
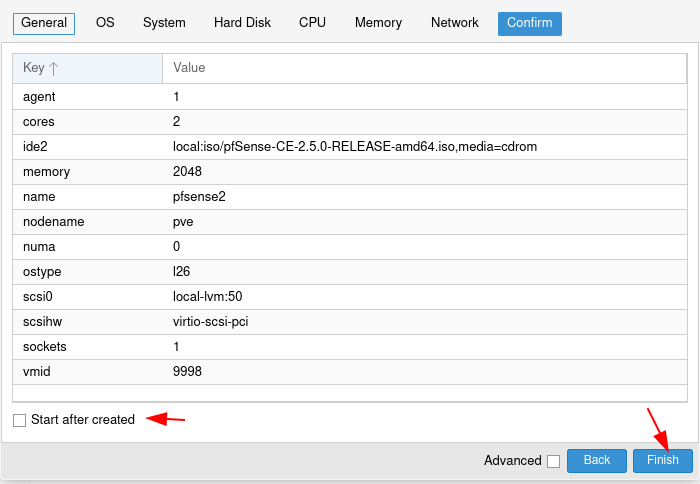
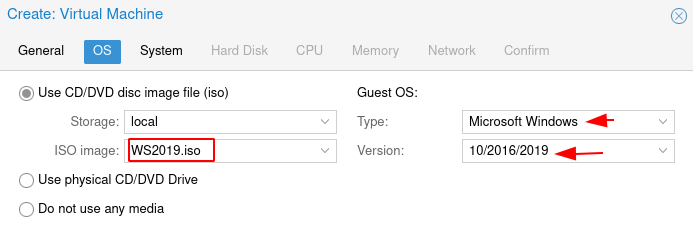
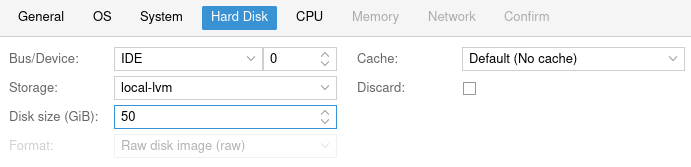
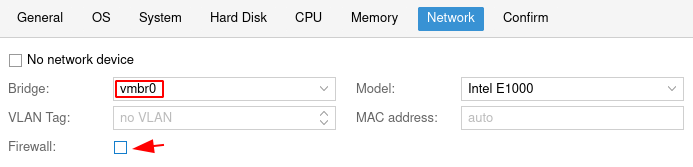
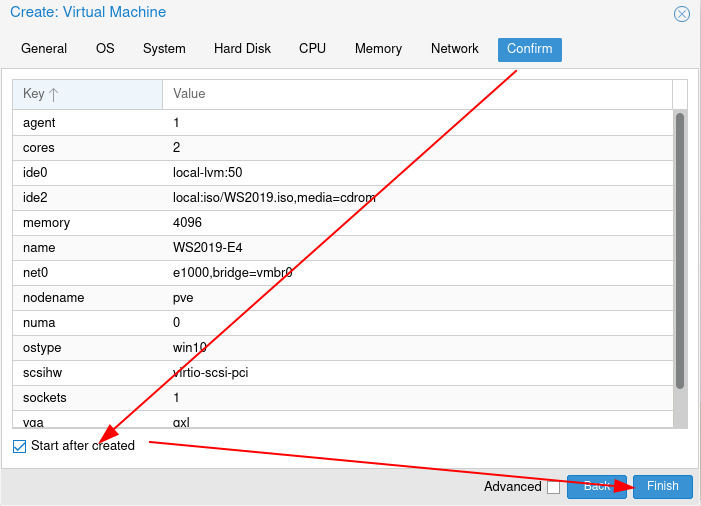
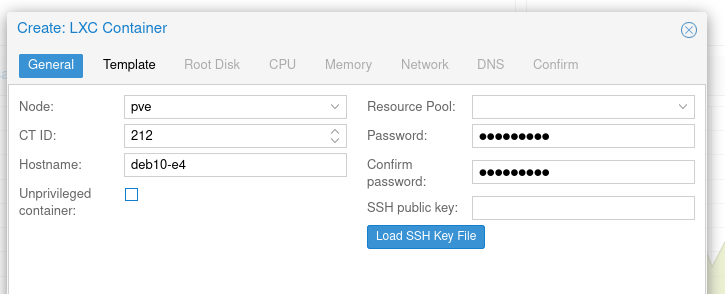
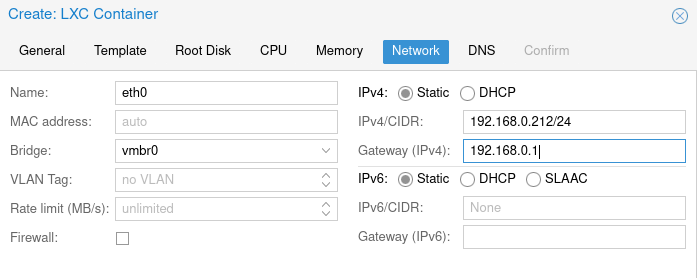
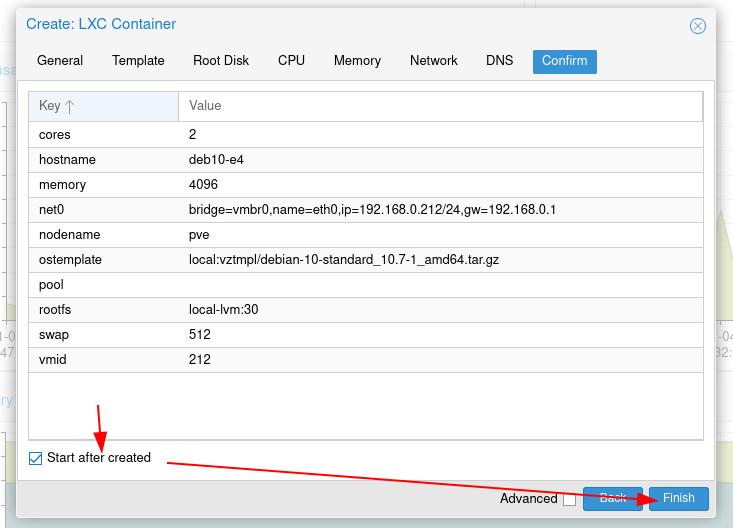
First let's create our debian10 local server at the ip adress we specified earlier, to do so we will create a LXC container from proxmox to speed up the installation process:


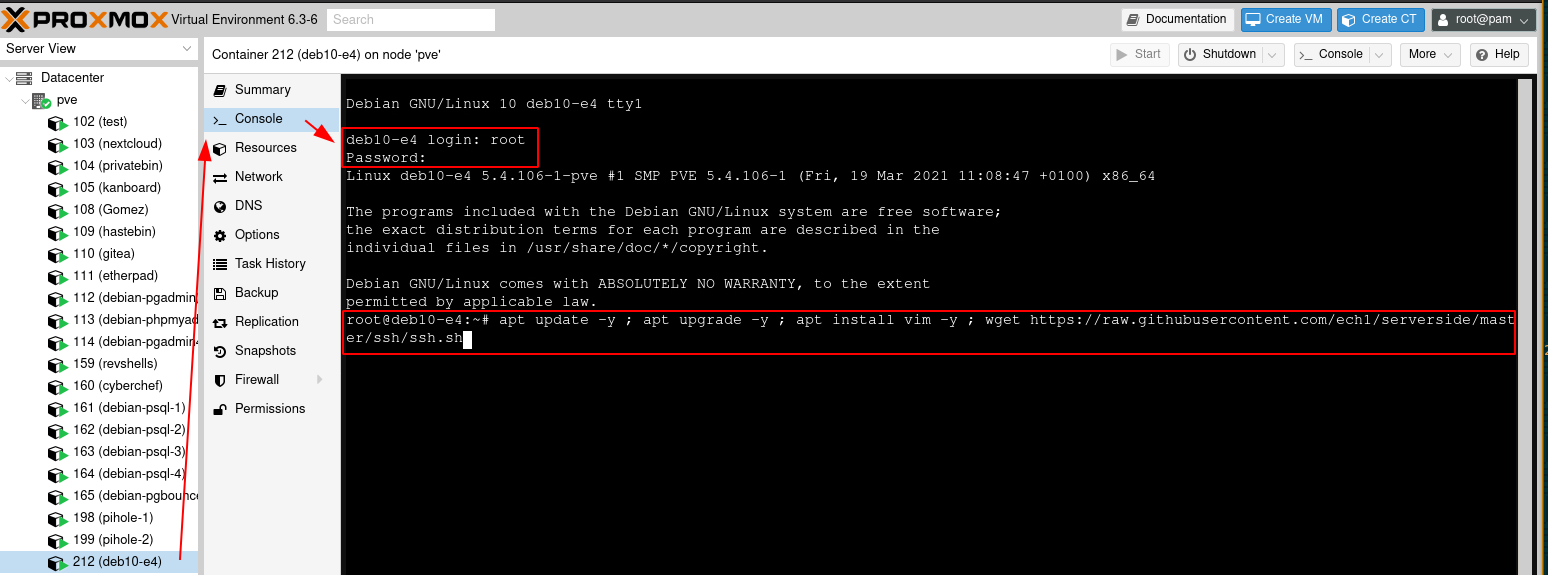
Once in the TTY, setup SSH properly with private key-based authentication:
Debian GNU/Linux 10 deb10-e4 tty1

deb10-e4 login: root
Password:
Linux deb10-e4 5.4.106-1-pve #1 SMP PVE 5.4.106-1 (Fri, 19 Mar 2021 11:08:47 +0100) x86_64

The programs included with the Debian GNU/Linux system are free software;
the exact distribution terms for each program are described in the
individual files in /usr/share/doc/*/copyright.

Debian GNU/Linux comes with ABSOLUTELY NO WARRANTY, to the extent
permitted by applicable law.

root@deb10-e4:~# apt update -y ; apt upgrade -y ; apt install vim -y ; wget https://raw.githubusercontent.com/ech1/serverside/master/ssh/ssh.sh
This will download my script to automatically setup SSH with private key authentication:
[...]

--2021-04-12 11:02:35--  https://raw.githubusercontent.com/ech1/serverside/master/ssh/ssh.sh
Resolving raw.githubusercontent.com (raw.githubusercontent.com)... 185.199.108.133, 185.199.110.133, 185.199.111.133, ...
Connecting to raw.githubusercontent.com (raw.githubusercontent.com)|185.199.108.133|:443... connected.
HTTP request sent, awaiting response... 200 OK
Length: 856 [text/plain]
Saving to: 'ssh.sh'

ssh.sh                           100%[========================================================>]     856  --.-KB/s    in 0s

2021-04-12 11:02:36 (13.7 MB/s) - 'ssh.sh' saved [856/856]

root@deb10-e4:~# chmod +x ssh.sh
root@deb10-e4:~# ./ssh.sh
Now hit enter to leave the default values for the ssh keygen:
[...]

Generating public/private ed25519 key pair.
Enter file in which to save the key (/root/.ssh/id_ed25519):
Enter passphrase (empty for no passphrase):
Enter same passphrase again:
Your identification has been saved in /root/.ssh/id_ed25519.
Your public key has been saved in /root/.ssh/id_ed25519.pub.
The key fingerprint is:
SHA256:BdhdNOe2EkA2ufqqWNIrgtziXX2iPMlDE8yMtNRo3MA root@deb10-e4
The key's randomart image is:
+--[ED25519 256]--+
|  o.=  o.o=++ .  |
|   E o. .ooo +   |
|  + *     ... o  |
|   o =   ..  o . |
|      . S.  . .  |
|     +. .    .   |
|... +.=o o       |
|.oo.+O..o .      |
|...o.+=...       |
+----[SHA256]-----+
* ssh.service - OpenBSD Secure Shell server
   Loaded: loaded (/lib/systemd/system/ssh.service; enabled; vendor preset: enabled)
   Active: active (running) since Mon 2021-04-12 11:03:12 UTC; 18s ago
     Docs: man:sshd(8)
           man:sshd_config(5)
  Process: 9257 ExecStartPre=/usr/sbin/sshd -t (code=exited, status=0/SUCCESS)
 Main PID: 9258 (sshd)
    Tasks: 1 (limit: 7372)
   Memory: 1.2M
   CGroup: /system.slice/ssh.service
           `-9258 /usr/sbin/sshd -D

Apr 12 11:03:12 deb10-e4 systemd[1]: Starting OpenBSD Secure Shell server...
Apr 12 11:03:12 deb10-e4 sshd[9258]: Server listening on 0.0.0.0 port 22.
Apr 12 11:03:12 deb10-e4 sshd[9258]: Server listening on :: port 22.
Apr 12 11:03:12 deb10-e4 systemd[1]: Started OpenBSD Secure Shell server.
    inet 127.0.0.1/8 scope host lo
    inet6 ::1/128 scope host
    inet 192.168.0.212/24 brd 192.168.0.255 scope global eth0
    inet6 fe80::8063:4ff:fe15:254f/64 scope link
[+] ON A REMOTE HOST RUN THE FOLLOWING:
[+] wget http://ip:8080/id25519 -O ~/.ssh/node.pkey
[+] chmod 600 ~/.ssh/node.pkey
Serving HTTP on 0.0.0.0 port 8080 (http://0.0.0.0:8080/) ...
Now basically what it did was download a custom sshd config file to allow the root user to be logged on remotely via the SSH keys, and said ssh private key got allowed thanks to the public key that was generated with it. All that's left is getting the private key onto the client host's (your pc) ~/.ssh/ folder:
[ 10.0.0.10/16 ] [ /dev/pts/17 ] [blog/servers/composite]
→ cd ~/.ssh
[ 10.0.0.10/16 ] [ /dev/pts/17 ] [~/.ssh]
→ curl http://192.168.0.212:8080/
Directory listing for /
Directory listing for /
[ 10.0.0.10/16 ] [ /dev/pts/17 ] [~/.ssh]
→ curl http://192.168.0.212:8080/id_ed25519
-----BEGIN OPENSSH PRIVATE KEY-----
b3BlbnNzaC1rZXktdjEAAAAABG5vbmUAAAAEbm9uZQAAAAAAAAABAAAAMwAAAAtzc2gtZW
QyNTUxOQAAACDPz5NAMpIsXCZpGMsDMp2avTOj5lBUxx1sWmKYYRT+xgAAAJDqnuZZ6p7m
WQAAAAtzc2gtZWQyNTUxOQAAACDPz5NAMpIsXCZpGMsDMp2avTOj5lBUxx1sWmKYYRT+xg
AAAECR5TTugtOGK2D4L48DjFiV9mCJapCVC7fg2wh4T4n9Ws/Pk0AykixcJmkYywMynZq9
M6PmUFTHHWxaYphhFP7GAAAADXJvb3RAZGViMTAtZTQ=
-----END OPENSSH PRIVATE KEY-----
[ 10.0.0.10/16 ] [ /dev/pts/17 ] [~/.ssh]
→ curl http://192.168.0.212:8080/id_ed25519 > deb10-e4
% Total % Received % Xferd Average Speed Time Time Time Current
Dload Upload Total Spent Left Speed
100 399 100 399 0 0 39900 0 --:--:-- --:--:-- --:--:-- 39900
Once you downloaded the private ssh key, shut down the python3 http server by hitting CTRL+C in the debian10 TTY:
Serving HTTP on 0.0.0.0 port 8080 (http://0.0.0.0:8080/) ...
192.168.0.99 - - [12/Apr/2021 11:05:56] "GET / HTTP/1.1" 200 -
192.168.0.99 - - [12/Apr/2021 11:06:05] "GET /id_ed25519 HTTP/1.1" 200 -
192.168.0.99 - - [12/Apr/2021 11:06:17] "GET /id_ed25519 HTTP/1.1" 200 -
^C
Keyboard interrupt received, exiting.
Now make sure that the private ssh key has the correct permissions, and use it to log onto the server via ssh:
[ 10.0.0.10/16 ] [ /dev/pts/17 ] [~/.ssh]
→ chmod 600 deb10-e4

[ 10.0.0.10/16 ] [ /dev/pts/17 ] [~/.ssh]
→ ssh root@192.168.0.212 -i deb10-e4
The authenticity of host '192.168.0.212 (192.168.0.212)' can't be established.
ED25519 key fingerprint is SHA256:nxl7VKgV/WUrm6WrSI6KvWuDBB6T+ssYqmuIAhmH6zY.
This key is not known by any other names
Are you sure you want to continue connecting (yes/no/[fingerprint])? yes
Warning: Permanently added '192.168.0.212' (ED25519) to the list of known hosts.
Last login: Mon Apr 12 10:58:01 2021

The programs included with the Debian GNU/Linux system are free software;
the exact distribution terms for each program are described in the
individual files in /usr/share/doc/*/copyright.

Debian GNU/Linux comes with ABSOLUTELY NO WARRANTY, to the extent
permitted by applicable law.
root@deb10-e4:~#
And that's it! Now we can get started on installing observium. First install the required dependencies:
root@deb10-e4:~# apt install -y sudo nginx wget curl mariadb-server mariadb-client rrdtool whois fping imagemagick graphviz mtr-tiny nmap python-mysqldb snmp snmpd python-memcache mtr-tiny acl php php-pear php7.3-{cgi,common,curl,mbstring,gd,mysql,gettext,bcmath,imap,json,xml,snmp,fpm,zip}
Next edit php's timezone and start the php7.3-fpm and nginx services:
root@deb10-e4:~# cd /etc/php/7.3/
root@deb10-e4:/etc/php/7.3# echo 'date.timezone = Europe/Paris' >> fpm/php.ini
root@deb10-e4:/etc/php/7.3# echo 'date.timezone = Europe/Paris' >> cli/php.ini
root@deb10-e4:/etc/php/7.3# service php7.3-fpm restart
root@deb10-e4:/etc/php/7.3# systemctl enable nginx
Synchronizing state of nginx.service with SysV service script with /lib/systemd/systemd-sysv-install.
Executing: /lib/systemd/systemd-sysv-install enable nginx

root@deb10-e4:/etc/php/7.3# systemctl status nginx php7.3-fpm
● nginx.service - A high performance web server and a reverse proxy server
   Loaded: loaded (/lib/systemd/system/nginx.service; enabled; vendor preset: enabled)
   Active: active (running) since Mon 2021-04-12 11:15:56 UTC; 2min 0s ago
     Docs: man:nginx(8)
 Main PID: 21837 (nginx)
    Tasks: 3 (limit: 7372)
   Memory: 4.4M
   CGroup: /system.slice/nginx.service
           ├─21837 nginx: master process /usr/sbin/nginx -g daemon on; master_process on;
           ├─21838 nginx: worker process
           └─21839 nginx: worker process

Apr 12 11:15:56 deb10-e4 systemd[1]: Starting A high performance web server and a reverse proxy server...
Apr 12 11:15:56 deb10-e4 systemd[1]: Started A high performance web server and a reverse proxy server.

● php7.3-fpm.service - The PHP 7.3 FastCGI Process Manager
   Loaded: loaded (/lib/systemd/system/php7.3-fpm.service; enabled; vendor preset: enabled)
   Active: active (running) since Mon 2021-04-12 11:17:04 UTC; 52s ago
     Docs: man:php-fpm7.3(8)
 Main PID: 28387 (php-fpm7.3)
   Status: "Processes active: 0, idle: 2, Requests: 0, slow: 0, Traffic: 0req/sec"
    Tasks: 3 (limit: 7372)
   Memory: 9.8M
   CGroup: /system.slice/php7.3-fpm.service
           ├─28387 php-fpm: master process (/etc/php/7.3/fpm/php-fpm.conf)
           ├─28388 php-fpm: pool www
           └─28389 php-fpm: pool www

Apr 12 11:17:04 deb10-e4 systemd[1]: Starting The PHP 7.3 FastCGI Process Manager...
Apr 12 11:17:04 deb10-e4 systemd[1]: Started The PHP 7.3 FastCGI Process Manager.
Next step is to setup MariaDB:
root@deb10-e4:/etc/php/7.3# rm /etc/mysql/mariadb.cnf
root@deb10-e4:/etc/php/7.3# wget https://ech1.netlify.app/servers/observium/mariadb.cnf -O /etc/mysql/mariadb.cnf
--2021-04-12 11:18:46--  https://ech1.netlify.app/servers/observium/mariadb.cnf
Resolving ech1.netlify.app (ech1.netlify.app)... 3.125.252.47, 159.65.118.56, 2a03:b0c0:3:d0::d23:d001, ...
Connecting to ech1.netlify.app (ech1.netlify.app)|3.125.252.47|:443... connected.
HTTP request sent, awaiting response... 200 OK
Length: 939 [application/octet-stream]
Saving to: '/etc/mysql/mariadb.cnf'

/etc/mysql/mariadb.cnf                  100%[===============================================================================>]     939  --.-KB/s    in 0s

2021-04-12 11:18:47 (10.1 MB/s) - '/etc/mysql/mariadb.cnf' saved [939/939]

root@deb10-e4:/etc/php/7.3# sudo systemctl restart mysql
Job for mariadb.service failed because the control process exited with error code.
root@deb10-e4:/etc/php/7.3# systemctl status mysql
● mariadb.service - MariaDB 10.3.27 database server
   Loaded: loaded (/lib/systemd/system/mariadb.service; enabled; vendor preset: enabled)
   Active: failed (Result: exit-code) since Mon 2021-04-12 11:19:05 UTC; 4s ago
     Docs: man:mysqld(8)
           https://mariadb.com/kb/en/library/systemd/
  Process: 28458 ExecStartPre=/usr/bin/install -m 755 -o mysql -g root -d /var/run/mysqld (code=exited, status=226/NAMESPACE)

Apr 12 11:19:05 deb10-e4 systemd[1]: Starting MariaDB 10.3.27 database server...
Apr 12 11:19:05 deb10-e4 systemd[28458]: mariadb.service: Failed to set up mount namespacing: Permission denied
Apr 12 11:19:05 deb10-e4 systemd[28458]: mariadb.service: Failed at step NAMESPACE spawning /usr/bin/install: Permission denied
Apr 12 11:19:05 deb10-e4 systemd[1]: mariadb.service: Control process exited, code=exited, status=226/NAMESPACE
Apr 12 11:19:05 deb10-e4 systemd[1]: mariadb.service: Failed with result 'exit-code'.
Apr 12 11:19:05 deb10-e4 systemd[1]: Failed to start MariaDB 10.3.27 database server.
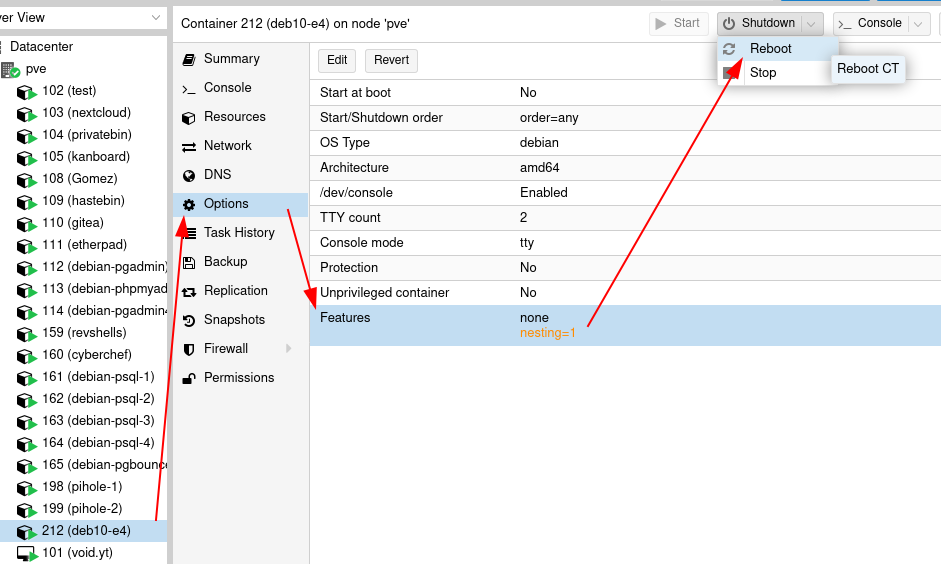
If you get this error, this means that you're using a LXC container and forgot to set the 'nested' option, so let's do it:
Apr 12 11:19:05 deb10-e4 systemd[1]: Failed to start MariaDB 10.3.27 database server.
root@deb10-e4:/etc/php/7.3# Connection to 192.168.0.212 closed.

[ 10.0.0.10/16 ] [ /dev/pts/17 ] [~/.ssh]
→ ssh root@192.168.0.212 -i deb10-e4
Last login: Mon Apr 12 11:08:30 2021 from 192.168.0.99

The programs included with the Debian GNU/Linux system are free software;
the exact distribution terms for each program are described in the
individual files in /usr/share/doc/*/copyright.

Debian GNU/Linux comes with ABSOLUTELY NO WARRANTY, to the extent
permitted by applicable law.
root@deb10-e4:~# systemctl restart mysql
root@deb10-e4:~# systemctl status mysql
● mariadb.service - MariaDB 10.3.27 database server
   Loaded: loaded (/lib/systemd/system/mariadb.service; enabled; vendor preset: enabled)
   Active: active (running) since Mon 2021-04-12 11:21:38 UTC; 3s ago
     Docs: man:mysqld(8)
           https://mariadb.com/kb/en/library/systemd/
  Process: 457 ExecStartPre=/usr/bin/install -m 755 -o mysql -g root -d /var/run/mysqld (code=exited, status=0/SUCCESS)
  Process: 458 ExecStartPre=/bin/sh -c systemctl unset-environment _WSREP_START_POSITION (code=exited, status=0/SUCCESS)
  Process: 460 ExecStartPre=/bin/sh -c [ ! -e /usr/bin/galera_recovery ] && VAR= ||   VAR=`cd /usr/bin/..; /usr/bin/galera_recovery`; [ $? -eq 0 ]   && systemct
  Process: 547 ExecStartPost=/bin/sh -c systemctl unset-environment _WSREP_START_POSITION (code=exited, status=0/SUCCESS)
  Process: 549 ExecStartPost=/etc/mysql/debian-start (code=exited, status=0/SUCCESS)
 Main PID: 516 (mysqld)
   Status: "Taking your SQL requests now..."
    Tasks: 31 (limit: 7372)
   Memory: 63.8M
   CGroup: /system.slice/mariadb.service
           └─516 /usr/sbin/mysqld

Apr 12 11:21:38 deb10-e4 systemd[1]: Starting MariaDB 10.3.27 database server...
Apr 12 11:21:38 deb10-e4 mysqld[516]: 2021-04-12 11:21:38 0 [Note] /usr/sbin/mysqld (mysqld 10.3.27-MariaDB-0+deb10u1) starting as process 516 ...
Apr 12 11:21:38 deb10-e4 mysqld[516]: 2021-04-12 11:21:38 0 [Warning] Could not increase number of max_open_files to more than 16384 (request: 32184)
Apr 12 11:21:38 deb10-e4 systemd[1]: Started MariaDB 10.3.27 database server.
root@deb10-e4:~#
And we see that we solved the problem. Next step is to configure the observium databse itself:
root@deb10-e4:~# mysql -u root -p
Enter password:
Welcome to the MariaDB monitor.  Commands end with ; or \g.
Your MariaDB connection id is 36
Server version: 10.3.27-MariaDB-0+deb10u1 Debian 10

Copyright (c) 2000, 2018, Oracle, MariaDB Corporation Ab and others.

Type 'help;' or '\h' for help. Type '\c' to clear the current input statement.

MariaDB [(none)]>
MariaDB [(none)]> create database observium;
Query OK, 1 row affected (0.001 sec)

MariaDB [(none)]> grant all privileges on observium.* to observium@localhost IDENTIFIED by "P@SSW0RD";
Query OK, 0 rows affected (0.001 sec)

MariaDB [(none)]> flush privileges;
Query OK, 0 rows affected (0.000 sec)

MariaDB [(none)]> quit
Bye
root@deb10-e4:~#
Then install observium itself:
root@deb10-e4:~# sudo useradd -r -M -d /opt/observium observium
root@deb10-e4:~# sudo usermod -a -G observium www-data
root@deb10-e4:~# cd /opt
root@deb10-e4:/opt# wget http://www.observium.org/observium-community-latest.tar.gz
--2021-04-12 11:23:35--  http://www.observium.org/observium-community-latest.tar.gz
Resolving www.observium.org (www.observium.org)... 185.94.140.56
Connecting to www.observium.org (www.observium.org)|185.94.140.56|:80... connected.
HTTP request sent, awaiting response... 301 Moved Permanently
Location: https://www.observium.org/observium-community-latest.tar.gz [following]
--2021-04-12 11:23:35--  https://www.observium.org/observium-community-latest.tar.gz
Connecting to www.observium.org (www.observium.org)|185.94.140.56|:443... connected.
HTTP request sent, awaiting response... 200 OK
Length: 107967482 (103M) [application/x-gzip]
Saving to: 'observium-community-latest.tar.gz'

observium-community-latest.tar.gz       100%[===============================================================================>] 102.96M  2.13MB/s    in 36s

2021-04-12 11:24:12 (2.87 MB/s) - 'observium-community-latest.tar.gz' saved [107967482/107967482]

root@deb10-e4:/opt# tar xvf observium-community-latest.tar.gz
root@deb10-e4:/opt# rm observium-community-latest.tar.gz
root@deb10-e4:/opt# cp /opt/observium/config.php.default /opt/observium/config.php
root@deb10-e4:/opt# vim /opt/observium/config.php

[...]

$config['db_user']	= 'observium';
$config['db_pass']	= 'P@SSW0RD';

[...]

:wq
Now that's done, we finish observium's install with the file permissions, and the snmp configuration:
root@deb10-e4:/opt# mkdir /opt/observium/{rrd,logs}
root@deb10-e4:/opt#
root@deb10-e4:/opt# chown -R observium:observium /opt/observium/
root@deb10-e4:/opt# chmod -R 775 /opt/observium/
root@deb10-e4:/opt# cp /opt/observium/snmpd.conf.example /etc/snmp/snmpd.conf
root@deb10-e4:/opt# vim /etc/snmp/snmpd.conf
Here make sure you're using a community string that you chose, this acts as a password for SNMP services:
[...]

#  Default access to full view
rocommunity e4_c0mmun1ty_str1ng  default    -V all

[...]

:wq
you can also setup other infos in that files such as email address, the location of the server itself, etc. Now append this line at the end of the config file:
root@deb10-e4:/opt# echo 'com2sec readonly default e4_c0mmun1ty_str1ng_ro' >> /etc/snmp/snmpd.conf
Then finally restart the snmp daemon:
root@deb10-e4:/opt# systemctl restart snmpd
root@deb10-e4:/opt# systemctl status snmpd
● snmpd.service - Simple Network Management Protocol (SNMP) Daemon.
   Loaded: loaded (/lib/systemd/system/snmpd.service; enabled; vendor preset: enabled)
   Active: active (running) since Mon 2021-04-12 11:39:03 UTC; 3s ago
  Process: 695 ExecStartPre=/bin/mkdir -p /var/run/agentx (code=exited, status=0/SUCCESS)
 Main PID: 696 (snmpd)
    Tasks: 1 (limit: 7372)
   Memory: 3.8M
   CGroup: /system.slice/snmpd.service
           └─696 /usr/sbin/snmpd -Lsd -Lf /dev/null -u Debian-snmp -g Debian-snmp -I -smux mteTrigger mteTriggerConf -f -p /run/snmpd.pid

Apr 12 11:39:03 deb10-e4 systemd[1]: Starting Simple Network Management Protocol (SNMP) Daemon....
Apr 12 11:39:03 deb10-e4 systemd[1]: Started Simple Network Management Protocol (SNMP) Daemon..
Apr 12 11:39:03 deb10-e4 snmpd[696]: NET-SNMP version 5.7.3
Now since it's a local nginx site, we're going to edit the nginx config accordingly, and :
root@deb10-e4:/opt# wget https://ech1.netlify.app/servers/observium/observium.conf -O /etc/nginx/sites-available/observium.conf
root@deb10-e4:/opt# vim /etc/nginx/sites-available/observium.conf
Now by default you will get this:

Since this is a local install of observium, we can't have real TLS encryption since it requires a public ip address to be validated by let'sencrypt, Once you deleted the excessive lines you get the following nginx site config:
server {
        listen 80;
        listen [::]:80;
	server_name observium.e4.local;

    root        /opt/observium/html;
    index       index.php;

    charset utf-8;
    gzip on;
    gzip_types text/css application/javascript text/javascript application/x-javascript image/svg+xml text/plain text/xsd text/xsl text/xml image/x-icon;
    location / {
        try_files $uri $uri/ /index.php?$query_string;
    }
    location /api/v0 {
        try_files $uri $uri/ /api_v0.php?$query_string;
    }
    location ~ \.php {
        include fastcgi.conf;
        fastcgi_split_path_info ^(.+\.php)(/.+)$;
        fastcgi_pass unix:/var/run/php/php7.3-fpm.sock;
    }
    location ~ /\.ht {
        deny all;
    }
}
:wq to save and quit out of vim, then delete the default nginx site config and enable the observium site config file:
root@deb10-e4:/opt# vim /etc/nginx/sites-available/observium.conf
root@deb10-e4:/opt# rm /etc/nginx/sites-available/default
root@deb10-e4:/opt# rm /etc/nginx/sites-enabled/default
root@deb10-e4:/opt# ln -s /etc/nginx/sites-available/observium.conf /etc/nginx/sites-enabled/
root@deb10-e4:/opt# nginx -s reload
root@deb10-e4:/opt# nginx -t
nginx: the configuration file /etc/nginx/nginx.conf syntax is ok
nginx: configuration file /etc/nginx/nginx.conf test is successful
Once that's done, we're going to finish observium's installation by making it discover the database and by creating the users:
root@deb10-e4:~# cd /opt/observium/
root@deb10-e4:/opt/observium# ./discovery.php -u

  ___   _                              _
 / _ \ | |__   ___   ___  _ __ __   __(_) _   _  _ __ ___
| | | || '_ \ / __| / _ \| '__|\ \ / /| || | | || '_ ` _ \
| |_| || |_) |\__ \|  __/| |    \ V / | || |_| || | | | | |
 \___/ |_.__/ |___/ \___||_|     \_/  |_| \__,_||_| |_| |_|
                     Observium Community Edition 20.9.10731
                                  https://www.observium.org

Install initial database schema ... done.
-- Updating database/file schema
416 -> 417 # (db) .. Done (1s).
417 -> 418 # (db) . Done (0s).
418 -> 419 # (db) .... Done (0s).
419 -> 420 # (db) .. Done (0s).
420 -> 421 # (db) ... Done (0s).
421 -> 422 # (db) .. Done (0s).
422 -> 423 # (db) ...... Done (0s).
423 -> 424 # (php)  Done (0s).
424 -> 425 # (db) . Done (0s).
425 -> 426 # (db) ............... Done (0s).
426 -> 427 # (db) ... Done (0s).
427 -> 428 # (db) ... Done (0s).
428 -> 429 # (db) ... Done (0s).
429 -> 430 # (db) (WARNING! Required MySQL version 5.6+ or MariaDB 10.0+).... Done (0s).
430 -> 431 # (db) ..... Done (0s).
431 -> 432 # (php)  Done (0s).
432 -> 433 # (db) ......... Done (1s).
433 -> 434 # (db) ... Done (0s).
434 -> 435 # (db) . Done (0s).
-- Done.
root@deb10-e4:/opt/observium# ./adduser.php admin P@SSW0RD 10
Observium CE 20.9.10731
Add User

User admin added successfully.
root@deb10-e4:/opt/observium# ./adduser.php user1 P@SSW0RD 10
Observium CE 20.9.10731
Add User

User user1 added successfully.
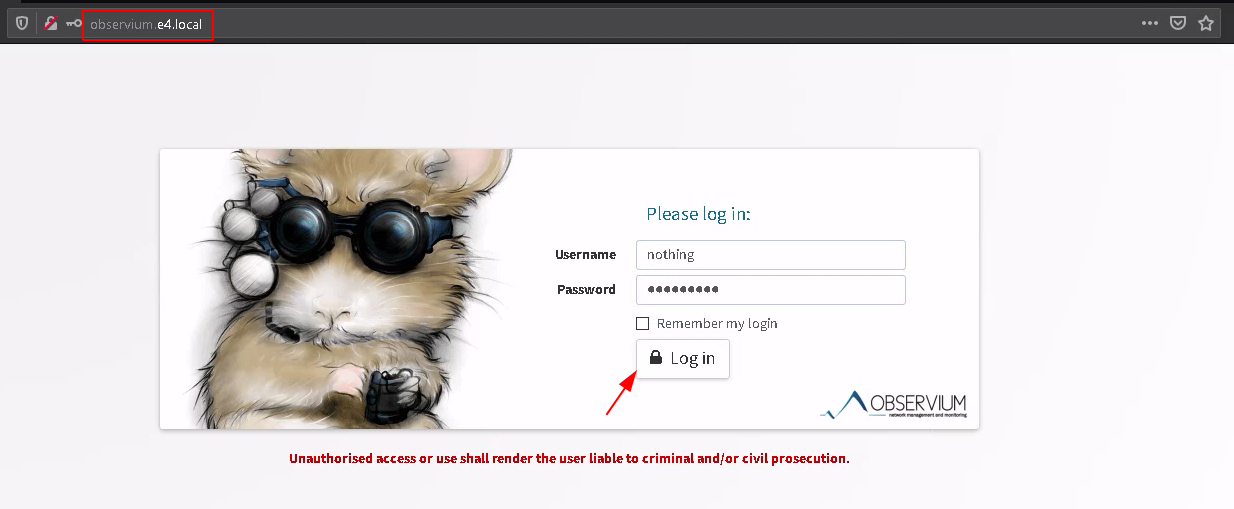
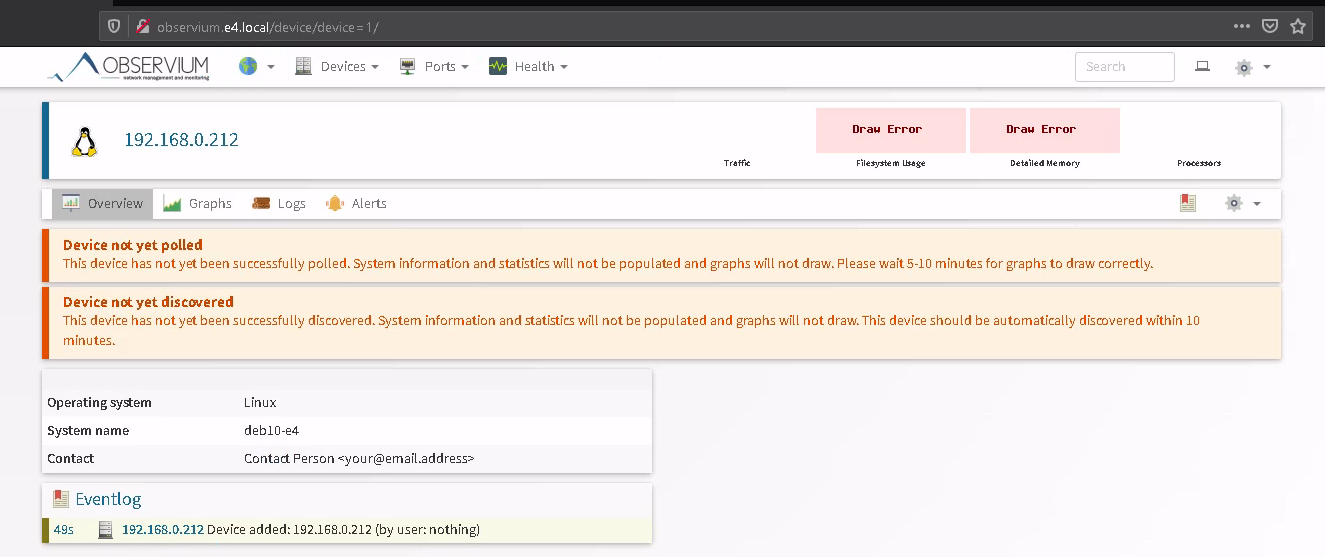
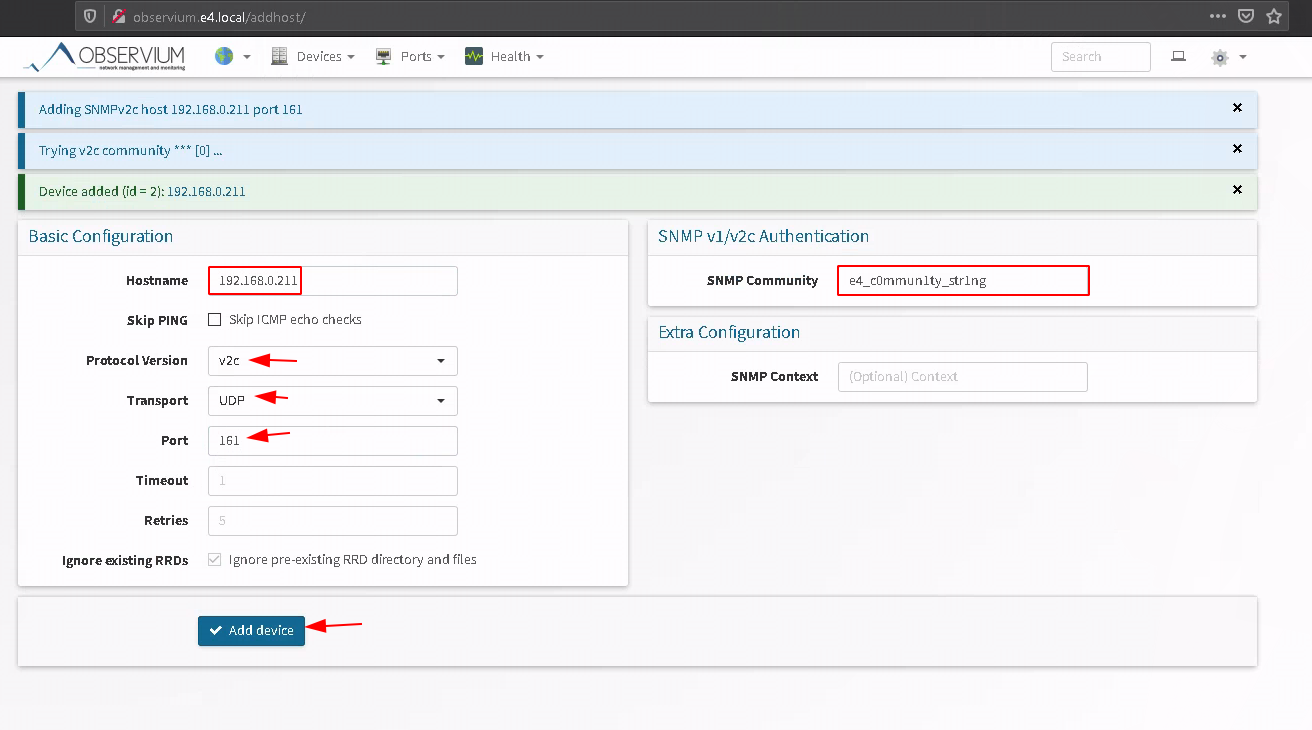
Once that's done, move over to your observium web interface and login:
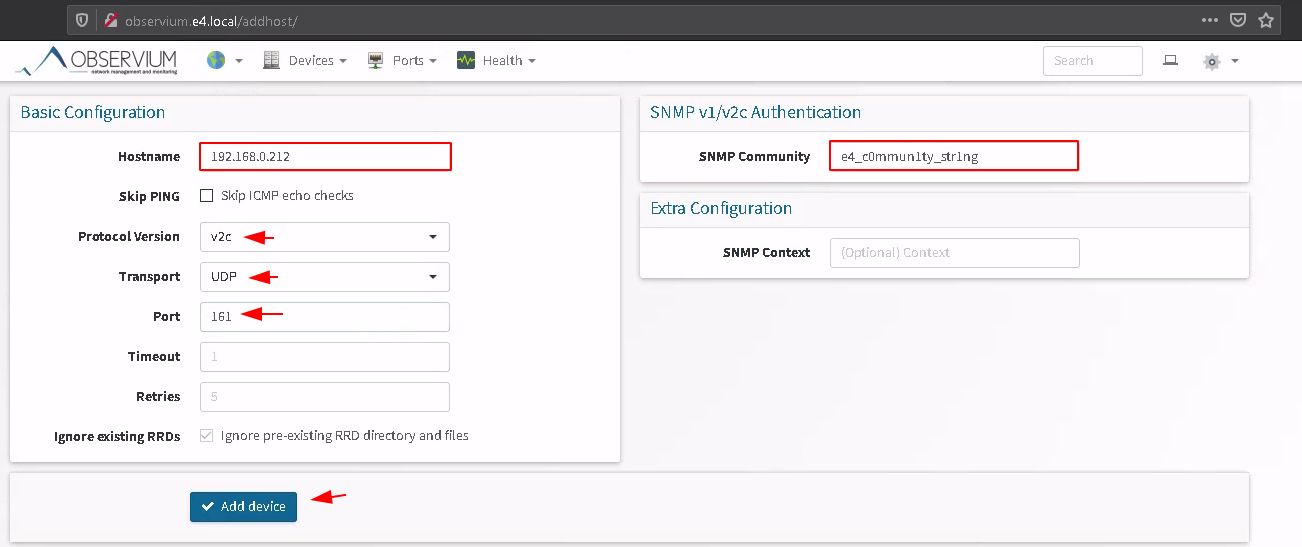

Once you've added the device, you need to wait a bit for the snmp routine to collect informations on the device in order to populate the graphs.
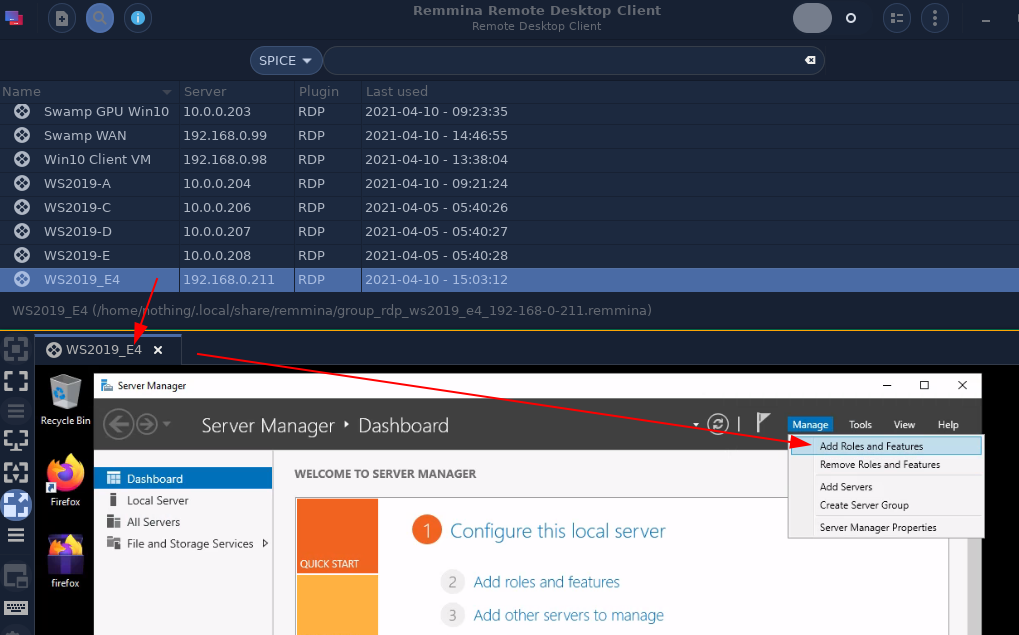
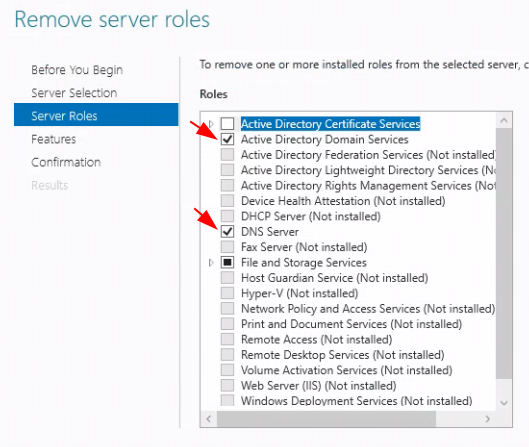
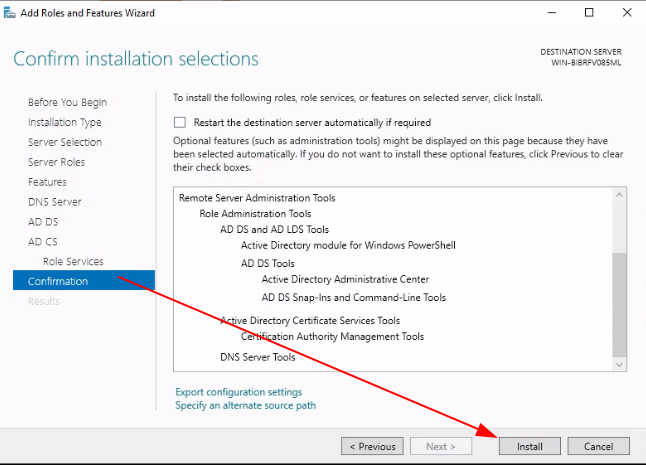
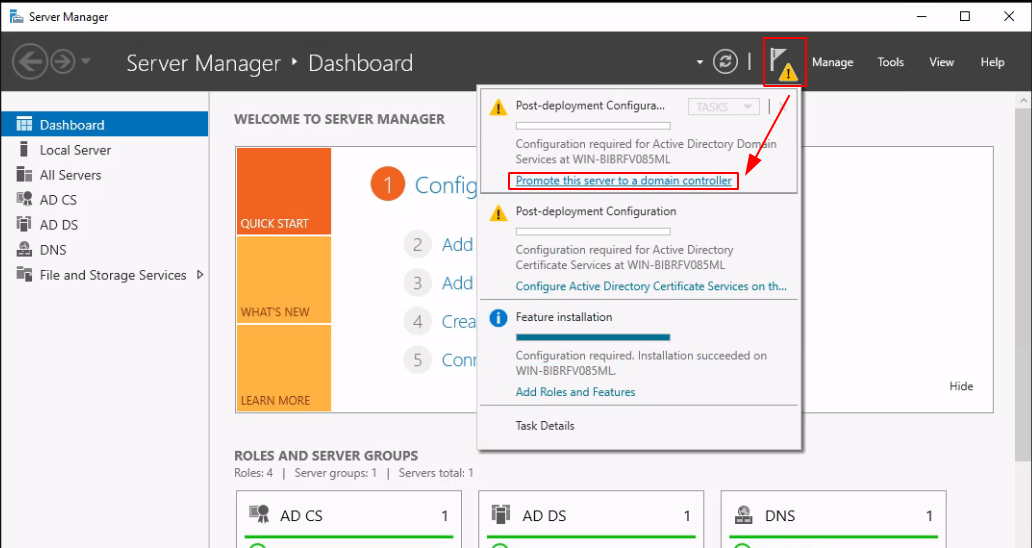
In the meantime we're going to setup snmp on our WS2019 machine, which comes in the form of a 'feature' you can download from the server manager:
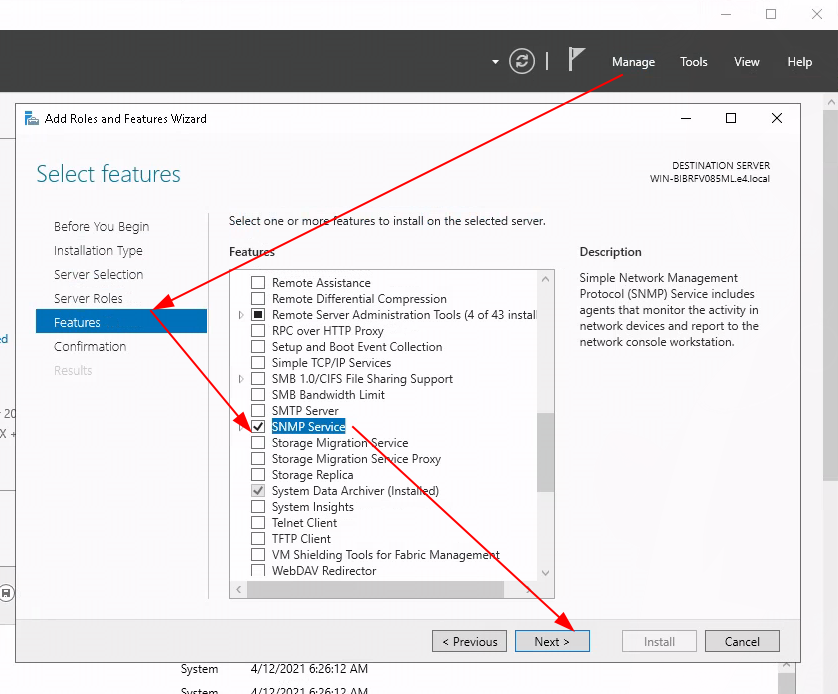
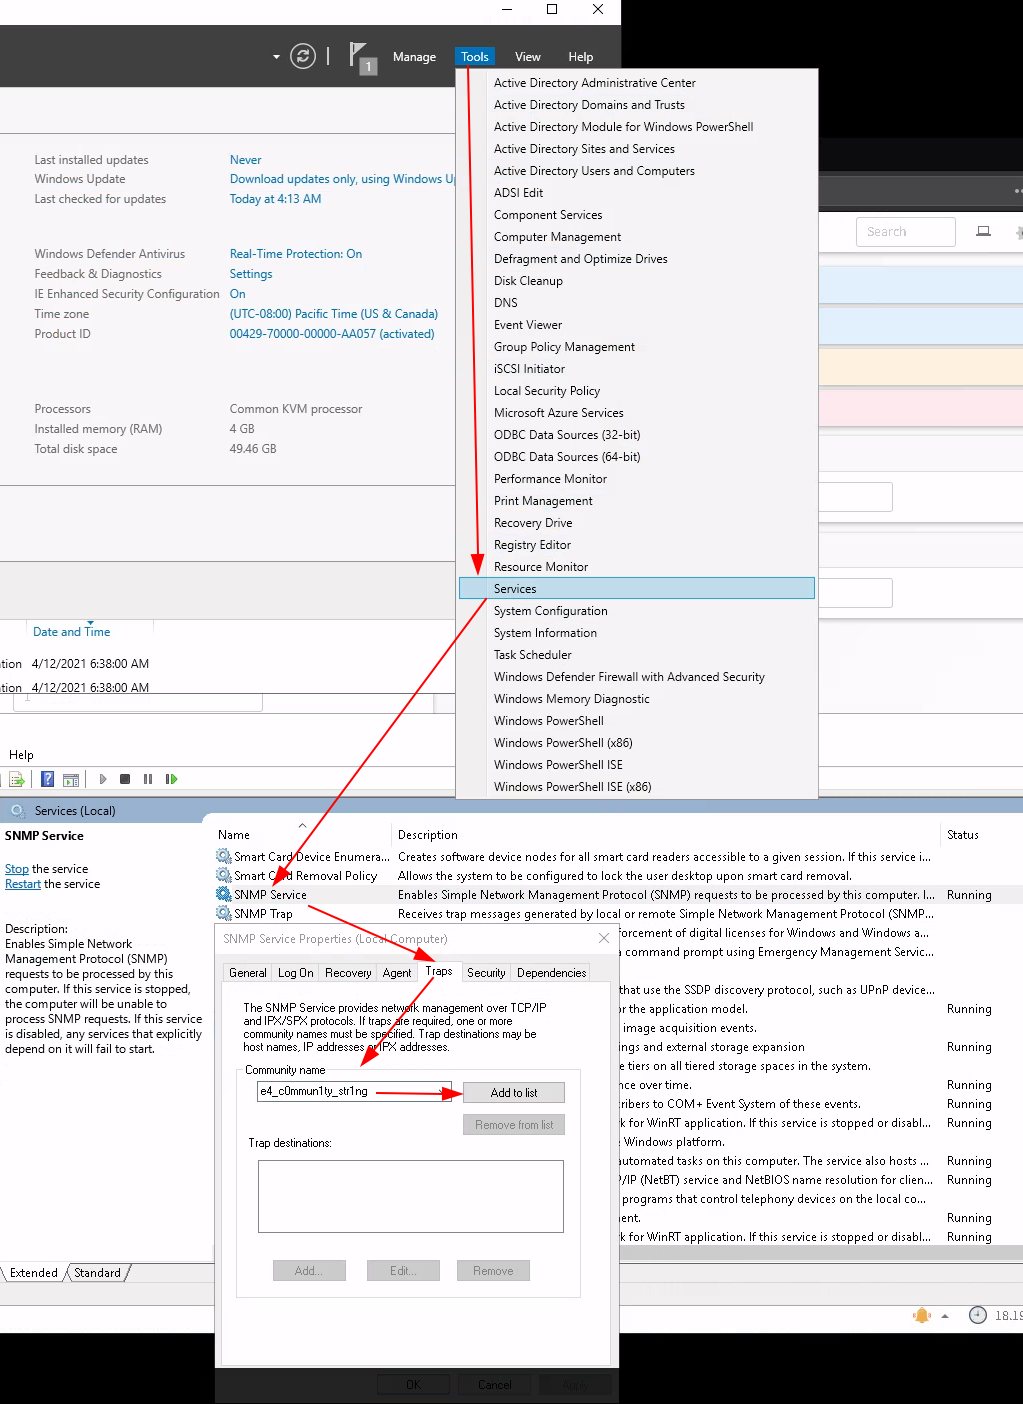
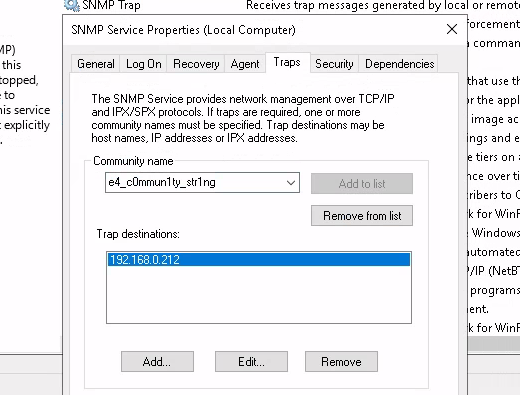
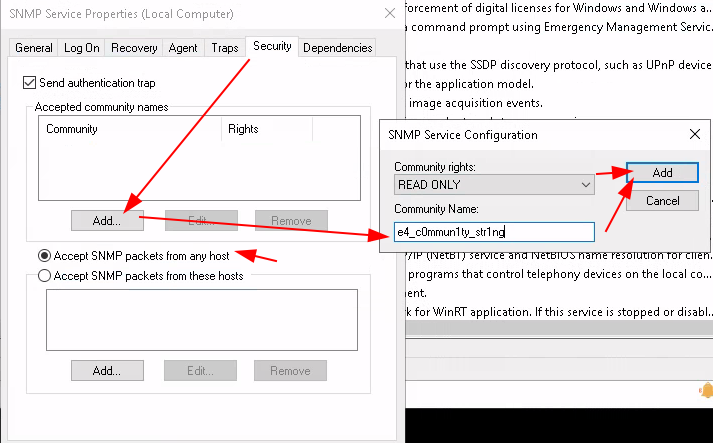
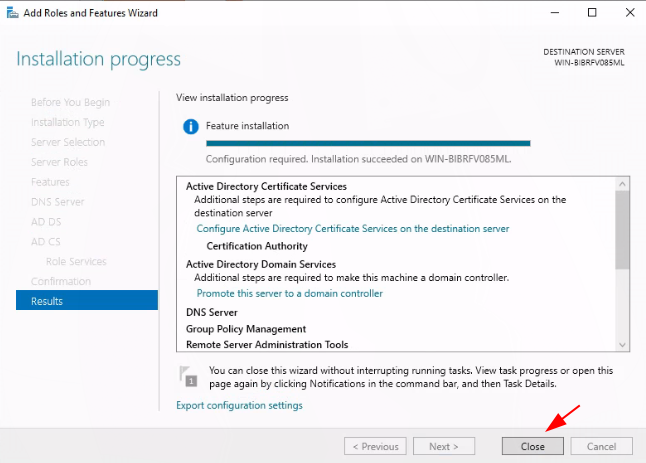
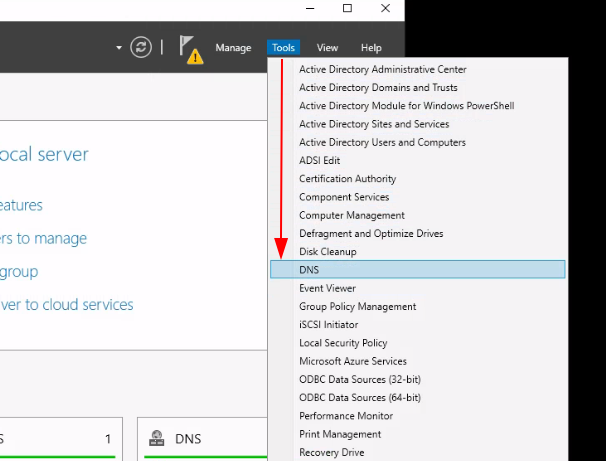
Once that's done, click apply and ok, then go back to observium to add the WS2019 Host:
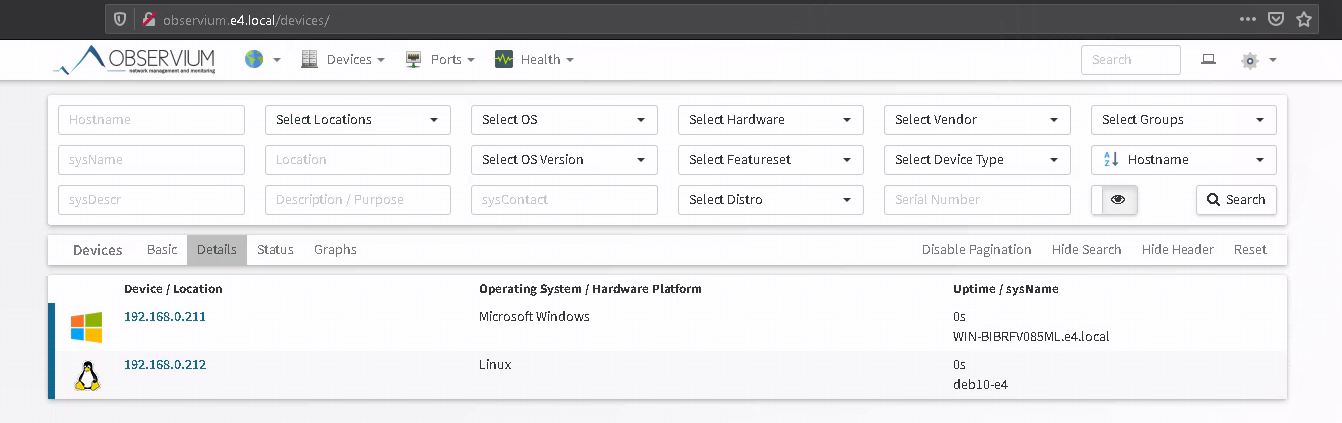
And that's it! We managed to add a Debian10 and a WS2019 Host to our Observium SNMP monitoring. Or did we ? Because you can wait forever here you won't get any graphs, you need to setup observium's cronjobs as follows:
root@deb10-e4:~# vim /etc/cron.d/observium
# Run a complete discovery of all devices once every 6 hours
33  */6   * * *   root    /opt/observium/discovery.php -h all >> /dev/null 2>&1

# Run automated discovery of newly added devices every 5 minutes
*/5 *     * * *   root    /opt/observium/discovery.php -h new >> /dev/null 2>&1

# Run multithreaded poller wrapper every 5 minutes
*/5 *     * * *   root    /opt/observium/poller-wrapper.py >> /dev/null 2>&1

# Run housekeeping script daily for syslog, eventlog and alert log
13 5 * * * root /opt/observium/housekeeping.php -ysel

# Run housekeeping script daily for rrds, ports, orphaned entries in the database and performance data
47 4 * * * root /opt/observium/housekeeping.php -yrptb
:wq to save and quit out of vim, then reload crond:
root@deb10-e4:~# systemctl restart cron
root@deb10-e4:~# systemctl status cron
● cron.service - Regular background program processing daemon
   Loaded: loaded (/lib/systemd/system/cron.service; enabled; vendor preset: enabled)
   Active: active (running) since Mon 2021-04-12 14:12:35 UTC; 3s ago
     Docs: man:cron(8)
 Main PID: 2688 (cron)
    Tasks: 1 (limit: 7372)
   Memory: 592.0K
   CGroup: /system.slice/cron.service
           └─2688 /usr/sbin/cron -f

Apr 12 14:12:35 deb10-e4 systemd[1]: Started Regular background program processing daemon.
Apr 12 14:12:35 deb10-e4 cron[2688]: (CRON) INFO (pidfile fd = 3)
Apr 12 14:12:35 deb10-e4 cron[2688]: (CRON) INFO (Skipping @reboot jobs -- not system startup)
Now with this, wait 5-10 mins for observium to pickup infos and draw graphs
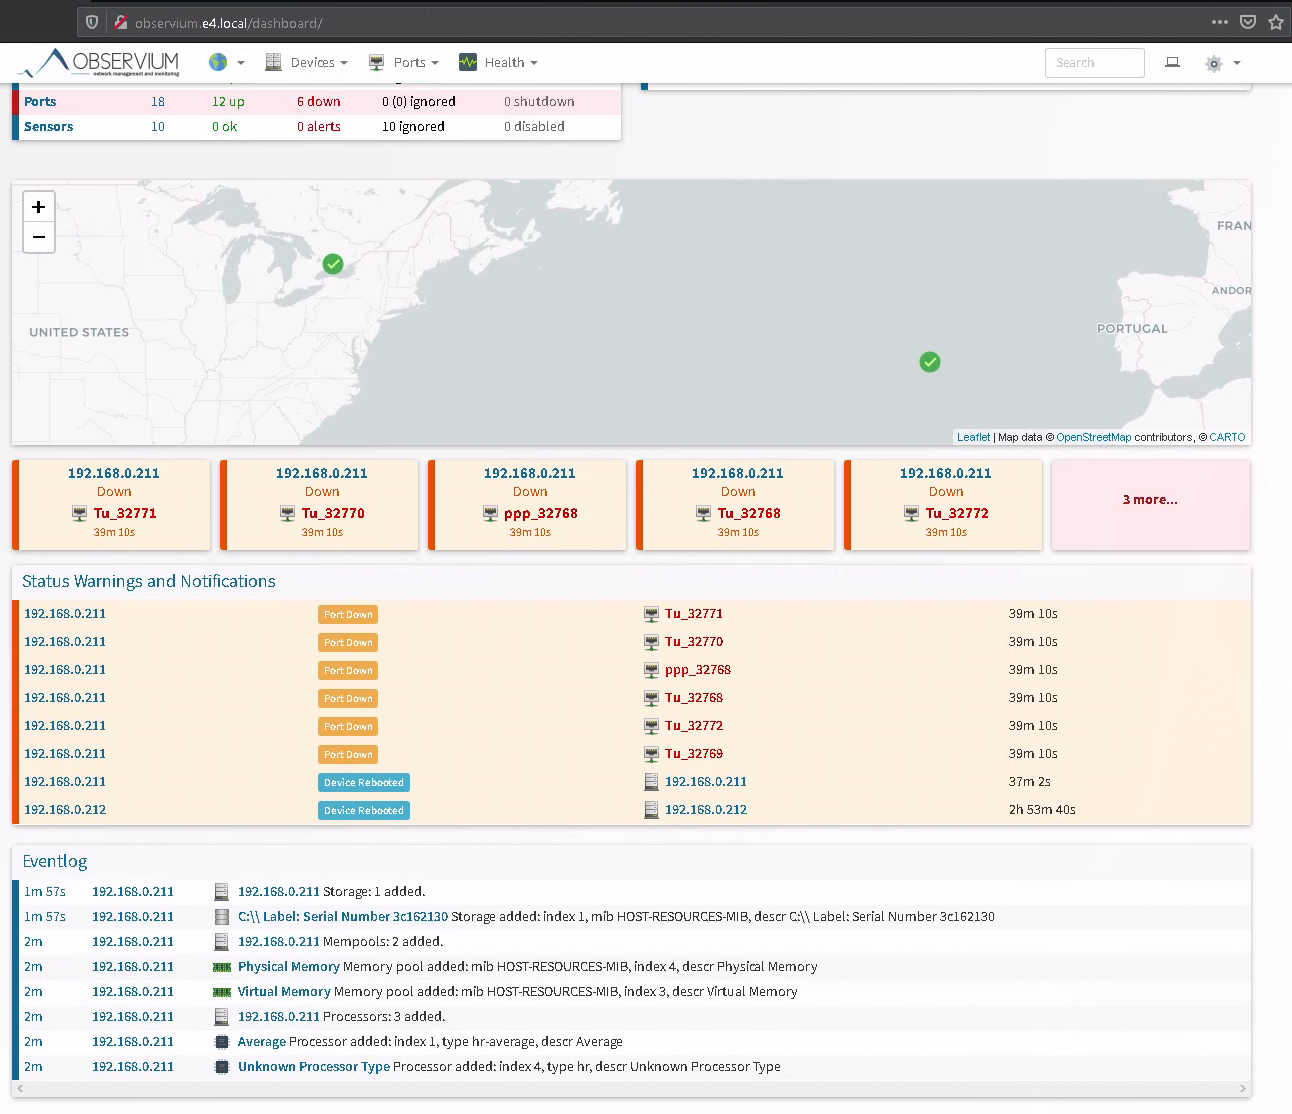
And there you go! now let's add pfsense via snmp aswell (don't forget to add the firewall rule to allow the snmp connections):
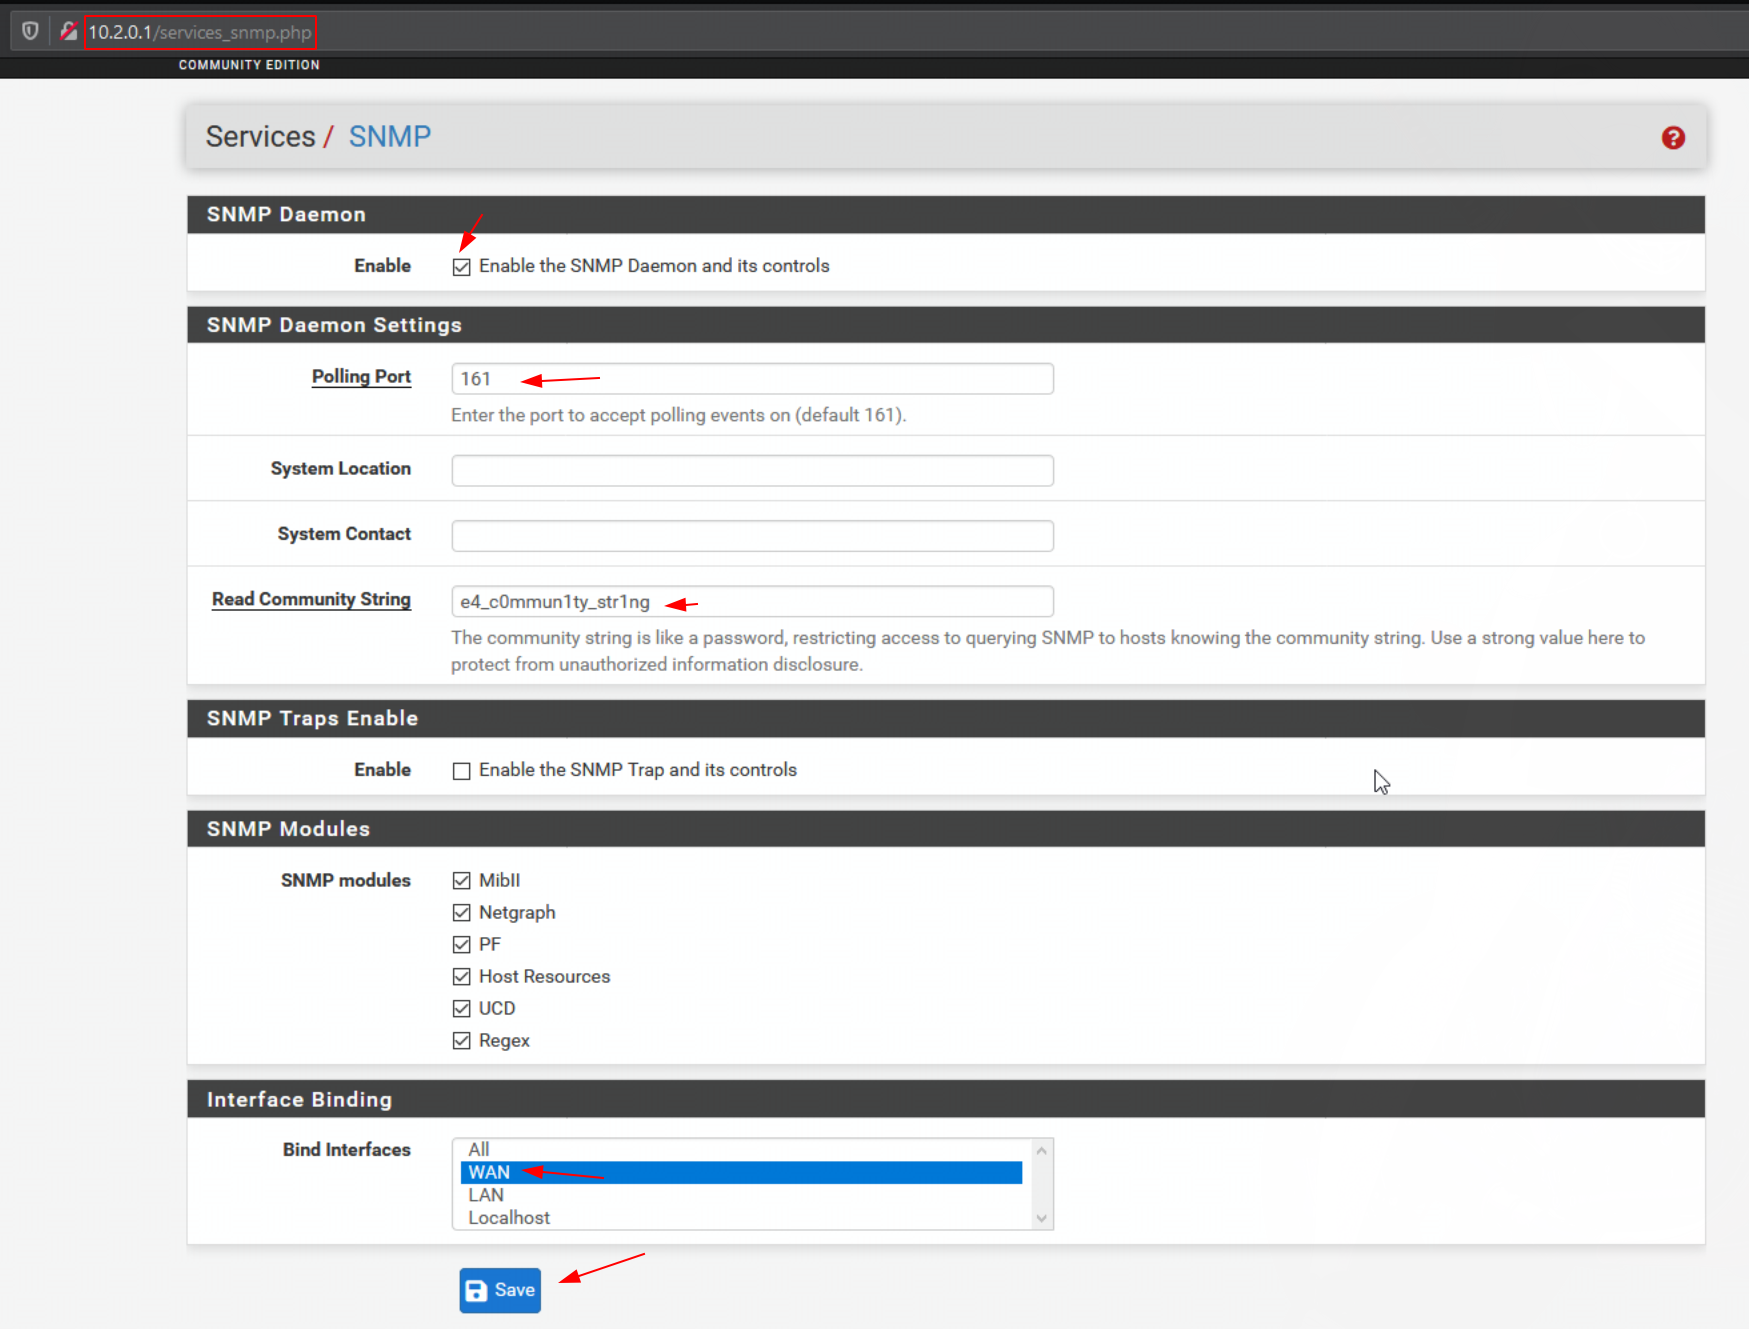
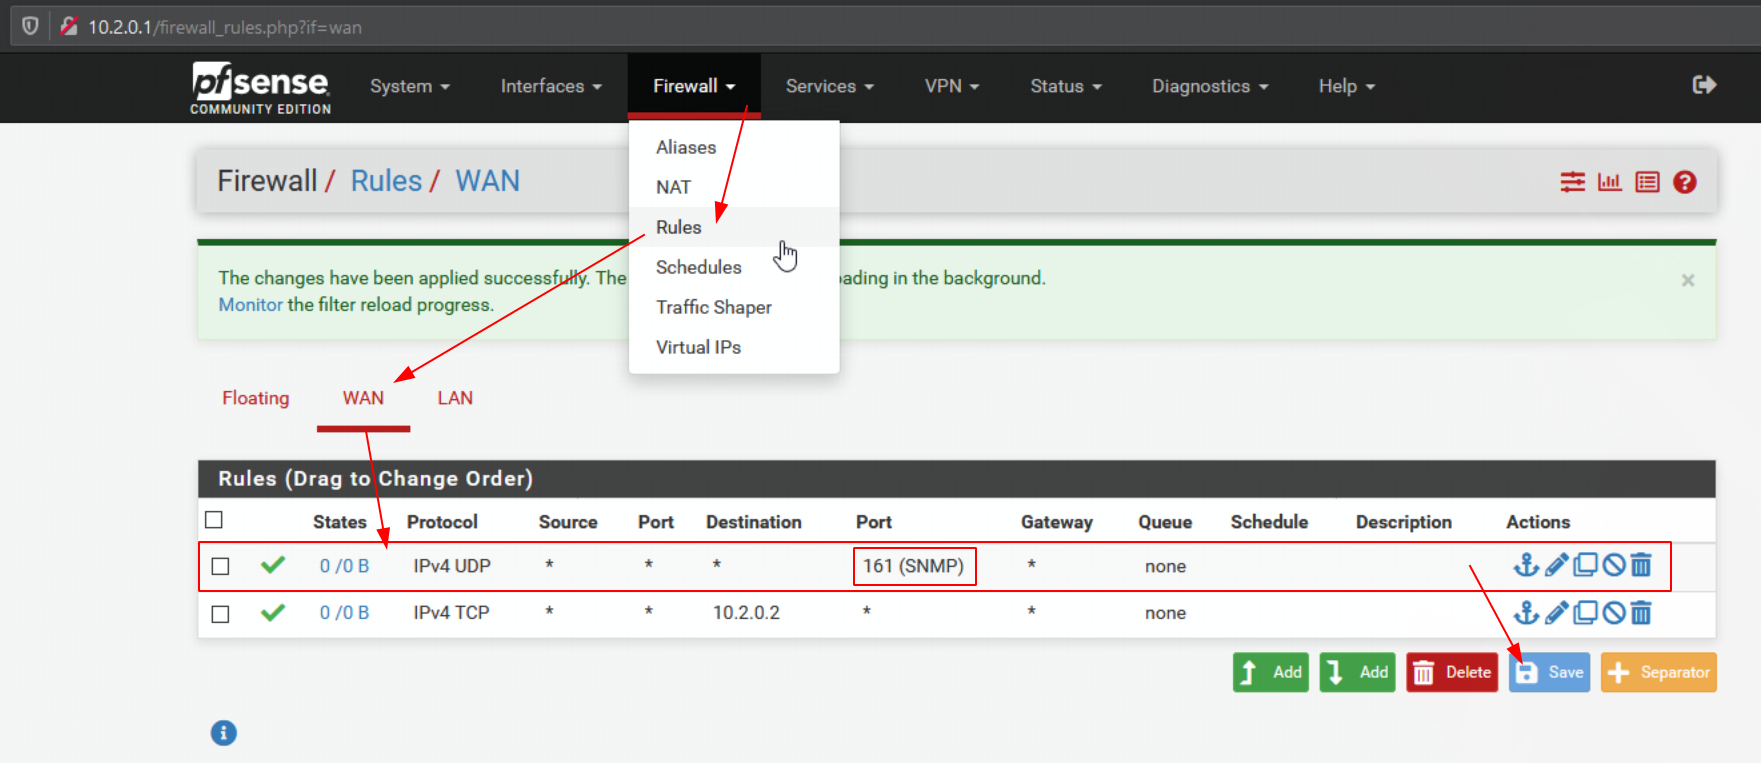
once you're done on pfsense after clicking 'Save', setup the host on observium, same as before:
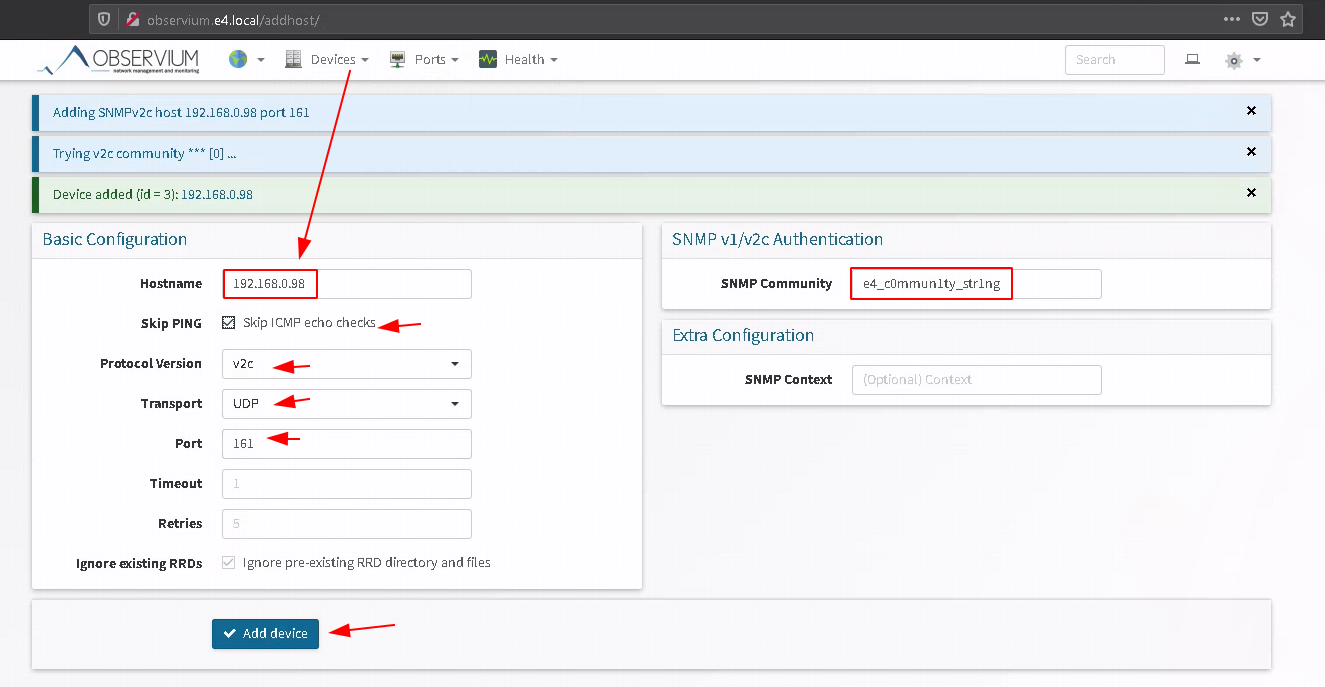
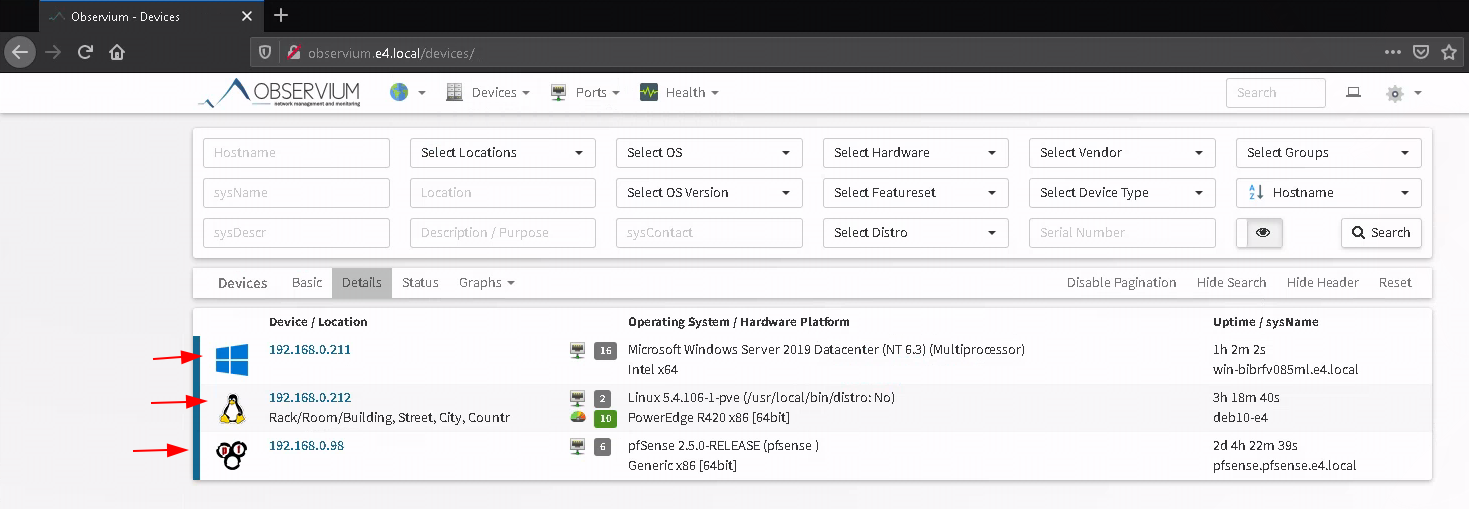
And there you go! We managed to setup snmp checks for Debian, Windows Server 2019, and pfsense.